background image

11

This appliance has the capability of opening the door from either the left or right 
side. The appliance is delivered to you with the door opening from the side indi-
cated  on the packaging. To change the opening direction, please follow the below 
instructions. Be sure to unplug the appliance to change the door.

CAUTION

: Make sure you have someone there to help you, do not attempt to  

do this yourself.

Reversing the Door swing (optional)
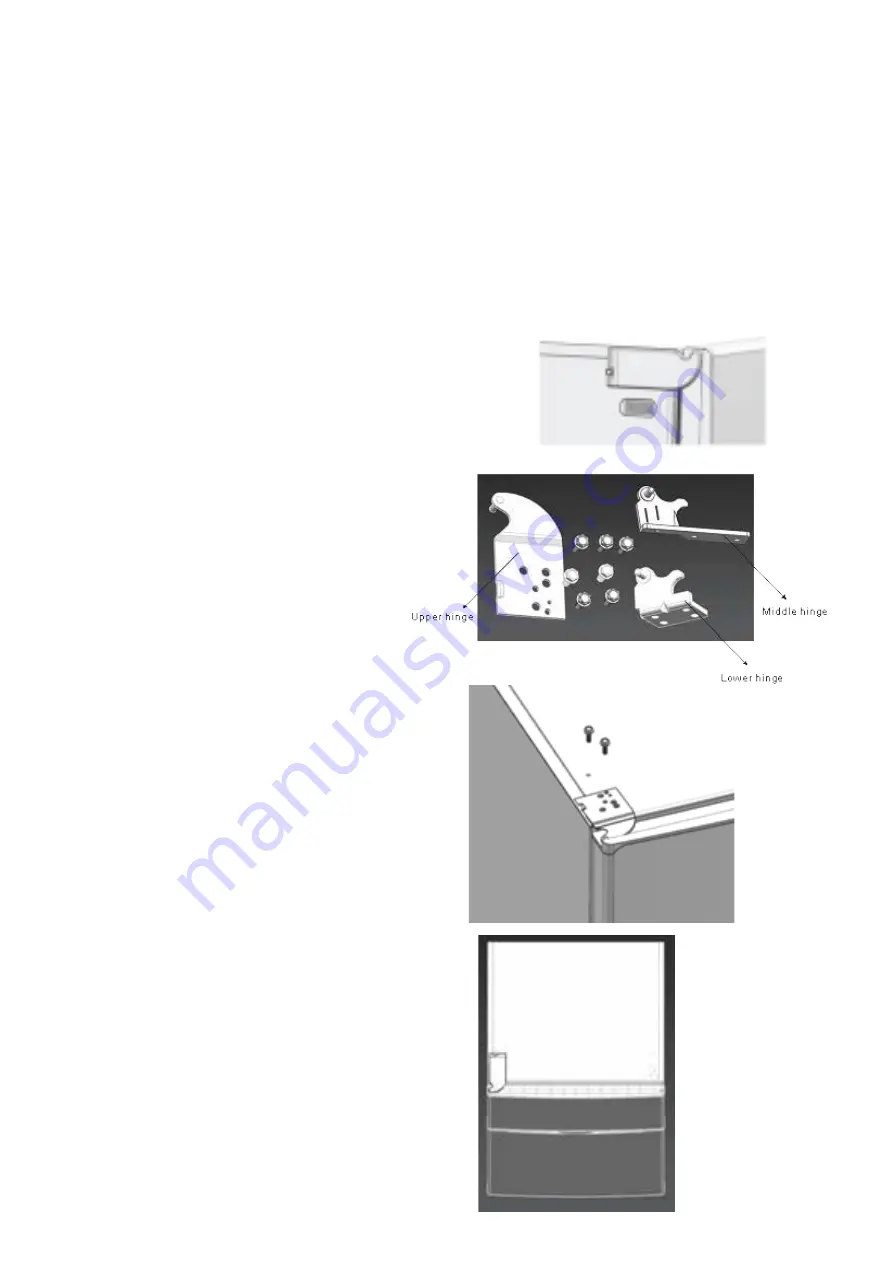
  1. 

Remove the screws of the  


upper hinged cover and that  


top hinged cover on  


one side.


  2.  Then, remove the middle  
   

hinge, lower hinge and


door. After that, remove the


upper, middle and lower


hinges on the other side.

  3.   Install the lower hinges.  
   

Then put on the middle hinge 


after the door is put in place.  


After that, install the 


refrigerator door and then put  


on the upper hinge and cover.

  4.   Adjust the height of the  
   

adjustable foot of the lower


hinge. Make sure that the foot  


touches the ground


before use.

OPERATION

Summary of Contents for GTM400AU70SS

Page 1: ...400L TOP MOUNT REFRIGERATOR INSTRUCTION MANUAL MODEL GTM400AU70SSR GTM400AU70SSL Please read this manual carefully before using and keep it for future reference ...

Page 2: ......

Page 3: ... General Safety 4 Product Overview 7 Installation 8 Operation 9 Troubleshooting 10 Specifications 11 Customer Helpline 12 CONTENTS ...

Page 4: ...than an authorised service person to work on this appliance In Queensland the authorised service person MUST hold a Gas Work Authorisation for hydrocarbon refrigerants to carry out servicing or repairs which involve the removal of covers The room for installing the appliance must be at least 1m per 8g of refrigerant The amount and type of refrigerant in the appliance can be found in the Technical ...

Page 5: ... SAFETY Voltage Plug the appliance to a 220 240V 50Hz properly earthed power outlet it must be in good working order Power connection Do not use an adaptor or an extension cord Plug the power plug directly into a separate power point that cannot be accidentally turned off and that is easily accessible so you can switch it off if needed Power cord Do not kink or damage the power supply cord Make su...

Page 6: ... to alter or modify this appliance Intended purpose Do not use any electrical or electronic appliances inside the food storage compartments of the appliance unless they are of the type recommended by the manufacturer CLEANING AND MAINTENANCE Flames Do not allow open flames or ignition sources enter the appliance Disconnect Make sure to unplug appliance before cleaning or servicing Failure to do so...

Page 7: ...7 PRODUCT OVERVIEW Freezer Shelf Shelf Shelf Vegetable Crisper Drawer Temperature Control Dial Temperature Control Dial Ice Cube Twist Tray Freezer Door Tray Door Tray Door Tray Door Tray ...

Page 8: ...ent the door from closing SPACING Allow 10cm clear space between the back and 10cm on the sides of the appliance and your wall or anything else to make sure there is enough air circulation which is needed to allow for the cooling of the compressor and condenser If you have to position the refrigerator on carpet use a plastic carpet protector underneath the appliance BE SURE TO PLACE APPLIANCE Away...

Page 9: ...ouches the ground before use Look down from the top clockwise and counterclockwise loosening tightening 3 Cleaning Before Use Wipe the inside of the unit with a weak solution of bicarbonate soda Then rinse with warm water using a Wrung out sponge or cloth Wash the shelves and salad bin in warm soapy water and dry completely before replacing in the unit Clean the exterior of the unit with a damp cl...

Page 10: ...r 2 3 hours then set the thermostat to desired settings and place foods in the appliance FREEZER COMPARTMENT TEMPERATURE SETTING The internal temperature is controlled by a sensor There are 2 settings COLD COLDER which you can also adjust anywhere in between the two depending freezer temperature OPERATION ...

Page 11: ...not attempt to do this yourself Reversing the Door swing optional 1 Remove the screws of the upper hinged cover and that top hinged cover on one side 2 Then remove the middle hinge lower hinge and door After that remove the upper middle and lower hinges on the other side 3 Install the lower hinges Then put on the middle hinge after the door is put in place After that install the refrigerator door ...

Page 12: ...flow of the refrigerant which is standard You may hear gurgling sounds caused by the flow of refrigerant Contraction and expansion of the internal walls may cause popping and crackling noises The door will not close properly Not Level The door was reversed and not installed correctly The gasket is dirty or bent The shelves bins or baskets are out of position Moisture forms on the inside or outside...

Page 13: ... Volume 371 Litres Climate Class T Classification of Protection I Rated Current 0 65A Power Supply 220 240V 50Hz Energy Consumption 359kWh y Refrigerant R600a 53g Insulation Blowing Gas Cyclopentane Weight Net 68kg Gross 75kg Dimensions 696 w x 685 d x 1712 h mm ...

Page 14: ...14 CUSTOMER HELPLINE 1300 296 699 DISTRIBUTED BY Ayonz Pty Ltd ...

Reviews: