background image

14

 SETUP 

2

1

ASSEMBLY:

1. Installation method of hose support

:

a. Insert the hose holder (A) through holes 
in the panel (B).
b. Pass hose support (A) through handle 
hole (B) and tighten nut (C).

2. Panel Installation Method:
a. b. c. b. Pass the panel bolt (A) through 
the handle hole (B) and tighten the bolt.


B

A

B

c.

A

A

B

a.

d.

B

A

b.

A

B

a.

b.

A

B

C

3

Installation method of gun hook

:

a. Pass the gun hook (A) through the 
handle hole (B) and tighten the nut (C).
b. Pass bolt (A) through hook and handle 
hole (B) and tighten.

a.

A

B

C

Summary of Contents for GPW2500V-E

Page 1: ... manual contains important information regarding safety Operation maintenance and storage of this product Before use read carefully and understand all cautions warnings instructions and product labels Failure to do so could result in serious personal injury and or property damage R ...

Page 2: ...7 OPERATION Pre start Checks 19 Starting The Engine 20 Pressure Washer Operation 21 Stopping The Engine And Pressure Washer 24 High Altitude Operation 24 MAINTENANCE Engine Maintenance Schedule 25 Pump Maintenance 26 Cleaning Pressure Washer 26 Changing Engine Oil 26 Adding Engine Oil 27 Spark Plug Maintenance 27 Air Filter Maintenance 28 Long term Storage 28 Trouble Shooting 30 ...

Page 3: ...0W 30 0 6 29 0 25 40 soap Recoil Start 2500 3000 2 1 2 4 7 6 170F P 212 3 6 SAE 10W 30 0 6 Nozzle Type 29 0 15 25 40 soap Starting Mode Recoil Start PRESSURE WASHER ENGINE Model Pump MAX Pressure PSI Rated Pressure PSI Rated Fiow GPM MAX Fiow GPM High Pressure Hose m Model Displacement cc Engine Type Cooling System Oil System Fuel Type Fuel Capacity L Engine Oil Type Engine Oil Capacity L GPW3000 ...

Page 4: ...Engine Oil Type Engine Oil Capacity L Single Cylinder 4 Stroke OHV Air Cooled Splash lubrication 92 Octane Unleaded Gasoline GPW4200 A Recoil Start Electric 3600 4200 3 6 4 15 192FD P 1 458 6 SAE 10W 30 1 1 40 0 15 25 40 soap GPW3200 B Recoil Start 2700 3200 2 7 3 15 170F P 212 3 6 SAE 10W 30 0 6 29 0 15 25 40 soap NOTICE We are always working to improve our products Therefore final product may var...

Page 5: ...Fire Explosion Electrical Shock Projectile Chemical Burns Electrical Hazard Slippery Surface Fall Safety Alert Read Operators Manual Asphyxiation Hazard Eye Protection Hot Surface Fluid Injection Kickback Moving Parts SAFETY 2 Safety Symbols and Warnings DANGER indicates a hazard which if not avoided will result in death or serious injury WARNING indicates a hazard which if not avoided could resul...

Page 6: ...s doors and vents to reduce the risk of carbon monoxide gas from accumulating and potentially being drawn towards occupied spaces DO NOT run this product inside homes garages basements crawlspaces sheds or other partially enclosed spaces even if using fans or opening doors and windows for ventilation Carbon monoxide can quickly build up in these spaces and can linger for hours even after this prod...

Page 7: ...ear Also wear protective hair covering to contain long hair Always wear proper eye protection with side shields marked to comply with ANSI Z87 1 Following this rule will re duce the risk of serious personal injury Do not overreach or stand on a ladder rooftop or other unstable support structure Keep proper footing and balance at all times Never leave product running unattended Turn power off Don t...

Page 8: ... scaffolding or any other similar location Firmly grasp spray gun with both hands when using high pressure spray to avoid injury when spray gun kicks back WARNING Kickback Hazard Starter cord kickback rapid retraction will pull hand and arm toward engine faster than you can let go which could cause fractures bruises or sprains resulting in serious injury NEVER pull starter cord without first reliev...

Page 9: ...are in place DO NOT crank engine with spark plug removed WHEN OPERATING EQUIPMENT DO NOT operate this product inside any building carport porch mobile equipment marine applications or enclosure DO NOT tip engine or equipment at angle which causes fuel to spill DO NOT spray flammable liquids WHEN TRANSPORTING MOVING OR REPAIRING EQUIPMENT Transport move repair with fuel tank EMPTY or with fuel shuto...

Page 10: ...a trigger lock or trigger guard in place and in working order Always be certain spray gun nozzles and accessories are correctly attached WARNING Moving parts hazard Starter and other rotating parts could entangle hands hair clothing or accessories resulting in serious injury NEVER operate pressure washer without protective housing or covers DO NOT wear loose clothing jewelry or anything that could...

Page 11: ...s chemicals including lead known to the State of California to cause cancer birth defects or other reproductive harm Wash your hands after handling product NOTICE High pressure spray could damage fragile items including glass DO NOT point spray gun at glass when using red 0 nozzle NEVER aim spray gun at plants NOTICE Improper treatment of pressure washer could damage it and shorten its life NEVER ...

Page 12: ...nning of this manual including all text under subheadings therein before set up or use of this product High pressure washer component identification 2 1 Handle Trigger Panel Nozzle Spray Gun Pressure Hose Pump Muffler Recoil Handle Wheel Wand Fuel Tank Air filter GPW2500V E ...

Page 13: ...tification GPW3000 E Trigger Handle Panel Spray Gun Nozzle Wand Recoil Handle Air filter Wheel Fuel Tank Pressure Hose Pump GPW3000 SP Trigger Handle Panel Spray Gun Nozzle Wand Recoil Handle Air filter Wheel Fuel Tank Pressure Hose Pump Muffler Muffler ...

Page 14: ...onent identification GPW3000 B GPW3200 A Trigger Handle Spray Gun Nozzle Panel Wand Pressure Hose Pump Wheel Recoil Handle Air filter Muffler Wheel Recoil Handle Air filter Muffler Panel Nozzle Handle Pressure Hose Wand Pump Spray Gun Trigger ...

Page 15: ...13 SETUP 2 1 High pressure washer component identification GPW4200 AE Handle Trigger Spray Gun Nozzle Panel Pressure Hose Wand Pump Wheel Air filter Fuel Tank Muffler Soap Box ...

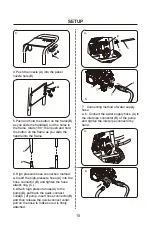
Page 16: ...h handle hole B and tighten nut C 2 Panel Installation Method a b c b Pass the panel bolt A through the handle hole B and tighten the bolt B A B c A A B a d B A b A B a b A B C 3 Installation method of gun hook a Pass the gun hook A through the handle hole B and tighten the nut C b Pass bolt A through hook and handle hole B and tighten a A B C ...

Page 17: ...nection method a Insert the high pressure hose A into the hose connector B and tighten the hose elastic ring C b Attach high pressure hose A to the pump D pull back the quick connect collar C of pump insert hose connector B and then release the quick connect collar pull on the hose to make sure it is firmly attached b B A a C 7 Connecting method of water supply hose a b Connect the water supply hos...

Page 18: ...d into the Spray Gun tip and tighten the nut firmly by hand Wand Spray Gun Tip 10 Attach the Nozzle to the Wand by pulling back the quick connect collar and pushing the Nozzle onto the end of the Wand Make sure the quick connect collar locks the Nozzle in place Nozzle Wand Quick Connect Collar GENERAL INFORMATION Fuel Use fresh high quality unleaded gasoline minimum 87 octane containing up to 10 et...

Page 19: ...ats this valve opens releasing the hot water and letting new cool water enter the pump Afterwards the valve closes returning pump to normal operation Caution the valve opens with no warning and the water will be hot Possible injury can occur Always keep hands and feet away from thermal relief valve Do not allow hoses to come in contact with engine muffler during use or immediately after use DO NOT...

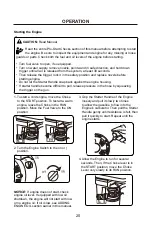
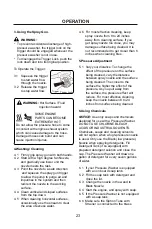
Page 20: ...l Consult the separate engine manufacturers manual if available See figure A section shows other viscosities to use 1 7 Reinsert the Dipstick without threading it in and remove it again to check the oil level The oil level should be up to the full level as shown above 1 8 If the oil level is at or below the low mark add the appropriate type of oil until the oil level is at the proper level The SAE ...

Page 21: ...al will void the warranty 2 5 If needed fill the Fuel Tank to about 1 inch under the fill neck of the Fuel Tank with 87 octane or higher unleaded gasoline that has been treated with a fuel stabilizer additive Follow fuel stabilizer manufacturer s recommendations for use 2 6 Replace the Fuel Cap making sure it is tight ans sealed 2 7 Wipe up any spilled fuel and allow excess to evaporate before start...

Page 22: ...pressure in the hose by squeezing the trigger on the gun NOTICE If engine does not start check engine oil level If equipped with low oil shutdown the engine will not start with low or no engine oil If oil is low see ADDING ENGINE OIL section earlier in this manual 4 Allow the Engine to run for several seconds Then if the Choke lever is in the START position move the Choke Lever very slowly to its ...

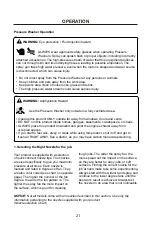
Page 23: ...engine exhaust away from occupied spaces If you start to feel sick dizzy or weak while using this product shut it off and get to fresh air RIGHT AWAY See a doctor as you may have carbon monoxide poisoning 1 Selecting the Right Nozzle for the job Your product is supplied with a selection of quick connect nozzle tips The nozzles are sized specifically to give you maximum pressure at all times Each no...

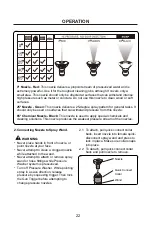
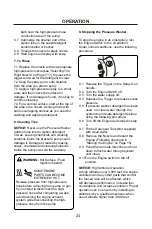
Page 24: ...ons This nozzle produces the weakest pressure stream of the nozzles 2 Connecting Nozzle to Spray Wand WARNING Never place hands in front of nozzle or point nozzle at your face Never attempt to clean a clogged nozzle while attached to the wand Never attempt to attach or remove spray wand or hose fittings while Pressure Washer system is pressurized Turn off Pressure Washer While pointing spray in a s...

Page 25: ...cleaning surface If you get spray nozzle too close you may damage surface being cleaned It is not recommended to get closer than 6 inches when cleaning tires 5 Pressure Adjustment 5 1 Vary your distance To change the effect of the pressure on the surface being cleaned vary the distance between spray nozzle and the surface being cleaned The closer to the surface the higher the effect of the pressur...

Page 26: ...tions use the following procedure WARNING Hot Surface Fluid Injection hazard SOME ENGINE PARTS CAN BECOME EXTREMELY HOT Release pressure from high pressure hose before removing from pump or gun If you intend to disconnect the high pressure hose after completing a wash avoid touching the engine exhaust system while disconnecting the high pressure hose from the pump 9 1 Release the Trigger on the Sp...

Page 27: ...ian for safety If you have any doubts about your ability to safely service the equipment or engine have a qualified technician service the equipment instead Engine Maintenance Schedule NOTICE This maintenance schedule is intended solely as a general guide If performance decreases or if equipment operates unusually check systems immediately The maintenance needs of each piece of equipment will diffe...

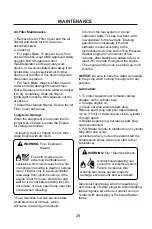
Page 28: ... without water inlet screen filter in place Cleaning Pressure Washer Daily or before use inspections should include areas around and underneath Pressure Washer looking for signs of fuel or oil leaks Preventative maintenance should be taken if leakage is found Clean accumulated debris from outside and inside Pressure Washer Ensure all linkages springs and other engine controls are kept clean Inspect...

Page 29: ...equipped with Low Oil Shutdown the engine will not start with low or no engine oil Spark Plug Maintenance 1 Disconnect spark plug cap from end of plug Clean out debris from around spark plug 2 Using a spark plug wrench remove the spark plug 3 Inspect the spark plug If the electrode is oily clean it using a clean dry rag If the electrode has deposits on it polish it using emery paper If the white i...

Page 30: ...refueling 1 Fuel Gasoline fuel can become stale when stored over 30 days which will cause acid and gum deposits to form in the fuel system or crucial carburetor parts To keep fuel fresh add fuel stabilizer to the fuel tank Draining gasoline is unnecessary if the fuel stabilizer is used according to the instructions that come with it Run Pressure Washer engine for a minimum of five minutes after sta...

Page 31: ...on sources such water heaters clothes dryers and furnaces Preparation for Use After Storage 1 Slowly pull the starter cord a few times to clean oil from the cylinder or to eject any pump protector from the pump which may have been added prior to storage 2 Remove the spark plug from the cylinder Wipe oil from the spark plug and return it to the cylinder and re tighten 3 Reconnect the spark plug wir...

Page 32: ...ly tap side of carburetor float chamber with screwdriver handle Too much fuel in cylinder This can be caused by the carburetor needle sticking Turn Choke to RUN position Remove spark plug and pull the start handle several times to air out the chamber Reinstall spark plug and set Choke to START position Intake valve stuck open or closed please submit to an authorized dealer Clogged Fuel Filter Repla...

Page 33: ... is low Dirty air filter Clogged or dirty fuel filter Clean or replace fuel filter Engine misfires Spark plug cap loose Check all wire connections Clean or replace fuel filter Incorrect or defective spark plug Re gap or replace spark plug Defective spark plug cap Replace spark plug cap Old or low quality gasoline Use only fresh 87 octane stabilizer treated unleaded gasoline Do not use gasoline with mor...

Page 34: ... mechanical problem Engine backfires Impure or low quality gasoline Engine too cold Allow engine to warm up prior to operating equipment Intake valve stuck or overheated engine Incorrect engine timing No pressure or low pressure No nozzle inserted into wand quick connect fitting See Selecting The Right Nozzle on Page 16 Inadequate water supply Water supply must be 5 GPM 20 PSI minimum Nozzle is clog...

Page 35: ... No intake of detergent Detergent hose not properly inserted into unit Soap injector hose cracked or split Replace hose Push firmly onto injector fitting Wrong Nozzle Injector turned off Switch to black SOAP nozzle Turn on injector Injection hose strainer clogged Clean hose and strainer Nozzle blocked Clean nozzle Dried detergent in injector Dissolve by running warm water through the injection hose ...

Page 36: ...34 6800 W01 GEM 02 01 V2 ...

Reviews: