background image

ENGLISH

18

OPERATING INSTRUCTIONS

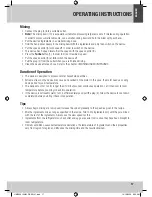
Removing hand mixer from mixer mount

•  Remove the plug (4) from the power outlet before removing the hand mixer (7) from the mixer mount. 
• 

Mixer mount in horizontal position:

 Hold the mixer release button (6) pressed on the mixer mount. Pull 

the hand mixer upward and then to the front in order to remove it from the mixer mount (7) (fig. 4). 

• 

Mixer mount tilted: 

You can also remove the hand mixer from the mixer mount (7) in a tilted position. 

Hold the release button (8) pressed to the base and tilt the mixer mount with the mounted mixer toward the 
back (fig.5). Now hold the mixer release button (6) pressed and remove the hand mixer from mixer mount as 
described (fig.6). 

•  Press the eject button (2) to unlock the whisk/dough hook and to remove it from the hand mixer.

Turbo

1

3

2

Turbo

1

2

Turbo

1

2

3

         Fig. 4 


Fig. 5 


Fig. 6

HMS5001W-IM-DE-EN-V1.indb   18

10/12/2009   9:55 AM

Summary of Contents for HMS5001W

Page 1: ...Handmixer Set Hand Mixer Set HMS5001W Bedienungsanleitung User Manual HMS5001W IM DE EN V1 indb 1 10 12 2009 9 55 AM ...

Page 2: ... dürfen Benutzen Sie bitte die Rückgabe und Sammelsysteme in Ihrer Gemeinde oder wenden Sie sich an den Händler bei dem das Produkt gekauft wurde INHALTSVERZEICHNIS INHALTSVERZEICHNIS 2 WICHTIGE SICHERHEITSANWEISUNGEN 3 4 BEDIENELEMENTE 5 BEDIENUNGSANWEISUNGEN 6 8 REINIGUNG UND PFLEGE TECHNISCHE DATEN 9 GARANTIE 10 11 HMS5001W IM DE EN V1 indb 2 10 12 2009 9 55 AM ...

Page 3: ... sollten beaufsichtigt werden um sicherzustellen dass sie nicht mit dem Gerät spielen Lassen Sie das Gerät nie unbeaufsichtigt solange es eingeschaltet ist Stellen Sie keine schweren Gegenstände auf das Gerät Tauchen Sie elektrische Teile des Geräts während des Reinigens oder des Betriebs nie in Wasser oder andere Flüssigkeiten Halten Sie das Gerät nie unter fließendes Wasser Netzanschluss Die Net...

Page 4: ...s Gerät vor extremer Hitze über 35 C und Kälte unter 5 C direktem Sonnenlicht und Staub Spezielle Sicherheitshinweise Schalten Sie das Gerät erst ein wenn sich die Schneebesen oder Knethaken tief im Mixbehälter befinden Halten Sie während des Betriebs Hände Haare Kleidungsstücke und Küchenwerkzeuge von den sich bewegenden Schneebesen Knethaken fern um Verletzungen zu vermeiden und um das Gerät nic...

Page 5: ...5 Stufen 4 Netzkabel mit Netzstecker 5 Motoreinheit 6 Mixer Entriegelungstaste 7 Mixerhalter 8 Entriegelungstaste für Mixerhalter 9 Sockel 10 Rührschüssel 11 Knethaken 12 Spatel 13 Schneebesen Turbo Turbo 2 3 1 4 5 6 7 8 9 10 11 12 13 HMS5001W IM DE EN V1 indb 5 10 12 2009 9 55 AM ...

Page 6: ...guten Halt finden Geben Sie die gewünschten Zutaten in die Rührschüssel 10 und stellen Sie sie auf den Sockel 9 Befestigen Sie die Schneebesen 13 oder Knethaken 11 am Handmixer Drehen Sie dabei die Schneebesen Knethaken leicht hin und her bis sie einrasten Der Schneebesen Knethaken mit dem weißen Aufsatz kann nur in die Buchse mit der sternförmigen Markierung eingesetzt werden Setzen Sie die Schne...

Page 7: ... haushaltsüblicher Mengen ausgelegt Extreme Belastungen des Gerätes führen unter Umständen zu einer Überlastung des Motors In diesem Fall benötigt der Motor eine Abkühlphase auf Zimmertemperatur Das Gerät darf nicht länger als 10 Minuten im Dauerbetrieb betrieben werden Lassen Sie es danach auf Raumtemperatur abkühlen bevor Sie es wieder in Betrieb nehmen Wenn sich das Gerät fühlbar erwärmt schalt...

Page 8: ... Abb 4 Mixerhalter gekippt Sie können den Handmixer auch in gekippter Stellung des Mixerhalters 7 entfernen Halten Sie die Entriegelungstaste 8 am Sockel gedrückt und kippen Sie den Mixerhalter mit dem montierten Mixer nach hinten Abb 5 Halten Sie nun die Mixer Entriegelungstaste 6 gedrückt und nehmen den Handmixer wie beschrieben vom Mixerhalter ab Abb 6 Drücken Sie auf die Auswurftaste 2 um die ...

Page 9: ...enflächen des Gehäuses des Mixerhalters 7 und des Sockels 9 mit einem leicht angefeuchteten Tuch Verwenden Sie zur Reinigung keinesfalls Lösungs und Scheuermittel harte Bürsten metallische oder scharfe Gegenstände Lösungsmittel sind gesundheitsschädlich und greifen die Plastikteile an scheuernde Reiniger und Hilfsmittel zerkratzen die Oberfläche Technische Daten Stromversorgung 230 240 V 50 Hz Lei...

Page 10: ...ENIUS HOME ob die Garantie durch Reparatur oder Austausch des Gerätes bzw des defekten Teiles erfüllt wird Weitere Ansprüche sind ausgeschlossen Sollten Sie Fragen zu GENIUS HOME Produkten haben sparen Sie sich den zeitraubenden Weg zum Händler und wenden sich direkt an unsere Servicehotline oder unser Servicecenter Ein Team von hochqualifizierten Produktberatern und Technikern steht Ihnen Montag ...

Page 11: ...s in Feuchträumen oder im Freien bei Schäden die auf höhere Gewalt Krieg Wasser Blitzschlag Überspannung und andere von GENIUS HOME nicht zu verantwortende Gründe zurückzuführen sind bei übermäßiger Nutzung insbesondere bei anderer als privater Nutzung bei Missachtung der Bedienungsanleitung und Installationsfehlern wenn das Gerät keinen technischen Defekt aufweist für Transport und Fahrtkosten so...

Page 12: ...ste Please use the return or collections systems of your municipality or contact the seller where you purchased this product TABLE OF CONTENTS TABLE OF CONTENTS 12 IMPORTANT SAFETY INSTRUCTIONS 13 14 CONTROL ELEMENTS 15 OPERATING INSTRUCTIONS 16 18 CLEANING AND CARE TECHNICAL DATA 19 WARRANTY 20 21 HMS5001W IM DE EN V1 indb 12 10 12 2009 9 55 AM ...

Page 13: ...play with the device Never leave the device unsupervised while it is switched on Do not place heavy objects on top of the device Never immerse electrical parts of the device in water during cleaning or operation Never hold the device under running water Power supply The mains voltage must match the information on the rating label of the device The power plug is used as the disconnect device Please...

Page 14: ...ts Protect this device from extreme heat over 35 C and cold under 5 C as well as from direct sunlight and dust Specific safety instructions Turn the device on only once the whisk or dough hook is located deeply into the mixing bowl Keep hands hair items of clothing and kitchen utensils away from moving whisks dough hooks in order to prevent injuries and to prevent the device from being damaged Att...

Page 15: ...control 5 speeds 4 Power cord with plug 5 Motor unit 6 Mixer release button 7 Mixer mount 8 Release button for mixer mount 9 Base 10 Mixing bowl 11 Dough hook 12 Spatula 13 Whisk Turbo Turbo 2 3 1 4 5 6 7 8 9 10 11 12 13 HMS5001W IM DE EN V1 indb 15 10 12 2009 9 55 AM ...

Page 16: ...t under the base find a good hold Put the desired ingredients in the mixing bowl 10 and put it on the base 9 Attach the whisk 13 or dough hook 11 to the hand mixer Rotate the whisk dough hook gently until it locks into place The whisk dough hook with the white part can only be put in the socket with the star shaped marking Do not insert the whisk dough hook into the socket otherwise Mixer mount in...

Page 17: ...ld quantities Extreme stress on the device may cause an overload of the motor In this case the motor needs a cooling down period to room temperature The device must not run for longer than 10 minutes under continuous operation Let it then cool to room temperature before you bring it back into operation If the device is noticeably warm turn it off immediately and pull the plug 4 Allow the device to...

Page 18: ...he mixer mount 7 fig 4 Mixer mount tilted You can also remove the hand mixer from the mixer mount 7 in a tilted position Hold the release button 8 pressed to the base and tilt the mixer mount with the mounted mixer toward the back fig 5 Now hold the mixer release button 6 pressed and remove the hand mixer from mixer mount as described fig 6 Press the eject button 2 to unlock the whisk dough hook a...

Page 19: ...e housing the mixer mount 7 and the base 9 with a slightly damp cloth Never use solvents and abrasives hard brushes metallic or sharp objects for cleaning Solvents are harmful to health and attack the plastic parts Abrasive cleaners and tools do scratch the surface Technical data Power supply 230 240 V 50 Hz Power consumption 300 W Short time operation 10 min Manufactured for JGC Company GmbH Heck...

Page 20: ...rranty by repair or replacement of the device or defect component Other claims are excluded In case of questions regarding GENIUS HOME products you no longer need to take the time to go to the seller but may call our service hotline or service center directly A team of highly qualified product consultants and technicians is available from Monday through Friday from 10 00 a m to 6 00 p m Service Ho...

Page 21: ...in case of damages resulting from force war water lightning excess voltage and other reasons not within the scope of GENIUS HOME s responsibility in case of excessive use in particular in case of non domestic use in case of disregard of the user instructions and installation errors if the device does not have a technical defect for transport and travel costs as well as costs incurred by installing...

Reviews: