background image

 WDR DAY & NIGHT COLOUR CAMERA

 WDR DAY & NIGHT COLOUR CAMERA

-16-

● 

The WDR mode cannot be used when FLK mode is selected in the SHUTTER.

● 

The following symptoms may occur, according to the ambient illumination, when WDR is selected, 

     if they do, set WDR to OFF. 
    Colour or screen changes unnaturally.
    Noise appears within the brightest part of the screen.

● 

The WDR performance can be affected if there is particularly bright area within the image 

    - always optimise the installation angle to avoid this.

 If the LIMIT is increased the image may become distorted.

● 

To achieve the best WDR performance use a DC Iris lens rather than a manual lens.

NOTE

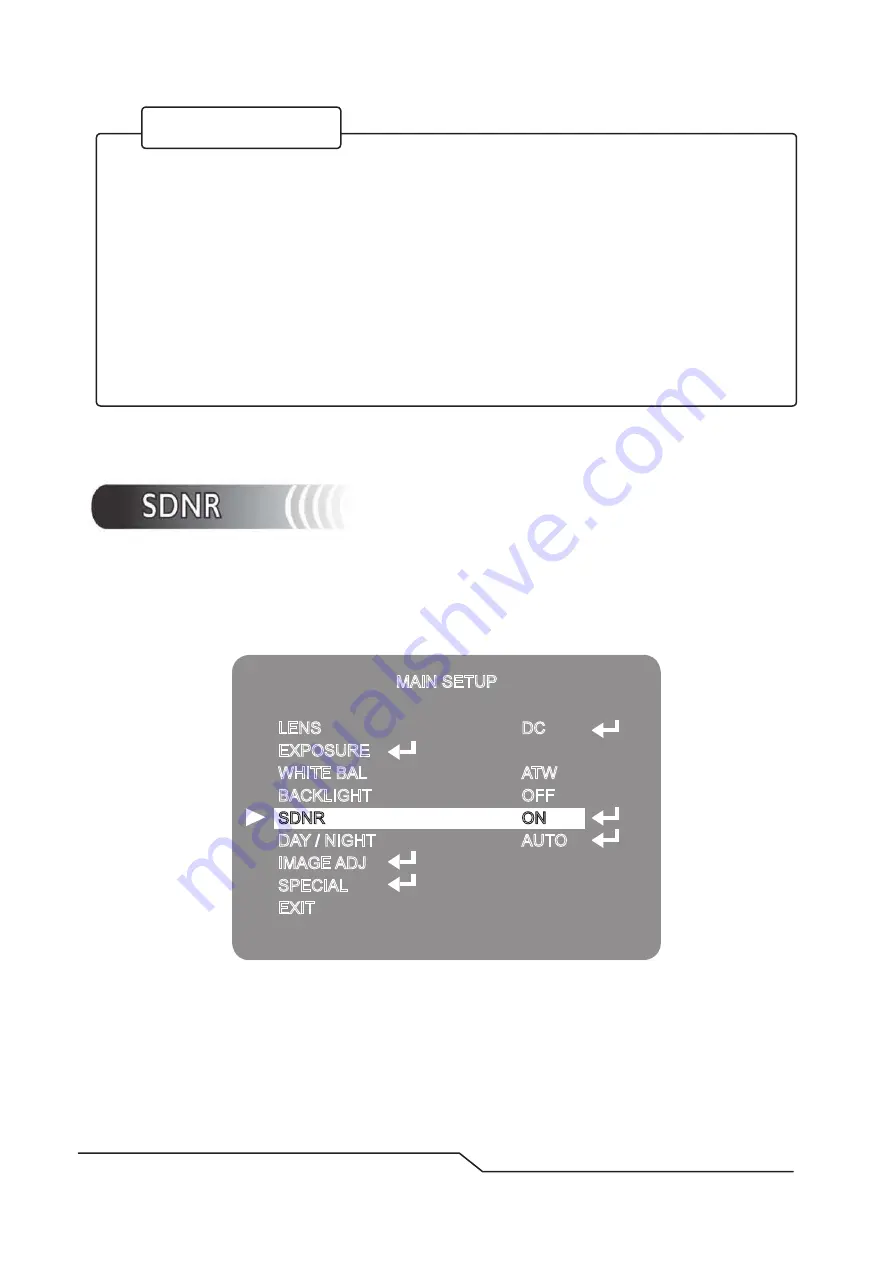
SDNR is used to reduce the level of background noise in a low luminance environment.
I. When the SETUP menu screen is displayed select SDNR using the Up and Down button.

MAIN SETUP

LENS
EXPOSURE
WHITE BAL
BACKLIGHT

SDNR

DAY / NIGHT
IMAGE ADJ
SPECIAL
EXIT

DC

ATW
OFF

ON

AUTO

2. Select whether or not to activate SDNR by using the Left and Right buttons.

 ON:  Activates SDNR - noise is reduced.

 OFF:  Deactivates SDNR - noise is not reduced.

Summary of Contents for ZW49IR

Page 1: ...USER MANUAL WDR TRUE DAY NIGHT CAMERA ZW49IR ...

Page 2: ...nstruction General Features Set Up Menu Special Menu Menu Set Up Exit How to Install Trouble Shooting Menu Set Up Lens Set Up Exposure White Bal BLC SDNR Day Night Image Adj Special Camera Title Sync Motion Det Privacy DIS COMM Adj Language 2 1 3 4 5 6 7 8 8 9 10 13 14 16 17 19 21 22 24 24 26 26 27 28 28 29 30 ...

Page 3: ...WDR DAY NIGHT COLOUR CAMERA WDR DAY NIGHT COLOUR CAMERA 2 ...

Page 4: ...stable ON OFF 8 Zone ALARM Output ON OFF 8 Zone ON OFF ON OFF ON OFF ON OFF Level Adjustable COLOUR BLACK WHITE AUTO EXT ON OFF ON x10 OFF 256 Point Even 128 Point ODD 128 Point RS 485 Pelco D Protocol Option DC 12V AC 24V Dual Voltage CDS ON 1 2A Max DC Auto Iris Varifocal Lens 4mm 9mm 20 50 Deg C RH 95 Max 20 60 Deg C RH 95 Max 88mm W 115mm H 245mm D 1600g MODEL ZW49IR Built in 42pcs Infra Red L...

Page 5: ...when still connected to the outlet Always disconnect the power by removing the plug from the power socket If the camera emits a burning smell immediately disconnect it from the power source and report the problem to your distributor Cautions When Install Only apply power after installation of the product Do not install the camera in a position facing directly at a strong light source Do not instal...

Page 6: ... the problem of ghosting and now displays clearer superior high resolution images even in extremely low light conditions Disk Saving Effects Advanced SDNR technology improves picture quality and saves hard drive space as less noise means much smaller file sizes much smaller than standard CCTV camera images DNR DSP Chip The DNR DSP chipset has various powerful functions that give superior high reso...

Page 7: ...AUTO EXTERNAL DWELLTIME 5 60SEC DURATION TIME SLOW FAST IMAGE ADJ FREEZE OFF V REV OFF H REV OFF DZOOM OFF SHARPNESS ON FREEZE ON OFF V REV ON OFF H REV ON OFF DZOOM ON OFF 0 230 Level Selectable SHARPNESS ON OFF I 3 I Level Selectable RETURN SPECIAL Refer to the next page EXIT Save the SETUP Menu and exit The IR range shown below are maximum distances that can be achieved using this camera The en...

Page 8: ...ILL SET RETURN PRIVACY OFF AREA SEL AREA I AREA MODE TOP BOTTOM LEFT RIGHT MASK COLOUR GREEN RED BLUE BLACK WHITE GREY TRANSP Level Selectable RETURN DIS OFF ON OFF COMM ADJ CAM ID 0 BAUD RATE 38400 PARITY 8 N 1 RET PKT ENABLE DISP CAM ID OFF CAM ID ID Selectable BAUD RATE 2400 4800 9600 19200 38400 57600 PARITY 8 N 1 RET PKT ENABLE DISP CAM ID OFF LANGUAGE ENGLISH RESET RETURNS TO FACTORY SETTING...

Page 9: ...WHITE BAL BACKLIGHT SDNR DAY NIGHT IMAGE ADJ SPECIAL EXIT DC ATW OFF ON AUTO Menu items can be selected by using the OSD buttons of the camera I Press the Set Up button The Set Up menu will be displayed on the monitor 2 Move and select the required function using the Up and Down button Move the arrow indicator Up or Down to select the desired feature by pressing the Up or Down button ...

Page 10: ...u settings using the Left or Right button Available values or Status are displayed by pressing the Left or Right buttons Press the button until desired value status is displayed 4 After completing the setting move the arrow indicator to EXIT and press the SET button to EXIT Move to available submenu by moving arrow to desired feature Submenu is not available when this symbol is displayed NOTE MAIN...

Page 11: ...r speed control I On the Set Up menu screen select EXPOSURE by using the Up or Down button 2 Select the desired shutter mode by pressing the Left or Right button FLK Select FLK mode when flickering occurs caused by the unmatched frequency of electric lights ESC Automatic shutter speed control The image brightness is automatically controlled when ESC mode is selected MANUAL Shutter speed can be sel...

Page 12: ...junction with the WDR mode in the BACKLIGHT menu When the SHUTTER is set to ESC and the CAMERA is using internal synchronisation the picture may become unstable if the camera is facing a bright fluorescent light So take special care when choosing the installation position When the SHUTTER is set to MANUAL or FLK mode SENS UP will be disabled ESC and MANUAL modes are only available together when th...

Page 13: ...ETURN Select Return to save the changes in the EXPOSURE menu and retun to the SETUP menu LIMIT Pressing the SET button in AUTO mode allows adjustment of image brightness by increasing or decreasing the shutter speed x2 x256 The higher the level the brighter the image becomes but it is possible that an after the image ghosting could appear When SENS UP is activated the increased magnification can i...

Page 14: ...etween 4 500 K to 8 500 K OUTDOOR Select this mode when the colour temperature range is between 1 800 K to 10 500 K AWC SET To obtain the best results press the SET button while the camera is focused onto white paper If the environment and or light source changes the White Balance will require re adjustment MANUAL Used for fine adjustment of White Balance Set White Balance first using ATW or AWC t...

Page 15: ...vercome even strong backlight conditions I Move the arrow indicator to BACKLIGHT using the Up or Down button on the SETUP menu screen 2 Select the desired level by using the Left or Right button WDR When there are simultaneous brightness dark image areas WDR makes both distinct OFF WDR function does not operate BLC Users can select and define a specific area in a scene and view the area clearly HL...

Page 16: ...DR sensitivity by selecting LOW MIDDLE or HIGH LEVEL Adjust the WDR brightness between 0 100 Select BLC to define the backlight enhancement area and the enhancement level HLC Enable a user to select a mask color of high light area from picture WDR LlMIT LIMIT LEVEL LOW 100 Press SET to Return HLC SETUP MASK COLOR 10 Press SET to Return BLC SETUP TOP BOTTOM LEFT RIGHT LEVEL 85 132 91 165 LOW Press ...

Page 17: ...mage always optimise the installation angle to avoid this If the LIMIT is increased the image may become distorted To achieve the best WDR performance use a DC Iris lens rather than a manual lens NOTE SDNR is used to reduce the level of background noise in a low luminance environment I When the SETUP menu screen is displayed select SDNR using the Up and Down button MAIN SETUP LENS EXPOSURE WHITE B...

Page 18: ...he Up or Down button on the MAIN SETUP menu screen SDNR cannot be set to ON or OFF when AGC is OFF AGC mode is in the EXPOSURE menu When adjusting the SDNR noise reduction level please remember that when higher SDNR levels are set noise is greatly reduced but this can cause ghosting to occur NOTE MAIN SETUP LENS EXPOSURE WHITE BAL BACKLIGHT SDNR DAY NIGHT IMAGE ADJ SPECIAL EXIT DC ATW OFF ON AUTO ...

Page 19: ...plication of a filter to external signals Colour B W B W Colour Fast 2 5 Lux 4 Lux Slow 0 8 Lux 6 Lux When using Video Drive lens with the lens level set to low it automatic switching between colour and monochrome may not occur The DAY NIGHT menu cannot be controlled if AGC is set to OFF in the EXPOSURE menu In instance where DAY NIGHT is already selected and AGC is switched off the camera functio...

Page 20: ... the Up or Down button MAIN SETUP LENS EXPOSURE WHITE BAL BACKLIGHT SDNR DAY NIGHT IMAGE ADJ SPECIAL EXIT DC ATW OFF ON AUTO IMAGE SETUP I FREEZE 2 V REV 3 H REV 4 D ZOOM 5 SHARPNESS RETURN OFF OFF OFF OFF ON FREEZE Image freezing or moving Image V REV Flip the image vertically on the screen H REV Flip the image horizontally on the screen D ZOOM Digital zoom available range x1 x I0 ...

Page 21: ...e image or cause noise RETURN Select Return and press SET to save the settings for the IMAGE Adj menu and return to the SETUP menu When H REV or V REV is selected any text in the picture also will be flipped horizontally or vertically If the SHARPNESS level is set too high the picture may become distort or noise may appear NOTE D ZOOM LEVEL 5 Press SET to Return SHARPNESS LEVEL 10 Press SET to Ret...

Page 22: ...n input the Camera ID is displayed on the monitor 1 1 Move the arrow indicator to CAMERA ID using the Up or Down button on the SETUP menu screen 1 2 Set to ON using the Left or Right button MAIN SETUP LENS EXPOSURE WHITE BAL BACKLIGHT SDNR DAY NIGHT IMAGE ADJ SPECIAL EXIT DC ATW OFF ON AUTO SPECIAL I CAMTITLE 2 SYNC 3 MOTION DET 4 PRIVACY 5 DIS 6 COMM ADJ 7 LANGUAGE 8 RESET 9 RETURN OFF INT OFF OF...

Page 23: ...d range A Z a z 0 9 using the Up Down Left and Right buttons Select the desired character by pressing the SETUP button The cursor moves to the next position after character input by pressing the SETUP button Repeat the above steps until the Camera ID has been created CAMERA TILE SETUP ABCDEFGHIJKLM NOPQRSTUVWXYZ a b c d e f g h i j k l m n o p q r s t u v w x y z 0 1 2 3 4 5 6 7 8 9 CLR POS END CA...

Page 24: ... right and repeat the above steps to input the characters again NOTE 1 5 To select the position where the Camera ID should be displayed on the screen Move the cursor to POS and press the SET button Created camera ID is displayed Factory default position CAM 1 CAMERA TILE SETUP ABCDEFGHIJKLM NOPQRSTUVWXYZ a b c d e f g h i j k l m n o p q r s t u v w x y z 0 1 2 3 4 5 6 7 8 9 CLR POS END ...

Page 25: ...he cursor to END and press the SET button after completing the above process 2 SYNC INT Internal Synchronisation 3 1 When the special menu screen is displayed use the Up or Down botton to access the MOTION DET menu 3 MOTION DETECTION MD MOTION DET I SENSITIVITY 2 AREA MODE 3 SEL POS 4 Y POS 5 X POS 6 FILL SET 7 Return AREA I ON L TOP IIIIIIIIIIIIIIIII 2 IIIIIIIIIIIIIIIII 1 ...

Page 26: ... is used SEL POS Determines which of the four vertices of each MD area is to be used Y POS Determines the coordinates of the vertical axis for SEL POS X POS Determines the coordinates of the horizontal axis for the SEL POS FILL SET Fills in a selected MD area The colour filling is sequentially selected as brown orange blue cyan green yellow magenta and red RETURN Select this to save the MOTION DET...

Page 27: ... and the size and the position of the area MASK COLOUR Set area colour Select either Gray Green Red Blue Black and White TRANSP Determines the transparency of selected area the range is 0 3 RETURN Select to save the PRIVACY menu settings and return to the SPECIAL menu 5 DIS Digital Image Stabiliser This picture negates any picture movement due to external factors such as wind PRIVACY I AREA SEL 2 ...

Page 28: ... device NOT AVAILABLE ON WDR CAMERA SERIES 6 1 When the SPECIAL menu screen is displayed press the UP and DOWN buttons to adjust COMM ADJ 6 2 Set up the mode using the 4 direction buttons CAM ID Determines the camera s identification number between 0 and 25 BAUD RATE You can select 2400 4800 9600 19200 38400 57600 bps UART MODE You can select NONE EVEN ODD for parity bits RET PKT Determines whethe...

Page 29: ...cording to local requirements through the multi language settings 8 RESET Resets the camera settings to the factory defaults 9 RETURN Select this to save the SPECIAL menu settings and return to the SETUP menu Press the SET button in the EXIT menu to save the current settings and exit the SETUP menu ...

Page 30: ... CAMERA 29 Camera Adjustment Connect Video Power Line AC 24V or DC 12V Regulated Power Position the camera for the correct angle of view Loosen the locking screws and focus the camera Re tighten the locking screws DC Auto Iris Varifocal Lens 4mm 9mm ...

Page 31: ...ION DET been set to ON in the menu Has MD AREA been properly defined Make sure that the camera isn t facing direct sunlight or fluorescent lighting If necessary change the camera position Check the settings in WHITE BALANCE menu Check that the AGC setting in the EXPOSURE menu isn t set to OFF Check the EXPOSURE menu and make sure SHUTTER is set to ESC Check the camera is correctly connected to an ...

Page 32: ...Edition GN July 2012 ...

Reviews: