Genie DN83SPX Instruction Manual Download Page 9

1

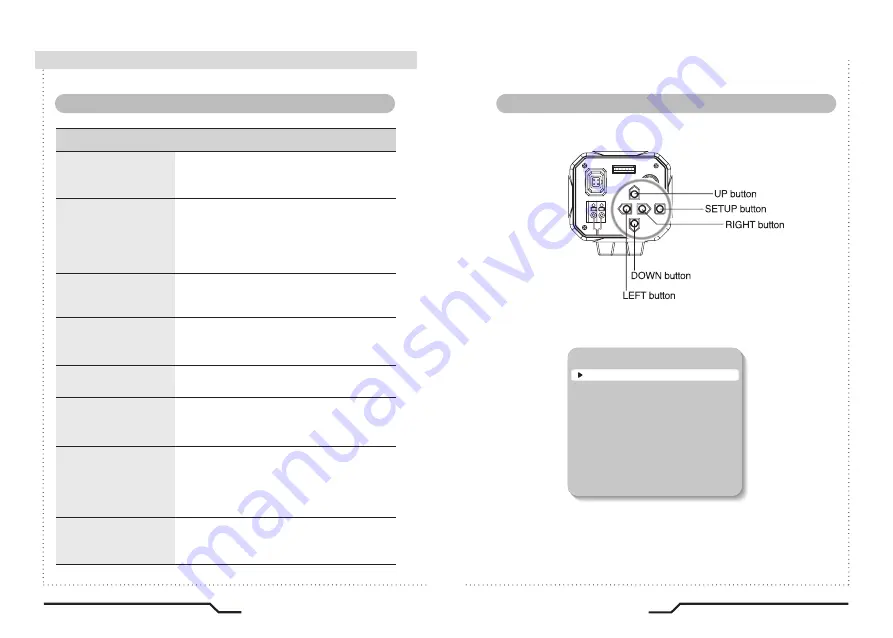
. Press the SET button

Settings can now be made. The SETUP menu is displayed on the 

    monitor.

2. Select a menu item from the list available by using the UP and DOWN

    buttons.

Funtions are selected using up and down buttons.

The selected position is displayed in blue.

SETUP

PRESETS

EXPOSURE..

WDR

WHITE BALANCE

DAY&NIGHT

IMAGE ADJ..

SPECIAL..

EXIT MENU.

NORMAL

MIDDLE

ATW

AUTO..

16

PIXIM Digital Day/Night Bodied Camera

17

PIXIM Digital Day/Night Bodied Camera

IRIS JACK

OSD EXTRA

POWER

DC

VIDEO

SET

VIDEO OUT

AC 24V IN
DC12V IN

SET


How to Use the Camera

Menu

Settings

Settings can be made using the 5 buttons on the rear of the camera.

NORMAL

SETUP menu

PRESETS

EXPOSURE

WDR

WHITE BALANCE

DAY&NIGHT

IMAGE ADJ.

EXIT MENU

MIDDLE

LOW

RESET

CAMERA ID

MOTION

ATW

AWB

BACKLIGHT

FREEZE

AUTO

SPECIAL

VERSION

CANCEL

COLOR GAIN

INDOOR

MANUAL

HIGH

VIDEO OUT

PRIVACY MASK

INDOOR

SAVE&EXIT

FLIP

GAMMA

COLOR

LENS SELECT

DNR

COLOR ROLL

SENS-UP 

EXPOSURE MODE

BLC

HIGHLIGHT

AGC

OUTDOOR

OUTDOOR

DEFAULT

SHARPNESS

USER

DZOOM

SYNC

BW

FOCUS

Summary of Contents for DN83SPX

Page 1: ...ces other than those specified Do NOT expose this appliance to rain or moisture This installation should be made by a qualified service person and should conform to all local codes The lightning flash...

Page 2: ...ns Using auto iris Using C CS mount lens Using a C Mount lens Connecting to a monitor Connecting to power 12 15 15 Components 8 How to Use the Camera 16 Menu 16 Settings 17 PRESETS 18 EXPOSURE 19 WDR...

Page 3: ...you find it malfunctioning If the camera emits smoke or is unusually hot for a long period a fire may be caused Do not Install the camera on a surface that can not support it If the camera is installe...

Page 4: ...sethecamerainan environmentwherethehumidityishigh If the camera is exposed to spotlight or an object reflecting strong light smear or blooming may occur Please check the power supply satisfies the nor...

Page 5: ...s 2 AUTO IRIS LENS CONNECTION PLUG 3 L WRENCH 4 C MOUNT ADAPTOR 5 INSTRUCTION GUIDE 1 COLOUR BOX CAMERA Front Lens protection cap Cover the lens when not using it CS Mount lens adaptor Attach the CS M...

Page 6: ...lied to the camera Setting button SET button Used for the menu display This button can be used to confirm settings after changing the value of the selected function or current conditions UP DOWN butto...

Page 7: ...conditions When using an auto iris lens 3 Remove the cover of the auto iris lens connection plug and solder the lens cable to the connector pin in the plug 4 Replace the auto iris lens connection plu...

Page 8: ...lens 1 Take off the lens protection cap and attach the C mount adaptor 2 Attach the C Mount lens to the camera by screwing it in clockwise When using a C Mount lens Connect the video output terminal...

Page 9: ...ra 17 PIXIM Digital Day Night Bodied Camera IRIS JACK OSD EXTRA POWER DC VIDEO SET VIDEO OUT AC24V IN DC12V IN SET How to Use the Camera Menu Settings Settings can be made using the 5 buttons on the r...

Page 10: ...HT button PRESETS Note An item with the icon also has sub menus To select a sub menu press the SET button SETUP PRESETS EXPOSURE WDR WHITE BALANCE DAY NIGHT IMAGE ADJ SPECIAL EXIT MENU NORMAL MIDDLE A...

Page 11: ...hat finds colour fluorescent roll OFF LOW HIGH selectable WDR SENS UP When it is night or dark the camera automatically detects the light level and maintains a clear picture if this mode is activated...

Page 12: ...of the following 5 modes as appropriate ATW The ATW mode continuously monitors INDOOR Select when the colour temperature is between 4000 K and 8500 K OUTDOOR Select when the colour temperature is betw...

Page 13: ...cleaner and more distinctive as the level of SHARPNESS increases If the level gose upexcessively however itmayaffectthevideoimageandgeneratenoise The available range of level is 8 8 COLOR GAIN To cont...

Page 14: ...T buttons Repeat the above steps until the ID is complete CAMERA ID ID POSITION PREVIOUS PAGE CAM 001 UP LEFT CAMERA ID ID POSITION PREVIOUS PAGE CAM 001 UP LEFT SPECIAL When the SETUP menu screen is...

Page 15: ...om edges of screen MOTION This product has a feature that allows you to observe movements of objects in on the screen hence a single individual can conduct supervision efficiently The camera detects a...

Page 16: ...ASKS 1 to 6 MASK 1 MASK 2 MASK 3 MASK 4 MASK 5 MASK 6 PREV NEXT ON OFF OFF OFF OFF OFF ENABLE MASKS 7 to 12 MASK 7 MASK 8 MASK 9 MASK 10 MASK 11 MASK 12 PREVIOUS PAGE OFF OFF OFF OFF OFF OFF White PRI...

Page 17: ...is an intermediate device set the 75ohm Hi z correctly and also check the connections Check if an auto iris lens is being used and if necessary adjust the brightness level Please check if an appropri...

Page 18: ...ht PIXIM 1 3 High Sensitivity Digital Sensor 17 bit Digital Signal Processing Progressive with Segmented Frames Internal Line Lock 758 H x 540 V 120dB Max 102dB Typical 690TVL Effective 0 1Lux AUTO CO...

Page 19: ...MEMO...

Page 20: ...NIE CCTV LTD CCTV House City Park Watchmead Welwyn Garden City Hertfordshire AL7 ILT Tel 44 0 1707 330541 Fax 44 0 1707 330543 www geniecctv com PIXIM Digital Day Night Bodied Camera Instruction Guide...

Reviews: