background image

1

Video Image Stabiliser

Introduction

The Video Stabiliser utilises advanced Digital Image Stabilising algorithms

to minimise the effects of camera shake. These algorithms have been

optimised to run in real

-

time on a dedicated digital media processor that

fits inside a box that can rest on the palm of your hand.
The video stabiliser has been designed to be totally plug

-

and

-

play, meaning

you can get started simply by plugging in and switching on.

This quick

-

start guide will help you get your video stabiliser up and running

quickly, as well as lead you through some of the advanced options provided

by this unit.

Connecting Up 

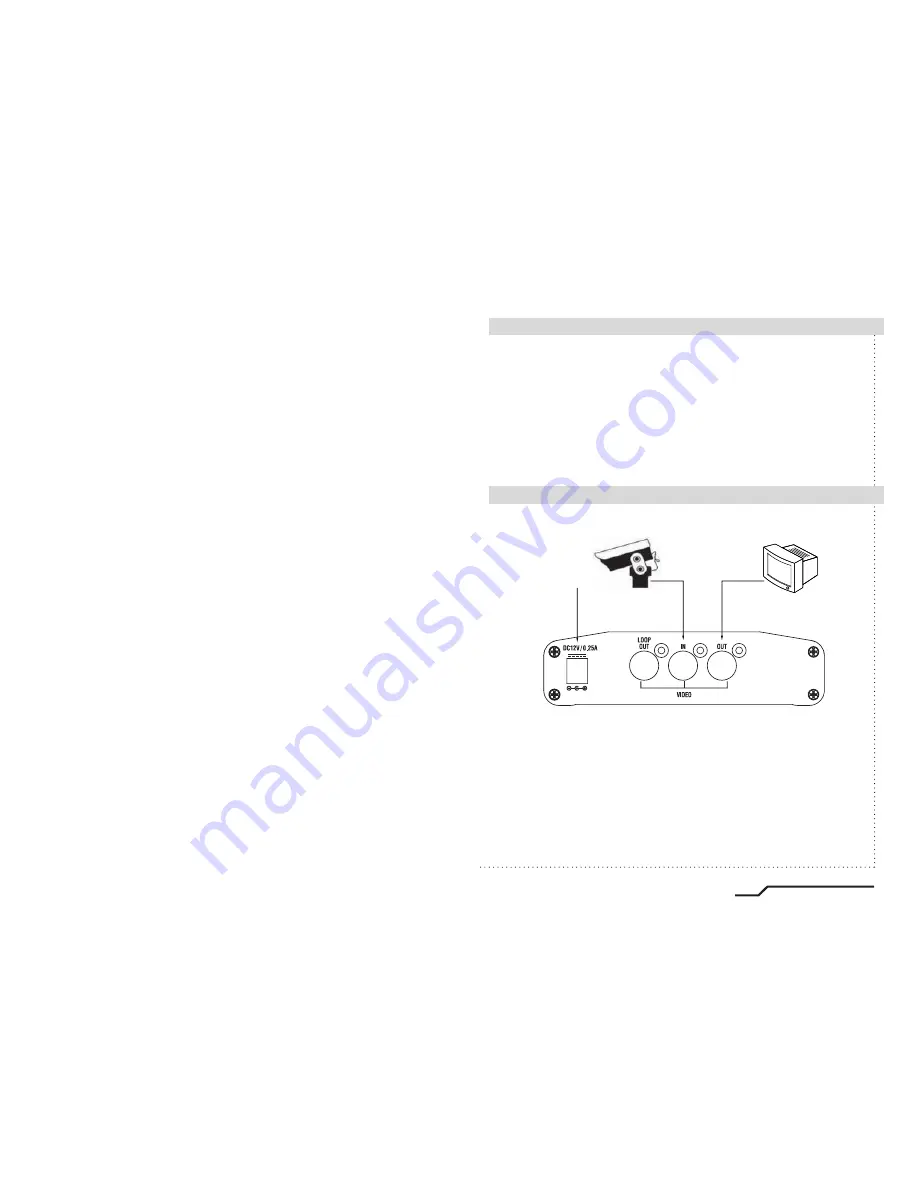
Connect the video stabiliser as shown in the diagram:

DC12V

The video stabiliser is intended to be connected in

-

line between the video

source and the video display.
Your video stabiliser should now be operational and stabilising video.

There is no need to perform any other set up. (Note the Stabiliser takes

about 1 minute to start operating. This is caused by the internal Linux

operating system booting

-

up. During the start

-

up time the stabiliser remains

in loop

-

through mode).

In the event of a power failure to the video stabiliser unit, the video will

pass through the unit un

-

stabilised.

Summary of Contents for IS-100

Page 1: ...ge Stabiliser Instruction Guide Model IS 100 GENIE CCTV LTD CCTV House City Park Watchmead Welwyn Garden City Hertfordshire AL7 ILT Tel 44 0 1707 330541 Fax 44 0 1707 330543 www geniecctv com Edition GN Feb 2010 ...

Page 2: ...liser up and running quickly as well as lead you through some of the advanced options provided by this unit Connecting Up Connect the video stabiliser as shown in the diagram DC12V The video stabiliser is intended to be connected in line between the video source and the video display Your video stabiliser should now be operational and stabilising video There is no need to perform any other set up ...

Page 3: ... output frames are shifted with respect to the input frames As the camera moves around so the output frames are shifted to keep the image features aligned to previous frames This results in areas for which there is no image data available The Border In fill mode controls what happens to those areas that do not contain any image data There are four options available ㆍFast Fade Default Newer frames ...

Page 4: ...The above two stabilisation modes are designed to allow tracking of intentional camera panning by not stabilising low frequency movements 1Hz The Low Frequency mode has a lower cut off frequency to allow better low frequency stabilisation at the expense of worse tracking of intentional movement see Attenuation vs Frequency graph on the last page This mode will automatically switch to the higher fr...

Page 5: ...shifts the frame horizontally and vertically in either direction from the normall position Both horizontal and vertical shifts are settable in the range 24 256 the default is 128 Usually the only reason to select low Frame Shift values is when the Border In Fill is in Fixed mode because as the borders are increased in size the viewable image area gets smaller by the same amount Warning Setting the...

Page 6: ...ication Selecting Slow Stabilisation mode in the Camera Installation settings on the Advanced Configuration page will improve low frequency stabilisation but will make PTZ tracking performance worse When border infill is enabled blank areas of the image left by the stabiliser shifting the image are filled in with old image data Sometimes this does not match well with the live part of the image Thi...

Page 7: ...racy Locks on to background features Ignores moving objects and burnt in text Image in fill Removes distracting image border movement by using in filling data from previous frames 80ms from change of image Composite 1V 75Ω BNC connector PAL NTSC selectable via the web browser interface Automaticloop throughwhenpowerisoffandduringstart up 720 x 576 720 x 480 Works straight out of the box Simply con...

Page 8: ... MEMO ...

Reviews: