background image


Sport  DV    |    ENGLISH    USER    MANUAL 

30 


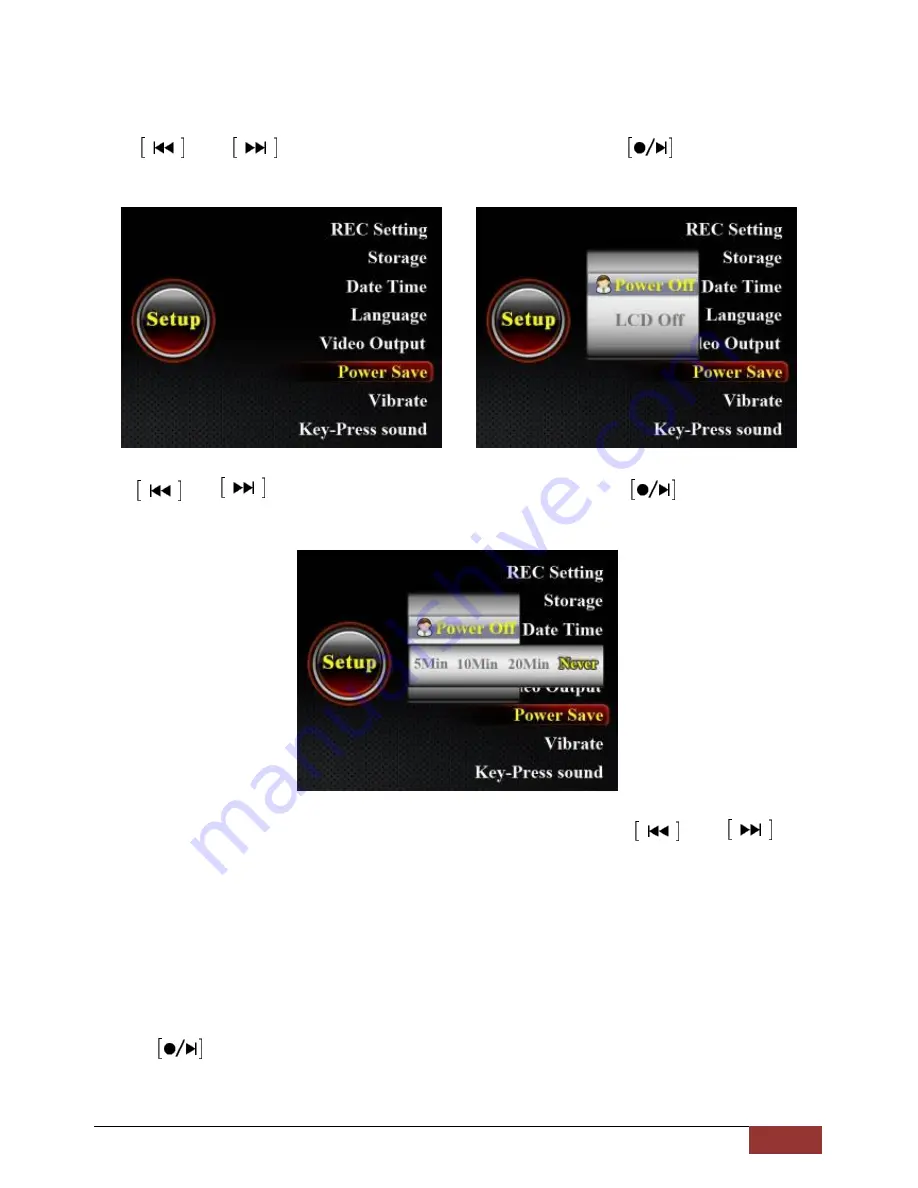
Power saving mode


Automatic power off mode 

Use            and            to select “Power Saving” menu, then press            to confirm and 

enter. 


Use          and            to select the setting “Power Off”, then press              to confirm and 

enter.   


The default setting is “Never” power off automatically, please use            and                to 

change the time according to your need. 


5Mins means power off automatically after 5 minutes if without operation; 

10Mins means power off automatically after 10 minutes if without operation; 

20Mins means power off automatically after 20 minutes if without operation; 


Press              to confirm and quit. 


After power off, we need to press the power switch button to restart it.


Summary of Contents for CVSA-DV68

Page 1: ...Sport DV ENGLISH USER MANUAL 0 USER MANUAL Please read this user manual carefully and thoroughly before any attempt to install...

Page 2: ...6 Basic operation link with other equipments 7 Battery installation 7 Connect with the camera 8 Start recording 9 Connect with TV 10 Connect with computer 11 Function Modes 13 Booting picture 13 Reco...

Page 3: ...and R TTE Directive1999 5 EC It passed the subject tests by the authority concerned and is authorized to bear CE mark OVERVIEW Thank you for buying the Digital Video Recorder Please read this manual c...

Page 4: ...of photos or movies recorded or edited with other equipment on your recorded are not guaranteed Do not shake or strike the recorder In addition to malfunctions and inability to record photos or movies...

Page 5: ...key 3 AV Input 11 Micro SD TransFlash slot key 4 Playing mode switch Blue 12 Remote control pair 5 Recording mode switch Red 13Indicator Red Charging Blue Working 6 Backward key long press Volume up k...

Page 6: ...tion twice rapid vibration In this state DVR is recording but screen is still off Step 2 Press to stop recording and save the video you record immediately DVR power off Rapid vibration Remarks During...

Page 7: ...charger via USB cable 2 Connect the charger into 110V 240V AC socket 3 During power charging the red indicator of the charger and the DVR will continuously light 4 After the power is fully charged th...

Page 8: ...cture shows Put the tags side upward let the 4 battery contact points aligned with points on battery holder Close the cover Battery using time information form Capability Charging time Standby time Pl...

Page 9: ...de the screen will show the live video and prepare recording Case2 Connect with a CCTV camera 1 Connect the DVR with a CCTV camera via the RCA of AV cable insert one terminal into AV in port of the DV...

Page 10: ...ct moves max per 15 minutes per video file If no any motion recording will stop automatically after 15 seconds Timer programs recording Record according to the time you set the file will be saved per...

Page 11: ...via AV cable 2 Power on DVR glide switch to Play side Use and to select files and to play The default signal output mode is PAL if the system in your local place is NTSC please enter setting menu and...

Page 12: ...connected Remark Connect with computer at power off states the DVR will enter USB power mode can do any operation as well Connect with computer at recording states the DVR will enter USB power mode to...

Page 13: ...e hard disk called NO_NAME Picture details Open the video files in the folders Check the video files in the folders and play it by the default media player in your computer Remark If the media player...

Page 14: ...g picture Recording interface Recording Mode 1 Recording symbol 6 Battery capacity 2 Current detail time 7 Current time 3 Current Date 8 Resolution of recording 4 Card icon if memory card available 9...

Page 15: ...MANUAL 14 Audio recording mode When select Recording Content Audio and press to confirm then display Select the audio source and press confirm then the screen will display the left time of storage Pre...

Page 16: ...s Use or to select the folder and press confirm and enter Video folder As picture above 20090103 means the folder that built in 3rd Jan of 2009 One fold for each day Video files As picture above 18334...

Page 17: ...DV ENGLISH USER MANUAL 16 Video play Use and to select a video for playing and press to start play or pause Long press and to toggle forward backward selection X2 X4 X8 X20 X1 default Press to play or...

Page 18: ...or to select the folder and press confirm and enter For the audio files that already exist please use and to select the content and press confirm and playing Playing interface Press and to adjust the...

Page 19: ...Sport DV ENGLISH USER MANUAL 18 Photo folders Press and to choose photo folders press to enter Photo playback Press and to view other photos Remark Photo format is JPG and resolution is 640 480...

Page 20: ...ss to confirm or select Cancel to quit operation Use and to select YES or NO Use to confirm delete or quit ALL Delete all data CURRENT Delete the file to be selected CANCEL Cancel the delete operation...

Page 21: ...on setting Use and to select the content you need Record setting Use and to select REC setting menu press to confirm and enter RECORDING MODE Press enter Recording Mode use and to select the recording...

Page 22: ...Sport DV ENGLISH USER MANUAL 21 RESOLUTION Use and to select Resolution Press to confirm and enter Use and to select the suitable resolution press to confirm and quit...

Page 23: ...resolution press to confirm and quit Storage memory information form Quality Resolution High Medium Low Battery time 720x576 45MB 36MB 20MB Approx 1 hour and 40 minutes 720x480 43MB 33MB 18MB Approx...

Page 24: ...Audio Use and to select the internal or external Microphone Press to confirm and quit Press start recording Notice The standard Button Camera without Microphone you need to select internal microphone...

Page 25: ...E DISPLAY Use and to select Time Display menu and press to confirm and enter Use and to select Yes display time or No according to your need Press to confirm and quit Remark The video time stamp shows...

Page 26: ...Cover menu and press to confirm and enter Use and to select Yes Automatic Cover or No according to your need Automatic cover function While using this function the system will delete the earliest file...

Page 27: ...Sport DV ENGLISH USER MANUAL 26 Select Memory Use and to select Storage menu Press to confirm and enter Use and to select Memory or Micro SD menu press to confirm and quit...

Page 28: ...nd Date setting Use and to select Date Time setting Press to confirm and enter Date display form setting Use and to select Date Format menu and press to confirm and enter Use and to select the suitabl...

Page 29: ...press to confirm and enter Use to select the setting content use and to do the setting then press save the setting and quit Time setting Use and to select Time Setting Menu press to confirm and enter...

Page 30: ...uage menu then press to confirm and enter Use and to select the suitable language then press to save and quit Video output Use and to select Video Output menu then press to confirm and enter Use and t...

Page 31: ...ault setting is Never power off automatically please use and to change the time according to your need 5Mins means power off automatically after 5 minutes if without operation 10Mins means power off a...

Page 32: ...LCD off press use and to select the suitable time according to your need 1Mins means LCD off after 1 minute if without operation 5Mins means LCD off after 5 minutes if without operation Press to conf...

Page 33: ...rate notice setting Use and to select Vibrate setting then press to confirm and enter Use and to select On or Off press to confirm and quit Select On menu The DVR will vibrate while no video signal or...

Page 34: ...R MANUAL 33 Key press sound setting Use and to select Key press sound menu then press to confirm and enter Use and to select On or Off press to confirm and quit Select Off menu turn off the sound whil...

Page 35: ...ing Use and to select Brightness menu then press to confirm and enter Use and to select increase or decrease the brightness according to your preference then press to confirm and quit Different bright...

Page 36: ...n press to confirm and enter Use and to select Yes or No YES Format the default memory card After press the system will format the card memory NO Without any operation and quit The data won t restore...

Page 37: ...mat should not be changed Copy the released firmware under the root director of a memory card then insert the card into the slot of the DVR Enter the setting menu use and to select Firmware Update men...

Page 38: ...Sport DV ENGLISH USER MANUAL 37 Factory Setting Use and to select Factory Setting Press to confirm entering Use and to select recover or not Press to confirm and quit...

Page 39: ...Sport DV ENGLISH USER MANUAL 38 Memory capacity information Enter the setting menu use and to select Memory info menu and then press to check Firmware version model year month day hour...

Page 40: ...MANUAL 39 Accessories DVR x 1 CMOS camera x 1 Battery x 1 AC charger x 1 AV input cable x 1 AV output cable x 1 USB cable x 1 CDR x 1 RF remote controller x 1 Protective pack x 1 Bracket x 4 Manual x...

Page 41: ...QVGA 320 240 30fps Video format AVI MPEG 4 Audio format WAV Built in flash memory 128MB Memory compatibility Trans Flash Card 256MB 32GB USB Jack High speed USB 2 0 AV In Jack 3 rings with 2 5mm AV O...

Page 42: ...s 648x488 Effective pixels 648x488 Horizontal resolution 380 TV lines S N ratio More than 45 dB AGC off Sensitivity 3 Lux 30 IRE F2 0 Sync System Internal Video output 1 Vp p Composite 75 unbalanced P...

Page 43: ...Sport DV ENGLISH USER MANUAL 42...

Page 44: ...Sport DV ENGLISH USER MANUAL 43...

Reviews: