17
SWITCH OFF
TO AVOID UNEXPECTED OR UNIN-
TENTIONAL START-UP, MAKE SURE
THAT THE POWER SWITCH IS IN
THE OFF POSITION BEFORE CON-
NECTING TO A POWER SOURCE.
BASIC ADJUSTMENTS & CONTROLS
TO REDUCE THE RISK OF SHOCK OR FIRE DO NOT OPERATE THE UNIT WITH A DAMAGED POWER CORD OR PLUG. RE-
PLACE DAMAGED CORD OR PLUG IMMEDIATELY. TO AVOID UNEXPECTED OR UNINTENTIONAL START-UP, MAKE SURE
THE POWER SWITCH IS IN THE OFF POSITION BEFORE CONNECTING TO A POWER SOURCE.
CONNECTING TO A POWER SOURCE
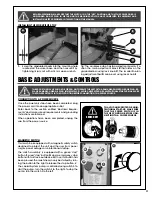
Once the assembly steps have been completed, plug
the power cord into an appropriate outlet.
Refer back to the section entitled “Electrical Require-
ments” and make sure all requirements and grounding
instructions are followed.
When operations have been completed, unplug the
saw from the power source.
F
G
H
I
J
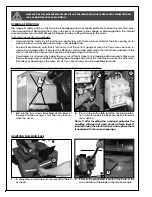
MAGNETIC SWITCH
This machine is equipped with a magnetic safety switch
designed to protect the unit and the user from power
surges, power outages or unintentional start-up.
The switch assembly is equipped with a green “start”
button
F
, a red “stop” button
G
and a emergency stop
button with twist lock-out device
H
. Once this button has
been pressed, the machine can only be started by turn-
ing the button to the right to release the stop button,
J
.
The coolant system pump is controlled using switch
I.
To
start the pump, turn the switch
I
to the right. To stop the
pump, turn the switch
I
to the left.
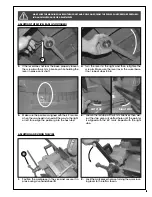
INSTALLING THE WORKPIECE STOP
1.
Screw the graduated bar
A
into the mounting hole
located on the swivel base, and then secure it by
tightening its jam nut with a 14 mm open wrench.
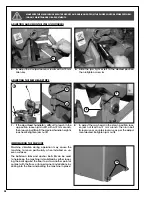
Tip: The workpiece stop has two adjustment points: Po-
sition the main adjustment block
B
that slides on the
graduated bar using lock knob
C
. The smaller fine-tun-
ing adjustment bar
D
can be set using lock knob
E
.
A
BEFORE ASSEMBLING, MAKE SURE THAT THE SWITCH IS IN THE “OFF” POSITION AND THAT THE POWER CORD IS
UNPLUGGED. DO NOT PLUG IN OR TURN ON THE MACHINE UNTIL YOU HAVE COMPLETED THE ASSEMBLY AND
INSTALLATION STEPS DESCRIBED IN THIS SECTION OF THE MANUAL.
C
E
B
D


