background image

Operation

12

Automatic Transfer Switch Owner’s Manual

Close to Generator Source Side

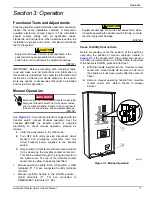
Before proceeding, verify the position of the switch by
observing the position of the manual operation handle in

Figure 3-1

If the handle is DOWN, the contacts are

closed in the generator (standby) position. No further
action is required. If the handle is UP, proceed with Step 1.

1.

With the handle inserted into the movable contact
carrier arm, move the handle DOWN. Be sure to
hold on to the handle as it will move quickly after
the center of travel.

2.

Remove manual operating handle from movable
contact carrier arm. Return handle to storage
bracket.

Return to Utility Source Side

1.

Manually actuate switch to return manual operating
handle to the UP position.

2.

Remove manual operating handle from movable
contact carrier arm. Return handle to storage
bracket.

Voltage Checks

NOTE: 

Use the Digital Multimeter (DMM) LowZ low input

impedance setting to collect accurate voltage
measurements. LowZ eliminates the possibility of
inaccurate ghost voltage readings, also known as
phantom voltage or stray voltage readings. Refer to the
DMM manufacturer’s literature for additional information.

Utility Voltage Checks

1.

Turn ON the utility power supply to the transfer
switch using the utility service disconnect circuit
breaker.

2.

With an accurate AC voltmeter, check for correct
voltage. Measure across ATS terminal lugs N1 and
N2; N1 to NEUTRAL and N2 to NEUTRAL.

Generator Voltage Checks

1.

On the generator panel, select the MANUAL mode
of operation. The generator should crank and start.

2.

Let the generator stabilize and warm up at no-load
for at least five minutes.

3.

Set the generator's main circuit breaker (CB1) to its
ON or CLOSED position.

4.

With an accurate AC voltmeter and frequency
meter, check the no-load, voltage and frequency.
Measure across ATS terminal lugs E1 to E2; E1 to
NEUTRAL and E2 to NEUTRAL.

5.

When certain that generator supply voltage is
correct and compatible with transfer switch ratings,
turn OFF the generator supply to the transfer switch.

6.

Set the generator main circuit breaker (CB1) to
OFF or OPEN.

7.

On the generator panel, select the OFF mode to
shut down the generator.

NOTE: Do NOT proceed until generator AC output
voltage and frequency are correct and within stated
limits. If the no-load voltage is correct but no-load
frequency is incorrect, the engine governed speed
may require adjustment. If no-load frequency is
correct but voltage is not, the voltage regulator may
require adjustment.

Generator Tests Under Load

1.

Set the generator main circuit breaker to OFF or
OPEN.

2.

Set the utility service disconnect circuit breaker of
the transfer switch to OFF or OPEN, and turn OFF
or OPEN all load circuit breakers.

3.

Manually actuate the transfer switch main contacts
to the emergency (standby) position. See 

Manual

Operation

.

4.

To start the generator, select the MANUAL mode of
operation. When engine starts, let it stabilize for a
few minutes, and close lid.

(000129)

DANGER

Electrocution. High voltage is present at 
transfer switch and terminals. Contact with live 
terminals will result in death or serious injury.


(000123)

DANGER

Electrocution. Turn utility supply OFF before 
working on utility connections of the transfer 
switch. Failure to do so will result in death or 
serious injury.


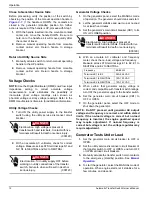
Frequency

60–62 Hz

Terminals E1 to E2

240–246 VAC

Terminals E1 to NEUTRAL

120–123 VAC

Terminals E2 to NEUTRAL

120–123 VAC

(000129)

DANGER

Electrocution. High voltage is present at 
transfer switch and terminals. Contact with live 
terminals will result in death or serious injury.


Summary of Contents for RXSW200A3F

Page 1: ...XSW200A3F SERIAL NUMBER _________________________ DATE PURCHASED ________________________ WWW GENERAC COM 888 436 3722 Para español visita http www generac com service support product support lookup Pour le français visiter http www generac com service support product support lookup SAVE THIS MANUAL FOR FUTURE REFERENCE 003722 ...

Page 2: ... contains or emits chemicals known to the state of California to cause cancer birth defects and other reproductive harm 000004 WARNING California Proposition 65 Engine exhaust and some of its constituents are known to the state of California to cause cancer birth defects and other reproductive harm ...

Page 3: ...lity Source Side 11 Close to Generator Source Side 12 Return to Utility Source Side 12 Voltage Checks 12 Utility Voltage Checks 12 Generator Voltage Checks 12 Generator Tests Under Load 12 Checking Automatic Operation 13 Installation Summary 13 Shutting Generator Down While Under Load 13 Shutting Generator Down To Perform Maintenance 14 Testing The SACM 14 Testing The SMM 14 Fuse Removal and Insta...

Page 4: ...iv Automatic Transfer Switch Owner s Manual This page intentionally left blank ...

Page 5: ...e that might involve a hazard The warnings in this manual and on tags and decals affixed to the unit are therefore not all inclusive If using a procedure work method or operating technique that the manufacturer does not specifically recommend verify that it is safe for others Also make sure the procedure work method or operating technique utilized does not render the equipment unsafe Safety Symbol...

Page 6: ...f the transfer switch Failure to do so will result in death or serious injury 000157 DANGER Electrocution Do not disable or modify the connection box door safety switch Doing so will result in death or serious injury Automatic start up Disconnect utility power and render unit inoperable before working on unit Failure to do so will result in death or serious injury 000191 DANGER 000119 Equipment ma...

Page 7: ...y 000123 DANGER Electrocution Turn utility supply OFF before working on utility connections of the transfer switch Failure to do so will result in death or serious injury 000104 DANGER Electrocution Water contact with a power source if not avoided will result in death or serious injury 000188 DANGER Electrocution Do not wear jewelry while working on this equipment Doing so will result in death or ...

Page 8: ...Safety 4 Automatic Transfer Switch Owner s Manual This page intentionally left blank ...

Page 9: ... Install the transfer switch as close as possible to the electrical loads that are to be connected to it Mount the switch vertically to a rigid supporting structure To prevent switch distortion level all mounting points If necessary use washers behind mounting holes to level the unit Open Enclosure See Figure 2 1 First remove outer cover A 1 Remove two thumb screws B 2 Slide slot C over retention ...

Page 10: ...cal codes It is the responsibility of the installer to perform an installation that will pass the final electrical inspection 1 Connect utility supply at the utility service disconnect circuit breaker terminals N1 and N2 2 Connect utility neutral and ground to the Load Center Neutral and Ground terminals Neutral and Ground terminals on the Load Center are bonded to each other with a jumper wire 3 ...

Page 11: ... generator control wiring is a Class 1 signaling circuit Reference instruction manual of specific engine generator for wiring connection details Recommended wire gauge sizes for this wiring depends on the length of the wire as recommended in the following chart Exception Conductors of AC and DC circuits rated 1000 volts nominal or less shall be permitted to occupy the same equipment cable or condu...

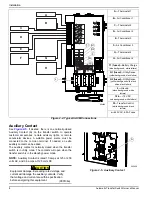
Page 12: ...y Contact A Thermostat 1 B Air Conditioner 1 C Thermostat 2 D Air Conditioner 2 E Thermostat 3 F Air Conditioner 3 G Thermostat 4 H Air Conditioner 4 T1 fused Battery Charge blue background white letters N1 fused Utility Sense yellow background black letters N2 fused Utility Sense yellow background with black stripe black letters 0 Ground black background white letters 194 12 VDC red background wh...

Page 13: ...ctive device protecting the transfer equipment be field marked on the exterior of the transfer equipment For NEC compliance verify the required short circuit current rating of the transfer switch before installation The completed label provides the local AHJ Authority Having Jurisdiction with the information he or she may require during inspection Apply the label to the exterior of the transfer sw...

Page 14: ...Installation 10 Automatic Transfer Switch Owner s Manual This page intentionally left blank ...

Page 15: ...s can be viewed through the long narrow slot in the inside cover The top of the movable contact carrier arm is yellow to be easily identified Manual operation handle in the UP position LOAD terminals T1 T2 are connected to utility terminals N1 N2 Manual operation handle in the DOWN position LOAD terminals T1 T2 are connected to EMERGENCY terminals E1 E2 Close to Utility Source Side Before proceedi...

Page 16: ...eaker CB1 to its ON or CLOSED position 4 With an accurate AC voltmeter and frequency meter check the no load voltage and frequency Measure across ATS terminal lugs E1 to E2 E1 to NEUTRAL and E2 to NEUTRAL 5 When certain that generator supply voltage is correct and compatible with transfer switch ratings turn OFF the generator supply to the transfer switch 6 Set the generator main circuit breaker C...

Page 17: ... the engine should crank and start when the utility source power is turned OFF after a five second delay factory default setting After starting the transfer switch should connect load circuits to the standby side after a five 5 second delay Let the system operate through its entire automatic sequence of operation With the generator running and loads powered by generator AC output set the utility s...

Page 18: ...ify that all of the connected loads to be shed become disabled 5 After five 5 minutes verify A C 1 is energized and Status LED A C 1 is ON 6 After another 15 seconds verify A C 2 is energized and Status LED A C 2 is ON 7 After another 15 seconds verify Load A C 3 is energized and Status LED Load A C 3 is ON 8 After another 15 seconds verify A C 4 is energized and Status LED A C 4 is ON Testing The...

Page 19: ...O 10000007892 REV B N A A SCALE 0 125 WT KG 40 524 SHEET 1 of 1 GENERAC POWER SYSTEMS OWNS THE COPYRIGHT OF THIS DRAWING WHICH IS SUPPLIED IN CONFIDENCE AND MUST NOT BE USED FOR ANY PURPOSE OTHER THAN FOR WHICH IT IS SUPPLIED WITHOUT THE EXPRESS WRITTEN CONSENT OF GENERAC POWER SYSTEMS c GENERAC POWER SYSTEMS 2013 ELECTRONICALLY APPROVED INSIDE WINDCHILL DRAWING CREATED FROM PRO ENGINEER 3D FILE E...

Page 20: ...Drawings and Diagrams 16 Automatic Transfer Switch Owner s Manual Interconnection Drawing No 10000017951 Sheet 1 of 4 Liquid Cooled Engine Generator ...

Page 21: ...Drawings and Diagrams Automatic Transfer Switch Owner s Manual 17 No 10000017951 Sheet 2 of 4 Liquid Cooled Engine Generator ...

Page 22: ...Drawings and Diagrams 18 Automatic Transfer Switch Owner s Manual No 10000017951 Sheet 3 of 4 Air Cooled Engine Generator ...

Page 23: ...Drawings and Diagrams Automatic Transfer Switch Owner s Manual 19 No 10000017951 Sheet 4 of 4 Air Cooled Engine Generator ...

Page 24: ...Drawings and Diagrams 20 Automatic Transfer Switch Owner s Manual This page intentionally left blank ...

Page 25: ...Drawings and Diagrams Automatic Transfer Switch Owner s Manual 21 This page intentionally left blank ...

Page 26: ...Drawings and Diagrams 22 Automatic Transfer Switch Owner s Manual This page intentionally left blank ...

Page 27: ......

Page 28: ...rights reserved Specifications are subject to change without notice No reproduction allowed in any form without prior written consent from Generac Power Systems Inc Generac Power Systems Inc S45 W29290 Hwy 59 Waukesha WI 53189 1 888 GENERAC 1 888 436 3722 www generac com ...

Reviews: