6
H i g h P r e s s u r e W a s h e r
GENER
A
C
Generac 1300PSI Electric High Pressure Washer
CARTON CONTENTS
Items in the carton include:
Main Unit
Cart Box (which includes instructions and hardware
to assemble the cart)
Parts Box (which includes the following):
Goggles
Owners Manual
Spray Gun
Nozzle Lance
Foamer
Rotary Brush
Turbo Nozzle
Utility Brush
High Pressure Hose
Parts Bag (which includes the following):
Nozzle Cleaning Kit
Bayonet adapter, must be used to attach the
brushes to the gun.
Quick Connect (male and female ends)
Refer to the above list for an illustrated listing of all
items included with your pressure washer. Become
familiar with each piece before assembling the pres-
sure washer. Check all contents against list. If any
parts are missing, call the pressure washer helpline at
1-800-270-1408.
HOW TO SET UP YOUR PRES-
SURE WASHER
Follow the instructions in the cart box to assemble
the cart and install it onto the main unit.
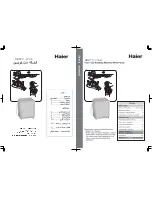
Unwind the high pressure hose and attach it to
spray gun (Figure 1).
Attach the high pressure hose to the high pressure
outlet and tighten by hand (Figure 2).
Included with this unit is a quick-connect fitting that
you must attach to the water inlet and your garden
hose. You can install the grey male connector by
hand but you may need to use an adjustable
wrench to tighten it (Figure 3).
Check the screen on the female connector. Make
sure it is clean and check for damage. If you see
any damage in the screen,
do not
use that female
connector.
Attach the female quick connect to your garden
hose.
Attach garden hose to the water inlet using the
quickconnect. The quickconnect should lock in
place. (Figure 4 on page 7).
A
A
SSSSE
EM
MB
BLL
Y
Y
Figure 1 — Attach High Pressure Hose to Spray
Gun.
Figure 2 — Attach High Pressure Hose to Main
Unit.
Figure 3 — Install Quick–Connect
Connect high pressure
hose here
Male QuickConnect
Female QuickConnect