background image


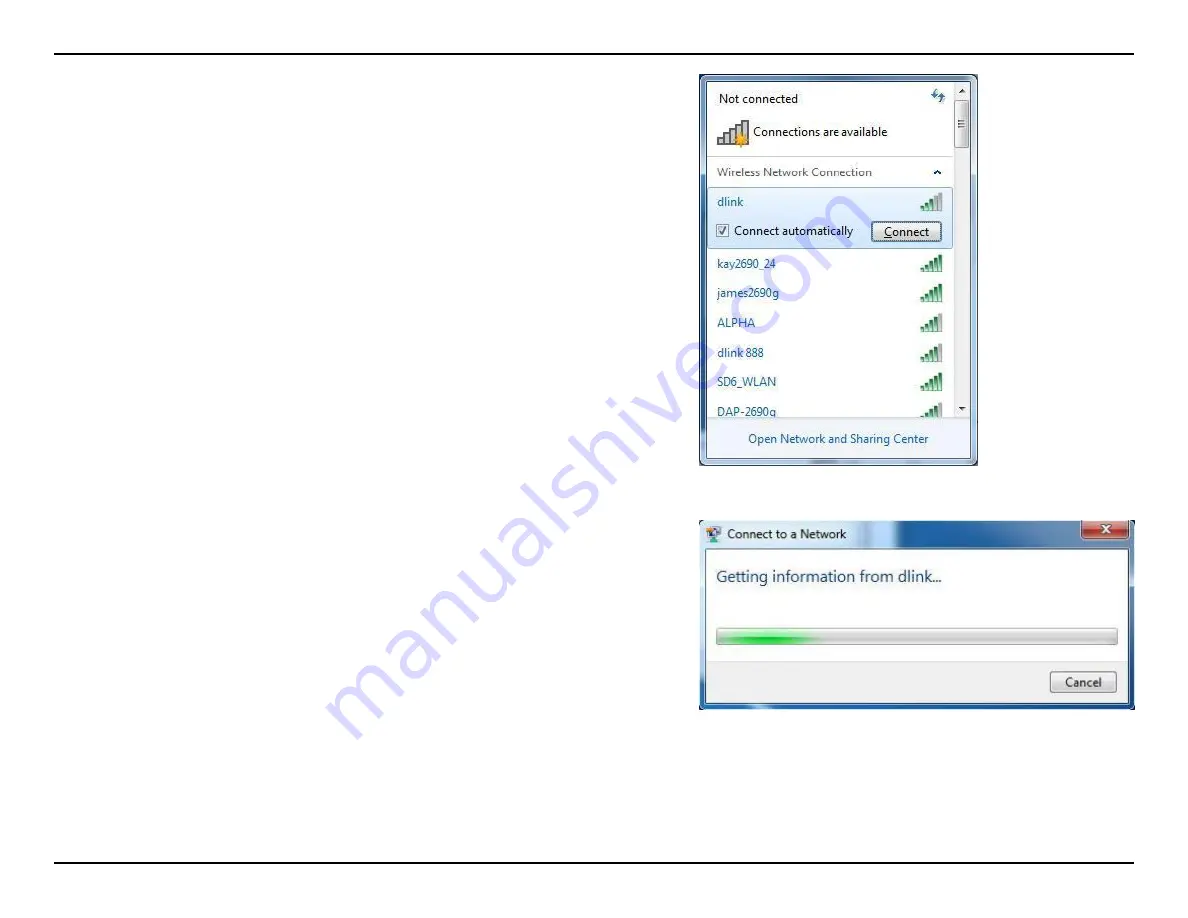
3.    Highlight the wireless network (SSID) you would like to connect to and click 

the Connect button. 


If you get a good signal but cannot access the Internet, check your TCP/IP 
settings for your wireless adapter. Refer to the Networking Basics section in 

this manual for more information. 


4.    The following window appears while your computer tries to connect to the 

router. 


Summary of Contents for WRTB-283N

Page 1: ...User Manual for WRTB 283N...

Page 2: ...ription Trademarks Gemtek and the Gemtek logo are trademarks or registered trademarks of Gemtek Corporation or its subsidiaries in the United States or other countries All other company or product nam...

Page 3: ...dapter CD ROM with Manual and Setup Wizard If any of the above items are missing please contact your reseller Note Using a power supply with a different voltage rating than the one included with the W...

Page 4: ...e following Windows Macintosh or Linux based operating system An installed Ethernet adapter Browser Requirements Internet Explorer 6 0 or higher Chrome 2 0 or higher Firefox 3 0 or higher Safari 3 0 o...

Page 5: ...and responsive providing a better Internet experience EXTENDED WHOLE HOME COVERAGE This high performance router provides superior Whole Home Coverage while reducing dead spots The WRTB 283N is design...

Page 6: ...in Name Filter Scheduling These filters can be scheduled to be active on certain days or for a duration of hours or minutes SecureMultiple ConcurrentSessions The WRTB 283N can pass through VPN session...

Page 7: ......

Page 8: ...ge Without any cumbersome cables or protruding antennas you can wirelessly share this disk space among family members stream stored music and video to media players attached to stereo systems or TV an...

Page 9: ...AN Ports 1 4 Connect Ethernet dvices such as computers switches and hubs 3 USB Connect a USB1 1 2 0 or 3 0 flash drive to configure the wireless settings using WCN 4 Rest Press and hold the reset butt...

Page 10: ...es a proper connection to the power supply LAN LED A solid light indicates a proper connection to the LAN WAN LED A solid light indicates a proper connection to the WAN USB LED A solid light indicates...

Page 11: ...e Ethernet port on your modem If you were using the USB connection before using the router then you must turn off your modem disconnect the USB cable and connect an Ethernet cable to the Internet port...

Page 12: ...t a 45 degree angle appears to be almost 3 feet 1 meter thick At a 2 degree angle it looks over 42 feet 14 meters thick Position devices so that the signal will travel straight through a wall or ceili...

Page 13: ......

Page 14: ...step by step instructions that follow are shown in Windows XP The steps and screens are similar for the other Windows operating systems If the CD Autorun function does not automatically start on your...

Page 15: ...er using the web based configuration utility Web based Configuration Utility To access the configuration utility open a web browser such as Internet Explorer and enter the IP address of the router 192...

Page 16: ......

Page 17: ...er your settings without running the wizard click Manual Configuration And skip to page 15 Click Next to continue Create a new password and then click Next to continue Select your time zone from the d...

Page 18: ...y to your modem If you are currently using that computer click Clone Your PC s MAC Address and then click Next to continue The Host Name is optional but may be required by some ISPs The default host n...

Page 19: ...Close your browser window and reopen it to test your Internet connection It may take a few tries to initially connect to the Internet...

Page 20: ...IP addresses assigned by your ISP These addresses are usually obtained automatically from your ISP Leave blank if you did not specifically receive these from your ISP MTU Maximum Transmission Unit you...

Page 21: ...and then retype the password in the next box Service Name Enter the ISP Service Name optional Reconnection Mode Select either Always on On Demand or Manual Maximum Idle Time Enter the Primary and Sec...

Page 22: ...PPTP password and then retype the password in the next box Reconnect Mode Select either Always on On Demand or Manual Maximum Idle Time Enter a maximum idle time during which the Internet connection...

Page 23: ...your L2TP username Enter your L2TP password and then retype the password in the next box Select either Always on On Demand or Manual Enter a maximum idle time during which the Internet connection is...

Page 24: ...Subnet Mask Enter the Subnet Mask assigned by your ISP Default Gateway Enter the Gateway assigned by your ISP DNS Servers The DNS server information wil be supplied by your ISP Internet Service Provid...

Page 25: ...to add your wireless clients to your router using WPS click Add Wireless Device with WPS and skip to page 75 If you want to configure your wireless settings manual y click Manual Wireless Connection S...

Page 26: ...283N to choose Channel Scan the channel with the least amount of interference Wireless Indicates the channel setting for the WRTB 283N By default the channel is set to 6 The Channel can be changed to...

Page 27: ......

Page 28: ...283N to choose the Channel Scan channel with the least amount of interference Wireless Indicates the channel setting for the WRTB 283N By default the channels set to 6 The Channel can be changed to f...

Page 29: ......

Page 30: ...P settings IP Address Enter the IP address of the router The default IP address is 192 168 1 1 If you change the IP address once you click Apply you will need to enter the new IP address in your brows...

Page 31: ...CP Server will automatically allocate an unused IP address from the IP address pool to the requesting computer You must specify the starting and ending address of the IP address pool Enable DHCP Check...

Page 32: ...Connection Click IPv6 Internet Connection Setup Wizard to begin Skip to page 29 If you want to configure your IPv6 Internet Connection manual y click Manual IPv6 Internet Connection Setup and skip to...

Page 33: ...d Link local If you are unsure of your connection method please contact your IPv6 Internet Service Provider Note If using the PPPoE option you will need to ensure that any PPPoE client software on you...

Page 34: ...Link Local Address Displays the Router s LAN Link Local Address Enable Autoconfiguration Check to enable the Autoconfiguration feature Autoconfiguration Type Select Stateful DHCPv6 IPv6 Address Range...

Page 35: ......

Page 36: ...der ISP LAN IPv6 Address Enter the LAN local IPv6 address for the router LAN Link Local Address Displays the Router s LAN Link Local Address Enable Autoconfiguration Check to enable the Autoconfigurat...

Page 37: ...Pv6 Address Enter the LAN local IPv6 address for the router LAN Link Local Address Displays the Router s LAN Link Local Address Enable Autoconfiguration Check to enable the Autoconfiguration feature A...

Page 38: ...ndary DNS Enter the primary and secondary DNS server addresses Address LAN IPv6 Address Enter the LAN local IPv6 address for the router LAN Link Local Address Displays the Router s LAN Link Local Addr...

Page 39: ...elect either Always on On Demand or Manual Maximum Idle Time Enter a maximum idle time during which the Internet connection is maintained during inactivity To disable this feature enable Auto reconnec...

Page 40: ...dress Range Start Enter the start IPv6 Address for the DHCPv6 range for your local computers IPv6 Address Range End Enter the end IPv6 Address for the DHCPv6 range for your local computers IPv6 Addres...

Page 41: ...PPPoE only Enter your PPPoE user name Enter your PPPoE password and then retype the password in the next box Enter the ISP Service Name optional Select either Always on On Demand or Manual Enter a max...

Page 42: ...nfiguration Autoconfiguration Type Router Advertisement Lifetime Check to enable the Autoconfiguration feature Select either SLAAC RDNSS or SLAAC Stateless DHCPv6 Enter the Router Advertisement Lifeti...

Page 43: ...LAN Link Local Displays the Router s LAN Link Local Address Address Enable Check to enable the Autoconfiguration feature Autoconfiguration Autoconfiguration Select Stateful DHCPv6 Type IPv6 Address R...

Page 44: ...provider ISP Settings LAN IPv6 Address Enter the LAN local IPv6 address for the router LAN Link Local Address Displays the Router s LAN Link Local Address Enable Check to enable the Autoconfiguration...

Page 45: ...cal IPv6 address for the router LAN Link Local Address Displays the Router s LAN Link Local Address Enable Check to enable the Autoconfiguration feature Autoconfiguration Autoconfiguration Type Select...

Page 46: ......

Page 47: ...and secondary DNS server addresses Address LAN IPv6 Address Enter the LAN local IPv6 address for the router LAN Link Local Address Displays the Router s LAN Link Local Address Enable Autoconfiguration...

Page 48: ...v6 Address Enter the LAN local IPv6 address for the router LAN Link Local Address Displays the Router s LAN Link Local Address Enable Autoconfiguration Check to enable the Autoconfiguration feature Au...

Page 49: ...l Address Displays the Router s LAN Link Local Address Enable Autoconfiguration Check to enable the Autoconfiguration feature Autoconfiguration Type Select Stateful DHCPv6 IPv6 Address Range Start Ent...

Page 50: ...Link Local Connectivity My IPv6 Connection Select Link Local Only from the drop down menu LAN IPv6 Address Displays the IPv6 address of the router Settings...

Page 51: ...Parental Controls...

Page 52: ...be listed in the Computer Name drop down menu Select your computer and click TCP UDP Enter the TCP and or UDP port or ports that you want to open You can enter a single port or a range of ports Separ...

Page 53: ...pendent Any incoming traffic sent to an open port will be forwarded to the application that opened the port The port will close if idle for 5 minutes Address Restricted Incoming traffic must match the...

Page 54: ...rough NAT This ALG may interfere with the operation of such VPN clients If you are having trouble connecting with your corporate network try turning this ALG off Please check with the system adminstra...

Page 55: ...f the route please note that the octets must match your destination IP address Gateway Enter your next hop gateway to be taken if this route is used Metric The route metric is a value from 1 to 16 tha...

Page 56: ......

Page 57: ...tes Threshold determines whether packets will be fragmented Packets exceeding the 2346 byte setting will be fragmented before transmission 2346 is the default setting DTIM Interval Delivery Traffic In...

Page 58: ...PIN at any time Only the Administrator admin account can change or reset the PIN Current PIN Shows the current value of the router s PIN Reset PIN to Restore the default PIN of the router Default Gene...

Page 59: ......

Page 60: ...IPv6 Routing This page allows you to specify custom routes that determine how data is moved around your network...

Page 61: ...SysLog server on your network Enable Logging to Check this box to send the router logs to a SysLog Server SysLog Server SysLog Server IP The address of the SysLog server that wil be used to send Addre...

Page 62: ...Local Hardsettings First click the Browse button to locate a previously Drive saved configuration file and then click the Load button to transfer those settings to the router Restore to Factory This o...

Page 63: ...tek support site for firmware updates at http support dlink com You can download firmware upgrades to your hard drive from the Gemtek support site Firmware Upgrade Click on Check Now to find out if th...

Page 64: ...an enter in your domain name to connect to your server no matter what your IP address is DDNS Dynamic Domain Name System is a method of keeping a domain name linked to a changing IP Address Check the...

Page 65: ...ck All Day 24hrs or enter a start and end time for your schedule Save Click Save to save your schedule You must click Save Settings at the top for your schedules to go into effect Schedule Rules List...

Page 66: ...be displayed Use Disconnect to drop the PPPoE connection and use Connect to establish the PPPoE connection General Displays the router s time and firmware version WAN Displays the MAC address and the...

Page 67: ......

Page 68: ...creen below displays the Traffic Statistics Here you can view the amount of packets that pass through the WRTB 283N on both the Internet and the LAN ports The traffic counter will reset if the device...

Page 69: ...Wireless The wireless client table displays a list of current connected wireless clients This table also displays the connection time and MAC address of the connected wireless clients...

Page 70: ...The IPv6 table displays a list of current IPv6 connections IPv6...

Page 71: ...cryption Standard AES instead of TKIP User authentication which is generally missing in WEP through the extensible authentication protocol EAP WEP regulates access to a wireless network based on a com...

Page 72: ......

Page 73: ...ow the steps below 1 Plug in USB Flash Drive in USB port on the back of the router 2 Press and hold the WPS button located on the front of the router for 5 seconds The power LED will blink 3 Wait 10 s...

Page 74: ...6 Click Yes to add the current computer to your wireless network 7 Click OK to finish adding your computer to your wireless network Repeat step 4 7 to add additional computers to your wireless network...

Page 75: ...Wireless Security Setup Wizard To run the security wizard click on Setup at the top and then click Launch Wireless Security Setup Wizard Click Next to continue...

Page 76: ...will show you your Pre Shared Key to enter on your wireless clients Click Save to finish the Security Wizard If you selected WPA Enterprise the RADIUS information will be displayed Click Save to finis...

Page 77: ...Mode select WPA Personal 3 Next to WPA Mode select Auto WPA2 Only or WPA Only Use Auto if you have wireless clients using both WPA and WPA2 4 Next to Group Key Update Interval enter the amount of time...

Page 78: ......

Page 79: ...ly or WPA Only Use Auto if you have wireless clients using both WPA and WPA2 4 Next to Group Key Update Interval enter the amount of time before the group key used for broadcast and multicast data is...

Page 80: ......

Page 81: ...10 Click Advanced to enter settings for a secondary RADIUS Server 11 Click Apply Settings to save your settings...

Page 82: ...Wireless Configuration The following steps allow you to configure your WRTB 283N wireless network settings using Windows 7 through WPS 1 Click the Start button and select Computer from the Start menu...

Page 83: ......

Page 84: ...3 Double click the WRTB 283N router 4 Input the WPS PIN number displayed in the Advanced Wi Fi Protected Setup section in the Router s Web UI and click Next WRTB 283N...

Page 85: ...5 Type a name for your wireless network 6 To configure advanced settings click the Click Next to continue icon...

Page 86: ......

Page 87: ...your wireless router or access point before configuring your wireless adapter If you are joining an existing network you will need to know the security key or passphrase being used 1 Click on the wir...

Page 88: ......

Page 89: ...Connect button If you get a good signal but cannot access the Internet check your TCP IP settings for your wireless adapter Refer to the Networking Basics section in this manual for more information 4...

Page 90: ...hat is on your router and click Ok It may take 20 30 seconds to connect to the wireless network If the connection fails please verify that the security settings are correct The key or passphrase must...

Page 91: ...e the Wireless Networks Detected bubble click on the center of the bubble to access the utility or Right click on the wireless computer icon in your system tray lower right corner next to the time Sel...

Page 92: ......

Page 93: ...pter If you are joining an existing network you will need to know the security key or passphrase being used 1 Open the Windows Vista Wireless Utility by right clicking on the wireless computer icon in...

Page 94: ......

Page 95: ...is on your router and click Connect It may take 20 30 seconds to connect to the wireless network If the connection fails please verify that the security settings are correct The key or passphrase mus...

Page 96: ...ity as seen below If you receive the Wireless Networks Detected bubble click on the center of the bubble to access the utility or Right click on the wireless computer icon in your system tray lower ri...

Page 97: ......

Page 98: ...u are joining an existing network you will need to know the passphrase being used 1 Open the Windows XP Wireless Utility by right clicking on the wireless computer icon in your system tray lower right...

Page 99: ......

Page 100: ...r the WPA PSK passphrase and click Connect It may take 20 30 seconds to connect to the wireless network If the connection fails please verify that the WPA PSK settings are correct The WPA PSK passphra...

Reviews: