.... Quick start up guide
Specification and installation
AC Drive
Vector inverter for
Hybrid injection molding machines
ADP200
Page 1: ... Quick start up guide Specification and installation AC Drive Vector inverter for Hybrid injection molding machines ADP200 ...
Page 2: ...ed with the Firmware ver rel PAR 490 parameter menu 2 6 General information Note In industry the terms Inverter Regulator and Drive are sometimes interchanged In this document the terms Drive and Inverter will be used Before using the product read the safety instruction section carefully Keep the manual in a safe place and available to engineering and installation personnel during the product func...
Page 3: ...external fuses 19 5 1 1 Network side fuses F1 19 5 2 Input chokes 20 5 2 1 AC input chokes 20 5 2 2 DC input chokes 21 5 3 AC output chokes 21 5 4 External braking resistors optional 22 5 5 EMC Filter 23 6 Mechanical installation 24 6 1 Maximum inclination and assembly clearances 24 6 2 Fastening positions 25 7 Wiring Procedure 26 7 1 Power section 28 7 1 1 Cable cross sections 28 7 1 2 Connection...
Page 4: ... first and second level menus 54 8 3 2 Display of a parameter 54 8 3 3 Scanning of the parameters 55 8 3 4 List of the last parameters modified 55 8 3 5 Parameter modification 55 8 3 6 How to save parameters 56 8 3 7 Configuration of the display 57 8 3 7 1 Language selection 57 8 3 7 2 Selection of Easy Expert mode 57 8 3 8 Startup display 57 8 3 9 Back lighting of the display 57 8 3 10 Alarms 57 ...
Page 5: ...t aid trained in the proper care and use of protective equipment in accordance with established safety procedures trained and authorized to energize de energize clear ground and tag circuits and equipment in accordance with established safety procedures Personne qualifiée Aux fins de ce manuel d instructions le terme personne qualifiée désigne toute personne compétente en matière d installation de...
Page 6: ...abled may cause accidental movements if it has not been disconnected from the mains supply En cas de panne et même désactivé le drive peut provoquer des mouvements fortuits s il n a pas été débranché de l alimentation secteur Electrical Shock The DC link capacitors remain charged at a hazardous voltage even after cutting off the power supply Never open the device or covers while the AC Input power...
Page 7: ...1 V Current 0 20 mA or 4 20mA 2 relay outputs RO 1 motor protection input MOT compatible with PTC KTY Klixon Encoder configuration EXP RES I1 ADP Resolver encoder Excitation Frequency from 2 0 to 10 kHz Transformation ratio from 0 1 to 1 0 Excitation Voltage from 1 1 Vrms to 5 6 Vrms Optional cards can be supplied on request for specific requirements I O Optional card EXP IO D10A3R2 ADP 1 enable i...
Page 8: ...injection molding machine application 1 Flow and pressure limit control Pressure sensor status control Adaptive Feedforward Automatic switchover between closed loop speed and pressure control Speed and pressure control loops tuning Pump Rotation direction identification Multipump convergent and divergent control ...
Page 9: ...ins supply voltage 2 Mains choke see chapter 5 2 3 Three phase rectifier bridge Converts AC voltage into DC voltage via a three phase full wave bridge 4 Intermediate circuit With pre load resistor and levelling capacitors DC voltage Udc 2 x mains voltage Uln 5 IGBT inverter bridge Converts DC voltage into three phase AC voltage with variable amplitude and frequency 6 Configurable control section C...
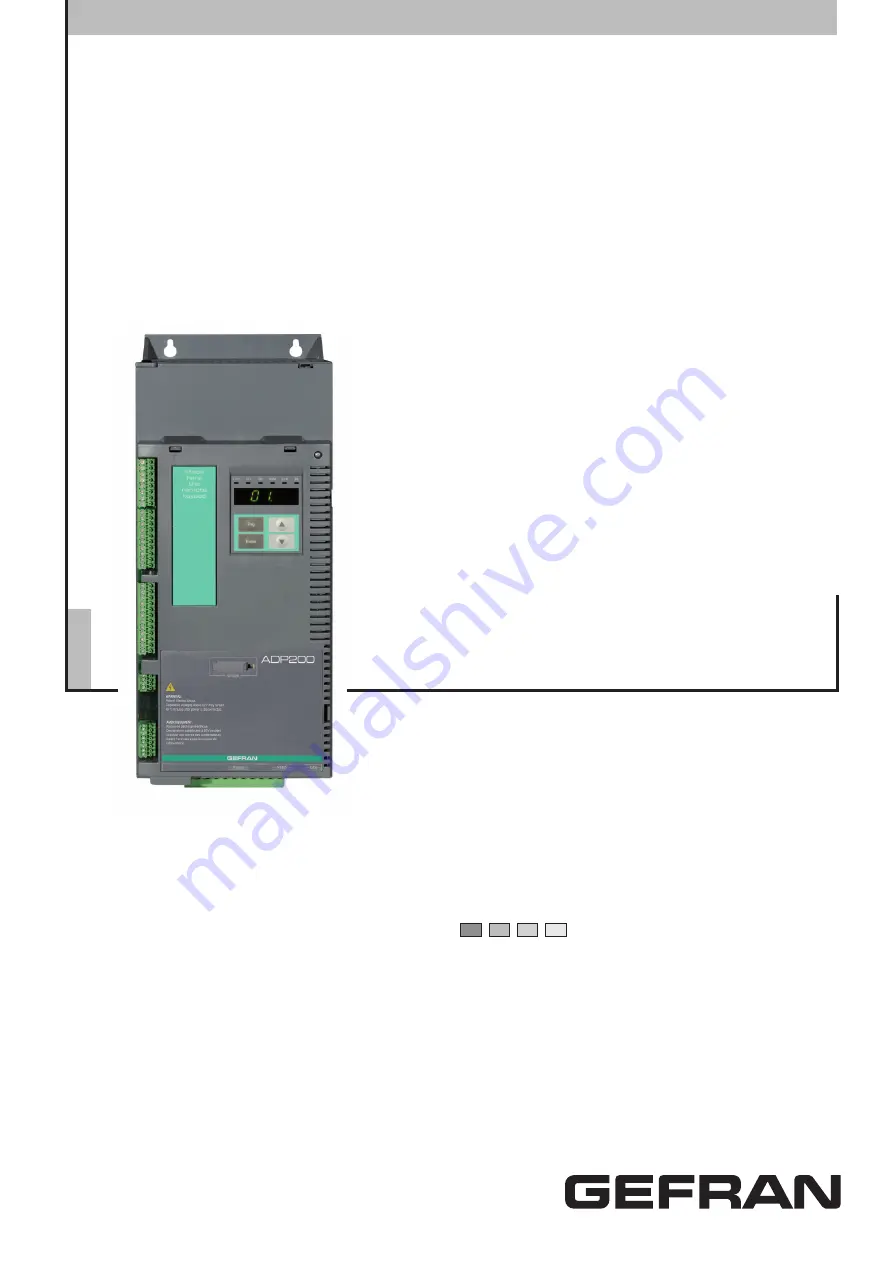
Page 10: ...ase EMI Filter F included PID IMM application P included Braking unit X not included B included Keypad K included 1 line x 4 character alpha numerical LED display Inverter power in kW 075 7 5kW 110 11kW 150 15kW 185 18 5kW 220 22kW 300 30kW 370 37kW 450 45kW 550 55kW 750 75kW Mechanical dimensions of the drive 2 size 2 3 size 3 4 size 4 5 size 5 5S size 5 slim Servodrive ADP200 series Data plate F...
Page 11: ...king the ADP200 Drives and preparing them for delivery They should only be transported with suitable transport equipment see weight data Observe the instructions printed on the packaging This also applies when the device is unpacked and installed in the control cabinet Upon delivery check the following the packaging for any external damage whether the delivery note matches your order Open the pack...
Page 12: ...r pressure operating kPa from 70 to 106 4 2 Standards Immunity emissions In compliance with EN61800 3 Conducted emission C2 up to 11kW and C3 with F configuration Climatic conditions EN 60721 3 3 Electrical safety EN 50178 EN 61800 5 1 Vibration Class 3M1 EN 60721 3 3 EMC compatibility EN 61800 3 Protection degree IP20 Approvals 4 3 Precision 4 3 1 Speed control Speed control precision Flux vector...
Page 13: ...put voltage U2 0 98 x Uln Uln AC input voltage Maximum output frequency f2 300 Hz Size In Rated output current fsw default Pn mot Recommended motor power fsw default fsw 4 Switching frequency Reduction factor IGBT braking unit Uln 230Vac Uln 400Vac Uln 460Vac Uln 230Vac Uln 230Vac Uln 400Vac Uln 460Vac Other Default Kt Kalt Kv A A A kW Hp kW Hp kHz kHz 1 2 3 2075 18 5 18 5 16 7 4 5 7 5 10 8 4 0 9 ...
Page 14: ...witching frequency of 4kHz and with drive used in continuous operation at nominal current plus fast and slow overload During operation at variable switching frequency the drive automatically switches from working frequency of 8kHz to 4kHz when the temperature of the heat sink exceeds the threshold T heatsink th see Figure 4 5 2 Note S Accessories brake resistors filters EMI and external AC input c...
Page 15: ... is 5 minutes This value takes into account the time to turn off an inverter supplied at 460 Vac 10 without any options time indicated for disabled inverter condition 4 8 Cooling All inverters are equipped with internal fans Size Pv Heat dissipation Fan capacity Minimum cabinet opening for cooling Uln 230 460Vac Heat sink m3 h Internal m3 h cm2 2075 220 2 x 58 144 2110 250 2 x 35 144 3150 350 2 x ...
Page 16: ... B C A C Sizes Dimensions Width x Height x Depth Weight mm inches kg lbs ADP200 2075 162 x 396 x 159 6 38 x 15 59 x 6 26 7 8 17 2 ADP200 2110 Figure 4 9 2 Size 3 dimensions 179 4 235 392 401 155 8 23 6 9 374 7 168 218 3 164 5 5 11 5 5 5 7 5 3 17 A B C A B C Sizes Dimensions Width x Height x Depth Weight mm inches kg lbs ADP200 3150 235 x 401 x 179 4 9 25 x 15 79 x 7 06 10 5 23 15 ADP200 3185 ADP20...
Page 17: ...dth x Height x Depth Weight mm inches kg lbs ADP200 4300 267 6 x 616 x 276 10 53 x 24 25 x 10 87 32 70 6 ADP200 4370 ADP200 4450 Figure 4 9 4 Size 5 dimensions 55kW 297 747 5 767 304 8 331 4 17 21 20 14 15 14 145 19 234 31 2 220 265 730 4 6 5 19 13 6 5 A B A B 311 Sizes Dimensions Width x Height x Depth Weight mm inches kg lbs ADP200 5550 311 x 767 x 331 4 12 2 x 30 2 x 13 05 60 132 3 ...
Page 18: ... x Height x Depth Weight mm inches kg lbs ADP200 5750 311 x 784 x 332 8 12 2 x 30 8 x 13 1 60 132 3 Figure 4 9 6 Size 5S dimensions 55 75kW 630 300 15 17 21 14 1 4 20 157 5 70 55 10 35 9 25 13 R3 25 6 5 6 5 R3 25 3 5 A DETTAGLIO 3 5 B DETTAGLIO 17 5 265 9 613 40 220 A B 332 305 192 Sizes Dimensions Width x Height x Depth Weight mm inches kg lbs ADP200 5S550 ADP200 5S750 300 x 630 x 332 11 8 x 24 8...
Page 19: ...0 50000 Z22GR63 F4M17 A70P60 4 S7I34 3185 20000 50000 Z22GR80 F4M19 A70P80 S7G54 3220 20000 50000 Z22GR80 F4M19 A70P80 S7G54 4300 25000 Z22GR80 F4M19 A70P80 S7G54 4370 25000 Z22GR100 F4M21 A70P100 S849B 4450 25000 Z22GR100 F4M21 A70P100 S849B 5550 25000 S00 üf1 80 200A 690V F4G23 A70P200 S7G58 5750 25000 S00 üf1 80 200A 690V F4G23 A70P200 S7G58 5S550 25000 50000 S00 üf1 80 200A 690V F4G23 A70P200 ...
Page 20: ...e 2075 7 5 24 20 0 89mH LR3y 2075 S7AB6 986 75 50 2110 11 28 25 0 68mH LR3y 3110 S7AB7 1 172 75 50 3150 15 40 35 0 51mH LR3y 3150 S7AB8 1 705 75 50 3185 18 5 48 44 0 35mH LR3 22 S7FF4 2 078 75 50 3220 22 51 47 0 35mH LR3 22 S7FF4 2 238 75 50 4300 30 65 45 4370 37 80 45 4450 45 99 45 5550 55 116 45 5750 75 161 45 5S550 55 120 0 13mH LR3 055 S7FF1 55 5S750 75 161 0 15mH LR3 090 S7D19 45 AC mains 480...
Page 21: ...ed for use with inverters do not require any specific filtering of output from the inverter For standard motors especially with long cable runs typically over 100 m an output choke may be necessary to maintain the voltage waveform with the specified limits The range of recommended chokes are listed in the following table The rated current of the chokes should be approx 20 higher than that of the i...
Page 22: ... 65 1 4 3220 SRF 600 T 18R 320 12 6 x 27 1 06 x 36 1 42 0 65 1 4 4300 SRF 1K0 T 12R 320 12 6 x 100 3 93 x 30 1 18 2 35 5 2 4370 SRF 1K0 T 12R 320 12 6 x 100 3 93 x 30 1 18 2 35 5 2 4450 SRF 1K0 T 10R 320 12 6 x 100 3 93 x 30 1 18 2 35 5 2 5550 5S550 SRF 1K0 T 8R 320 12 6 x 100 3 93 x 30 1 18 2 35 5 2 5750 5S750 SRF 1K0 T 8R 320 12 6 x 100 3 93 x 30 1 18 2 35 5 2 Pnbr Braking resistor rated power R...
Page 23: ...TF 480 16 S7GHO 250 9 84 x 45 1 77 x 70 2 76 0 8 1 8 EN 61800 3 C3 30 m ADP200 2110 EMI FTF 480 30 S7GHP 270 10 63 x 50 1 97 x 85 3 35 1 2 2 ADP200 3150 EMI FTF 480 30 S7GHP 270 10 63 x 50 1 97 x 85 3 35 1 2 2 ADP200 3185 EMI FTF 480 42 S7GOA 310 12 20 x 50 1 97 x 85 3 35 1 3 2 9 ADP200 3220 EMI FTF 480 42 S7GOA 310 12 20 x 50 1 97 x 85 3 35 1 3 2 9 ADP200 4300 EMI FTF 480 55 S7GOB 250 9 84 x 90 3...
Page 24: ...perature permise est dépassée Be sure to remove the desicant dryer packet s when unpacking the Drive If not removed these packets may become lodged in the fan or air passages and cause the Drive to overheat Lors du déballage du drive retirer le sachet déshydraté Si celui ci n est pas retiré il empêche la ventilation et provoque une surchauffe du drive Protect the device from impermissible environm...
Page 25: ...5 23 42 730 4 28 75 265 10 43 Taglia 5 Size 5 Grandeur 5 Größe 5 Tamaño 5 Taglia 4 Size 4 Grandeur 4 Größe 4 Tamaño 4 Fissaggio a muro Wall mounting Fixation mural Wandmontagee Fijación en pared A1 B1 6 5 19 13 6 5 A1 B1 A2 B2 220 8 66 6 5 19 13 6 5 A2 B2 613 24 13 A2 B2 Taglia 5S Size 5S Grandeur 5S Größe 5S Tamaño 5S 220 8 66 265 10 43 Recommended screws for fastening Size 2 3 4 x M5 x 12 mm scr...
Page 26: ...tched on Minimum time to wait before working on the terminals or inside the device is listed in section 4 6 Ne jamais ouvrir l appareil lorsqu il est suns tension Le temps minimum d attente avant de pouvoir travailler sur les bornes ou bien à l intérieur de l appareil est indiqué dans la section 4 6 Do not touch or damage any components when handling the device The changing of the isolation gaps o...
Page 27: ...on of the inputs and outputs bypass are not permissible Aucune tension ne doit être appliquée sur la sortie du convertisseur bornes U2 V2 et W2 Il n est pas permis de raccorder la sortie de plusieurs convertisseurs en parallèle ni d effectuer une connexion directe de l entrée avec la sortie du convertisseur Bypass The electrical commissioning should only be carried out by qualified personnel who a...
Page 28: ...s extractable on all mechanical sizes Size Terminals BR1 BR2 Maximum cable cross section flexible conductor Minimum cable cross section flexible conductor Recommended stripping Recommended terminal Tightening torque min mm2 AWG mm2 AWG mm mm Nm 5S550 5S750 25 2 10 10 19 None 4 5 Sizes Terminals L1 L2 L3 C D U V W Cable cross section Lock screw diameter Recommended terminal Tightening torque min mm...
Page 29: ...S726501 size 3 Cod S72902 size 4 Cod S725621 size 5 Loosen the two screws B put the metal support A optional POWER SHIELD KIT in place and screw down tightly Fasten the power cable shield to the omega sections C as illustrated in the figure Sizes 5S550 and 5S750 for these sizes the metal support A is not provided Cable shielding must be provided by the installer ...
Page 30: ...ground from the motors controlled by the drives directly to the ground connection on the associated inverter Separate the control cables from the power cables as much as possible using separate trunking if necessary at 90º to each other Whenever possible use screened leads for the connections to the control circuitry Ensure that the contactors in the cubicle are suppressed either with R C suppress...
Page 31: ...nnect the resistor between terminals BR1 and BR2 3 an optional external BUy braking unit can be used and connected to terminals C and D Refer to the BUy hand book for further information EMI L1 L2 L3 Emi filter converter DC link Inverter Rprc EMI L1 L2 L3 Emi filter converter DC link Inverter Rprc C1 C BR D D C BR1 BR2 U V W U V W ADP200 2075 3220 ADP200 4300 5550 ADP200 5S550 ADP200 5S750 EMI L1 ...
Page 32: ...er and remove plastic rivet 3 remove cover A and shield B A B 1 1 2 3 ADP200 5S550 ADP200 5S750 ADP200 2075 3220 ADP200 4300 5550 L1 L2 L3 BR C1 C D U V W K1M L1 L2 L3 F1 400 50 60 Hz 3ph 230 480 VAC L1 L2 L3 BR1 C D U V W K1M L1 L2 L3 F1 3ph 230 400 480 VAC 50 60 Hz BR2 ADP200 5750 ADP200 5S550 ADP200 5S750 L1 L2 L3 C D U V W K1M L1 L2 L3 F1 3ph 230 400 480 VAC 50 60 Hz K1M L1 L2 L3 F1 3ph 230 40...
Page 33: ...Refer to chapter 5 2 for the recommended chokes If no DC choke is used terminals C1 and C must be bridged sizes 2 and 3 7 1 7 1 Connection of AC choke ADP200 2075 3220 ADP200 4300 5550 L1 L2 L3 BR C1 C D U V W K1M L1 L2 L3 F1 400 50 60 Hz 3ph 230 480 VAC AC chokes optional L1 L2 L3 BR1 C D U V W BR2 K1M L1 L2 L3 F1 400 50 60 Hz 3ph 230 480 VAC AC chokes optional ADP200 5750 ADP200 5S550 ADP200 5S7...
Page 34: ... V W M 3 ph K2M M 3 ph K2M 7 1 9 Connection of braking resistor optional To access power terminals see chapter 7 1 6 ADP200 2075 3220 ADP200 4300 5550 L1 L2 L3 BR C1 C D U V W Braking resistor L1 L2 L3 BR1BR2 C D U V W Braking resistor ADP200 5S550 ADP200 5S750 Braking resistor Note Recommended combination braking resistors see paragraph 5 4 For size 5750 an optional external BUy braking unit can ...
Page 35: ...tion A1 of the Appendix For electrical properties of analog digital and relay inputs outputs see section A 2 of the Appendix Figure 7 2 2 Recommended card wiring 7 2 2 1 Terminal strip and connection standard ADP200 models 6 digital inputs DI 1 Enable input EN HW 1 motor protection input MO 2 digital outputs DO 3 analog inputs AI 1 analog outputs AO 2 relay outputs RO EXP IO D8A4R2 ADP T3 T2 T1 Co...
Page 36: ...5 56 57 26 27 29 99 80 81 40 41 42 43 70 71 72 99 1 2 3 4 5 6 7 8 9 10 11 12 Note In this version terminals 11 0V I O and 12 24V I O can be used only to power external circuits with the 24 volts generated by the ADP Connecting an external 24 volt power supply to these terminals has no effect because the control card cannot be powered with external voltage 7 2 2 4 Terminal strip and connection ADP2...
Page 37: ...4 Connection of shielding recommended Connection resolver encoder For technical specification see EXP RES I1 ADP on section A 3 3 Encoder cards EXP RES I1 ADP XE EXC EXC COS COS SIN SIN 8 9 10 11 12 13 14 15 RESOLVER ENCODER RES EXC EXC COS COS SIN SIN 15 8 9 10 11 12 13 14 XE Connection of shielding see figure 7 2 4 ...
Page 38: ...s Relay 2 54 55 LOAD LOAD 0V DIO COM Analog input 1 Sensor 24V Analog input 1 0V Sensor Analog input 1 IN Sensor Digital input 1X Digital input nX Figure 7 3 1 2 24V internal IO sink mode PNP L O A D L O A D L O A D L O A D RO 20 RO 2C RO 10 RO 1C DO 2 DO 1 DO PS PE MOT MOT AI 2 AI 2 AI 1 AI 1 AI IN AI 24V AI 0V PE AO AO DI 6 DI 5 DI 4 DI 3 DI 2 DI 1 EN HW DIO CM OV I O 24V I O 54 55 56 57 26 27 2...
Page 39: ...5 46 3 4 5 6 7 8 9 10 11 12 L O A D L O A D L O A D L O A D Power Supply 24V external Figure 7 3 1 5 24V external IO source mode NPN RO 20 RO 2C RO 10 RO 1C DO 2 DO 1 DO PS PE MOT MOT AI 2 AI 2 AI 1 AI 1 AI IN AI 24V AI 0V PE AO AO DI 6 DI 5 DI 4 DI 3 DI 2 DI 1 EN HW DIO CM OV I O 24V I O 54 55 56 57 26 27 29 99 80 81 40 41 42 43 70 71 72 99 45 46 3 4 5 6 7 8 9 10 11 12 L O A D L O A D L O A D L O...
Page 40: ...O 1O RO 1C Relay 1 3 DI 6X RS485 PC CAN GND H L KEYPAD DCP KB ADV100 optional Prg Enter FWD n 0 ILIM EN CNT AL CAN Internal Keypad Analog input 1 Sensor Motor protection input CAN to PLC Optional Drive Ready to PLC 24V from PLC Fault State to PLC 24V from PLC Fault Reset from PLC Start from PLC Enable from PLC Pressure Sensor PRESSURE SENSOR Speed feedback PLC Pressure command Flow rate command Mo...
Page 41: ...7 6 TxA RxA TxB RxB PE 5 V RS485 Reserved RS485 EQP Figure 7 5 1 Serial connection not isolated A twin pair consisting of two symmetrical conductors spiral wound with a common shield plus the bonding connection cable connected as shown in the figure must be used for connection The transmission speed is 38 4 kBaud For connection of the RS485 serial line to the PC see the figure below RS485 RS232 PC...
Page 42: ...ter see figure 7 5 2 7 4 2 Drive RS485 port point to point connection isolated To make the connection with galvanic isolation the OPT RS485 ADP optional card is required The card is equipped with a 9 pin D SUB male receptacle connector which must be inserted in the RS485 connector of the ADP200 drive Connect P1 side to RS485 connector of ADP200 and J1 side to the PC serial line the adapters indica...
Page 43: ...inant 0 2 2 5 mm2 AWG 26 12 GND CAN_GND Ground 0V V H CAN_H CAN_H bus line high dominant LEDs Meaning CAN green Off Stop Flashing Pre operational On Operational A shielded twin pair of the type described in the CANopen specifications must be used for connection to the bus and must be laid separately from the power cables at a distance of at least 20 cm Cable shielding must be grounded at the two e...
Page 44: ...onger distances a 1 1 non crossover cable must be used 9 shielded cables e g code 8S8F59 length 5 m Very long cables max 15 m must be of good quality with low voltage loss max 0 3 ohm m The connections have no galvanic isolation 7 7 Saving data on the Memory Card With the ADP200 drive data can be saved on a normal Secure Digital type memory card In order to use the memory card the specific adapter...
Page 45: ... to the capacitors of the intermediate circuit The feedback energy is converted to heat via the braking resistor Rbr thus providing very short deceleration times and restricted four quadrant operation In the standard configuration ADP200 drives 55kW comprise an internal braking unit E 3 M _ R BR BU U ZK Figure 7 8 1 Operation with braking unit circuit diagram Note When the internal braking unit is...
Page 46: ...r or selects an operation It is used when modifying parameters to confirm the new value that has been set Up Moves the selection up in a menu or list of parameters During modification of a parameter increases the value of the blinking digit Down Moves the selection down in a menu or list of parameters During modification of a parameter decreases the value of the blinking digit 8 1 1 2 Meaning of L...
Page 47: ...use from local to remote and vice versa Is active only if the drive is not enabled RST Reset Resets alarms only if the causes have been eliminated CUST Custom Displays the last 10 parameters that have been modified To exit these functions press the key DISP Display Displays a list of drive functioning parameters E Enter Enters the submenu or selected parameter or selects an operation It is used wh...
Page 48: ...o the menu Only 4 characters are displayed which means it is not possible to distinguish between regulation parameters and application parameters Application parameters are only in menu 26 In this menu the first character on the left is not displayed e g for PAR 11000 Control Selector 1000 is displayed Display using windows With the optional keypad numbers of up to 10 digits plus the sign can be d...
Page 49: ... 6 Complete number 4 5 6 7 8 E g Synchronous list Menu 16 MOTOR DATA PAR 2002 Rated current 9 6 A 16 88 Enter q 20 02 Enter 88 89 the flashing point of the second digit from the left displays the middle window q 86 88 The point flashes the decimal values are displayed in the bottom window Displaying values To display the value of a parameter for integer parameters the bottom window is shown first ...
Page 50: ...ss Prg to exit the Edit mode without saving the parameter E g Synchronous list Menu 22 15 TEMP CONTROL PAR 3504 Drv temp thr default 45 C 22 88 Enter 22 15 Enter q 35 04 Enter 88 4 5 Enter 00 4 5 Enter x4 00 4 9 Enter 00 4 9 Enter 00 4 9 Enter 00 4 9 Enter 00 00 Enter 00 00 Enter 00 00 Enter 00 00 Enter 00 00 Enter 00 00 Enter 00 4 9 22 88 Enter 22 15 Enter q 35 04 Enter 88 4 5 Enter 00 4 5 Enter ...
Page 51: ...hes Use the up and down arrow keys to change the value cyclically from On to Off Press Enter again to accept the value Press Prg to reject the value and restore the previous value E g Synchronous list Menu 4 14 DRIVE CONFIG PAR 576 Display backlight default 0 OFF 04 88 Enter q x13 85 76 Enter 8o FF Enter 8o FF q 88 on 8 2 4 Error messages when modifying a parameter When accepting a value if you ho...
Page 52: ...o display the alarm code 8 2 7 Startup wizard Enter Menu 3 STARTUP WIZARD to scroll the list of operations which are abbreviated as follows Operations displayed on the optional keypad Operations displayed on the integrated keypad Set motor data MOT Run autotune rot ROT Run autotune still STIL Set encoder param ENC Run phasing rot PHAr Run phasing still PHAS Set max speed SdP Set ramps rA P Set app...
Page 53: ...ations displayed on the integrated keypad Close Enable input C EN Open Enable input O EN When the self tuning procedure is executed its progress is displayed In this phase the first digit on the right indicates the progress of the procedure by rotating the external segments of the display If an error occurs the word Er is displayed with the error code Press Prg to exit the error Note For further i...
Page 54: ...unit of measurement Binary selection the parameter may assume only 2 states indicated as On Off or 0 1 LINK type parameter displays the description of the parameter set from the selection list ENUM type parameter displays the description of the selection Command displays the method of execution of the command 5 Parameter number 6 In this position the following may be displayed Numeric parameter di...
Page 55: ...further information about the type of parameters displayed see paragraph 8 2 2 Numeric parameters 16 MOTOR DATA 17 ENCODER CONFIG 18 SPEED REG GAINS 19 REGULATOR PARAM 20 TORQUE CONFIG u 16 MOTOR DATA 16 01 PAR 2000 Rated voltage 175 V Def 400 E 16 MOTOR DATA 16 01 PAR 2000 Rated voltage 000000175 v Def 400 When E is pressed to access modification mode the cursor is activated on the digit correspo...
Page 56: ... mode Expert Value 1 Press E to activate modification mode The entire line is displayed in reverse The elements of the selection list can be scrolled using the and keys Press E to confirm the modification or ESC to cancel Execution of commands A parameter can be used to carry out a number of operations on the drive For an example see next paragraph in this case the request Press E to execute is di...
Page 57: ...Entering the value 1 default the function is disabled and the main menu is displayed at power on 8 3 9 Back lighting of the display Menu 04 DRIVE CONFIG parameter 04 14 Display backlight PAR 576 Sets lighting of the display On the light of the display always stays on Off default the light switches off approx 3 minutes after the last key is pressed 8 3 10 Alarms The alarms page is displayed automat...
Page 58: ...afety backup or transferring parameters from one drive to another 8 3 12 1 Selection of the keypad memory Note This example is only visible in Expert mode 01 MONITOR 02 DRIVE INFO 03 STARTUP WIZARD 04 DRIVE CONFIG 05 REFERENCES u x3 04 DRIVE CONFIG 04 19 PAR 594 Keypad memory select 1 Def 1 E 04 DRIVE CONFIG 04 19 PAR 594 Keypad memory select 0000000002 Def 1 Menu 04 DRIVE CONFIG parameter 04 19 K...
Page 59: ...displayed Message 01 Load par failed Code XX Press ESC to exit The code XX indicates the type of error see paragraph 10 3 To exit the error message press the ESC key 8 3 12 4 Transfer of parameters between drives Transfer the parameters of the source drive to the keypad memory as indicated in paragraph 8 3 12 2 then connect the keypad to the drive where the new setting is to be saved and follow th...
Page 60: ...ur ELCB Earth Leakage Circuit Breaker cf DIN VDE 0160 paragraphe 5 5 2 et EN50178 paragraphe 5 2 11 1 Les bornes suivantes peuvent recevoir des tensions dangereuses même si l onduleur est désactivé bornes d alimentation L1 L2 L3 C1 C D bornes du moteur U V W Ne pas utiliser cet appareil en tant que dispositif d arrêt d urgence cf EN 60204 9 2 5 4 Do not touch or damage any components when handling...
Page 61: ... parallèle il n est pas permis d effectuer une connexion directe de l entrée avec la sortie du convertisseur Bypass The electrical commissioning should only be carried out by qualified personnel who are also responsible for the provision of a suitable ground connection and a protected power supply feeder in accordance with the local and national regulations The motor must be protected against over...
Page 62: ...g rotating or still See step 5 Setting the maximum speed reference See step 6 Setting the ramps See step 7 Setting application parameters See step 8 Saving parameters See step 9 The format of the function selection page is as follows 03 88 Enter Πo t8 Pressing the Enter key the function to be programmed is accessed Press the Down key to move to the next function skipping the current function Press...
Page 63: ...tered during the STARTUP WIZARD procedure are saved in a RAM memory to enable the drive to perform the necessary calculations These data are lost if the device is switched off To save the motor data follow the procedure described in step 9 At the end of the procedure proceed to step 3 Press the Prg and qkeys Step 3 Autotune of the motor The drive carries out the motor autotune procedure real measu...
Page 64: ...press the Prg key 4 Once the drive is enabled the autotune procedure starts This may take a few minutes depending on the type of motor being used 5 At the end of the procedure the following screen is displayed After opening the Enable contact proceed to step 4 Press the Prg x2 and qkeys Note At the end of the autotune procedure there is a request to open the Enable contact terminals 9 12 this resu...
Page 65: ...t the autotune procedure 3 Enable the drive by connecting terminal 9 on the I O card Enable to terminal 12 24 V To abort this operation press the Prg key 4 Once the drive is enabled the autophase procedure starts This may take a few minutes depending on the type of motor being used 5 At the end of the procedure the following screen is displayed After opening the Enable contact proceed to step 6 Pr...
Page 66: ...f proceed as follows SA vE Enter 85 5 0 Enter 8E nt Enter do nE 1 2 3 4 1 Press the Enter key to start the save parameters procedure 2 Press Enter to confirm 3 End of procedure 4 When the parameters have been saved correctly the drive displays this screen to show that the startup wizard is complete Press the Prg x3s key Proceed to the next step Application set up Refer to PID IMM Application manua...
Page 67: ...ring and calculating the parameters necessary for correct drive and PID_IMM application operation The order of these sequences is as follows Electrical connections See step 1 Setting motor parameters See step 2 Autotune with rotating motor at stand still or coupled to the load See step 3 Setting encoder parameters See step 4 Encoder phasing rotating or still See step 5 Setting the maximum speed re...
Page 68: ...E q SEQ SEQ 04 PAR 2008 Pole pairs 4 Def 4 E SEQ SEQ 04 PAR 2008 Pole pairs 0000000004 Def 4 5 3 E q SEQ SEQ 05 PAR 2010 Torque constant 1 29 Nm A Def 1 55 E SEQ SEQ 05 PAR 2010 Torque constant 000001 29 Nm A Def 1 55 1 30Nm A 1 28Nm A E q SEQ SEQ 06 PAR 2012 EMF constant 0 74 Wb Def 0 89 E SEQ SEQ 06 PAR 2012 EMF constant 000000 74 Wb Def 0 89 0 75 Wb 0 73 Wb E Set the plate data of the motor con...
Page 69: ...tor is coupled to the transmission and cannot rotate freely May cause limited rotation of the shaft Peut entraîner une rotation de l arbre limitée 03 STARTUP WIZARD Run autotune Still E Yes Down Next E SEQ Close Enable input E SEQ SEQ 01 PAR 2024 Autotune still Press E to execute Autotune Progress 0 1 2 3 4 Autotune Progress 10 Press ESC to abort Autotune Progress 100 Open Enable input Autotune Do...
Page 70: ...om previous drive the motor is replaced the encoder is replaced Note For more information see parameters 17 23 PAR 2190 Autophase rotation and 17 24 PAR 2192 Autophase still on Functions description and parameters list manual ADP200 Vector inverter for Hybrid injection molding machines See section A 3 2 Phasing in the Appendix for further information Step 5A Encoder phasing with rotating motor 03 ...
Page 71: ... 2401 rpm 2399 rpm E After setting the speed proceed to step 7 Note The factory default setting depends on the size of the drive that is connected These values refer to the ADP200 2110 Step 7 Setting the ramps Set the acceleration and deceleration times for the profile of ramp 0 03 STARTUP WIZARD Set ramps E Yes Down Next E SEQ SEQ 01 PAR 700 Acceleration time 0 11 00 s Def 10 00 E SEQ SEQ 01 PAR ...
Page 72: ...s and connection 4 When the parameters have been saved correctly the drive displays this screen to show that the startup wizard is complete Proceed to the next step Application set up Refer to PID IMM Application manual for detailed Set up procedure ...
Page 73: ... exceeded the set PAR 4650 UVRep attempts value in the PAR 4652 UVRep delay time Solution Too many Undervoltage alarms Adopt the proposed solutions for the Undervoltage alarm 7 MultiOvercurr MOC Condition 2 attempted automatic restarts after the Overcurrent alarm within 30 seconds If more than 30 seconds pass after the Overcurrent alarm was generated the attempt counter is reset Solution Too many ...
Page 74: ...lution Check that it has been inserted correctly see Appendix section A 1 21 External fault EF Condition External alarm present A digital input has been programmed as an external alarm but the 24V voltage is not available on the terminal Solution Check that the terminal screws are tight 22 Speed fbk loss SFL Condition Speed feedback loss alarm The encoder is not connected not connected properly or...
Page 75: ...If the IPA of the parameter is not shown in the manual contact the service centre 46 Load default LD Condition this can occur during loading of the parameter database saved in the Flash memory it is normal if it appears in the following conditions the first time the drive is switched on when a new version of the firmware is downloaded when the regulation is installed on a new size when a new regio...
Page 76: ...ng A0 10100000 bit 5 and bit 7 The following causes simultaneously occours Bit 5 20H Cause the SSI signal interferences cause an error in the CKS or parity Bit 7 80H Cause The encoder has detected an incorrect operation and communicates it to the converter through the Error bit Bits 16 31 present the type of incorrect encoder operation detected The value is displayed in hexadecimal format on the o...
Page 77: ...r supply check parameter 2112 Encoder SSI bits 8 0x100 Setup error Cause An error occurred during setup Solution Check the connection of the clock and encoder drive data check the connection of the screen check the encoder supply voltage check parameter 2102 Encoder supply check parameter 2112 Encoder SSI bits Speed fbk loss 22 alarm with EnDat absolute encoder Bit Value Name Description 3 0x08 MO...
Page 78: ...etting the encoder following Speed fbk loss 22 activation Bit Value Name Description 7 0x80 DT1_ERR Cause Encoder has detected malfunction and signals this to the drive via Error bit Bits 16 31 contain the type of malfunction detected by the encoder Solution See the encoder manufacturer s technical guide 16 31 Type Code Description Transmission 09h Transmitted parity bit is incorrect 0AH Checksum ...
Page 79: ...scription 8 0x100 Setup error Cause An error occurred during setup When this has been signalled the information obtained from the encoder is not reliable Solution Take the action recommended for Speed fbk loss 22 alarm according to the type of encoder 9 0x200 Compatibility error Cause Firmware on option card incompatible with firmware on regulation card When this has been signalled the information...
Page 80: ... D8A4R4 ADL 1501H 5377 I O 6 EXP IO D5R3 F ADL 1F01H 7937 I O 7 EXP IO D10A3R2 ADP 2301H 8961 I O 8 EXP IO D8A4R2 ADP 00FFH 255 Unknown Solution 5 Autotune motor Condition this may occur during the Autotune procedure SLFT 0 No error 1 The commands are not configured in Local mode Solution Execute the requested configuration 2 The Commands local sel parameter has not been configured from the keypad...
Page 81: ...the keypad are not valid 0026H 38 Incompatible drive series 0027H 39 Incompatible software version 0028H 40 Incompatible drive size 0029H 41 Error during saving of parameters on the drive Solution 8 Load par failed Condition during transfer of the parameters from the memory of the keypad to the drive 9 Load par incomplete 0H 0 Communication error FAIL 0023H 35 Communication error 0024H 36 Communic...
Page 82: ...ring the drive if the incorrect enable key is inserted for a given firmware function KEYF 0001H 1 Incorrect PLC key PLC application not available Solution Ask Gefran to supply the correct key to enable the desired firmware function 19 Key expiring Condition this may occur at drive power on if the incorrect enabling key was inserted for a given firmware function At this stage the firmware function ...
Page 83: ...sed by the incorrect value of the encoder impulse parameter Solution Check the electric signals of the incremental encoder Check the value of the encoder impulse parameter 45 Incorrect absolute encoder impulse count Solution Check the electric signals of the absolute encoder Check the configuration of the absolute encoder 46 Incremental encoder impulse count sign inverted with respect to the absol...
Page 84: ...p of the plastic card cover and push gently 2 Raise the cover as shown in the figure 3 To replace an expansion card loosen the screws B and remove the card to be replaced 4A Insert the EXP IO ADP card in the guide bars C of Slot 1 until the male terminal D is fully inserted in the female terminal D of the regulation card 4B Insert the Encoder card in the guide bars C of Slot 2 until the male termi...
Page 85: ...IS 24V AIS 0V PE AO AO DI 6 DI 5 DI 4 DI 3 DI 2 DI 1 EN HW DIO CM 0V I O 24V I O 54 55 56 57 26 27 29 99 80 81 40 41 42 43 70 71 72 99 45 46 3 4 5 6 7 8 9 10 11 12 EXP IO D10A3R2 ADP 8 digital inputs DI 1 Enable input EN HW 2 digital outputs DO 3 analog inputs AI 2 relay outputs RO 1 motor protection input MO EXP IO D10A3R2 ADP T3 T2 T1 Commands Associated parameter 24V from PLC Fault State to PLC...
Page 86: ... Functional 1 kV PNP NPN 24V DIO CM EN HW DI X 4k7 EN HW DI X DIO CM EN HW DI X 4k7 EN HW DI X 24V Digital outputs DO Description Features Type 24V PNP NPN Operating voltage 0V to 24V 30V max Load 20mA 24V Rl 1 2 kΩ 40mA max Thresholds Vol 1V Voh Vali 1 Isolation Yes Functional 1 kV PNP NPN DO X 24V LOAD DO X DO PS DIO CM 4k7 DO X 24V LOAD DO X DO PS DIO CM 4k7 Relay outputs RO Description Feature...
Page 87: ... I O card must also be checked P2 P3 P4 P5 OFF ON I V Jumper I O card Parameter combination P2 AIS Pressure sensor input ON I OFF V 1502 Analog inp 1 type P3 AI1 Analog input ON I OFF V 1602 Analog inp 1X type P4 AI2 Analog input ON I OFF V 1652 Analog inp 2X type P5 AI2 Analog output See figure 1898 Analog out 2X type Analog output AO Description Features Type Single ended in voltage Output volta...
Page 88: ...voltage 0 to 10 V or 0 1 to 10 1 V 3 wires Input R 10 kΩ Resolution 12 Bits Precision 1 of full scale Isolation NO Description Features Type Current differential Input current 0 4 mA to 20 mA Input R 500 Ω Resolution 12 Bits Precision 1 of full scale Isolation NO AI S AI S AI S 500 OP Select input V I V OFF I ON Motor temperature sensor MOT VREF MOT MOT MOT KTY PTC ...
Page 89: ...mode Encoder type Card PAR 532 Slot2 card type Resolver EXP RES I1 ADP EXP RES I1R1 ADP Enc 6 Default Incremental Digital EXP DE I1R1F2 ADL Enc 1 Possible Incremental sinusoidal EXP SE I1R1F2 ADL Enc 2 Possible Incremental sinusoidal absolute SinCos EXP SESC I1R1F2 ADL Enc 3 Recommended Incremental sinusoidal Absolute Endat SSI EXP EN SSI I1R1F2 ADL Enc 4 Recommended Incremental sinusoidal Hiperfa...
Page 90: ... Autophase still static phasing this procedure must be performed with the motor still and brake applied Rotation phasing This procedure is based on the possibility of moving the motor by a maximum angle of two pole pairs to find correct encoder phasing cross check the available encoder and motor data and if the encoder count direction does not match the phase sequence of the motor power supply cor...
Page 91: ...sinusoidal differential Resolver input voltage 1 1 Vrms typ 1 4 Vrms max Resolver input impedance 3kΩ Cable length max 50m shielded coupled plus a total external shield RESOLVER ENCODER RES EXC EXC COS COS SIN SIN 15 8 9 10 11 12 13 14 XE 0 90 180 270 360 EXC SIN COS θ Shaft Angle Connection of shielding see figure 7 2 4 Electrical resolver representation Resolver T ratio setting J1 J2 J3 J1 Open ...
Page 92: ...lt 5 kHz Transformation Ratio 0 2 1 0 selected by jumper See table 1 end of this chapter default 0 5 Resolution Equivalent of 16 bits max in one revolution of electrical resolver turn selectable through param eters 10 12 14 16 Output impedance for the resolver excitation 20Ω Resolver Excitation power supply Internal 5V Resolver input sinusoidal differential Resolver input voltage 1 1 Vrms typ 1 4 ...
Page 93: ... 6 0 V default 5 2 V Imax 150 mA See table 1 Cable length max 50m INCREMENTAL DIGITAL ENCODER DE PUSH PULL LINE DRIVER Z Z B B A A 0VE out VE out 8 9 10 11 12 13 14 15 1 2 3 4 5 6 7 XE Fast input 2 Fast input 1 CM Connection of shielding see figure 7 2 4 TTL HTL push pull Channels A B Z complementary push pull optoisolated Loss of encoder cannot be managed with single ended versions In this case d...
Page 94: ...s and connection INCREMENTAL DIGITAL ENCODER DE SINGLE ENDED NPN O C B B A A 0VE out VE out 10 11 12 13 14 15 XE INCREMENTAL DIGITAL ENCODER DE SINGLE ENDED PNP O C B B A A 0VE out VE out 10 11 12 13 14 15 XE Connection of shielding see figure 7 2 4 ...
Page 95: ...gnals Max frequency 200 kHz check the number of encoder impulses according to the maximum speed Number of impulses min 128 max 16384 default 1024 Electrical interface Channels A B 0 8V Vpp 1 2V typ 1 0V Channel Z 0 2V Vpp 0 8V Load capacity 8mA 1 0Vpp Zin 120Ω Programmable internal power supply min 5 2 V max 6 0 V default 5 2 V Imax 150 mA See table 1 Cable length max 50m INCREMENTAL SINUSOIDAL EN...
Page 96: ...umber of encoder impulses according to the maximum speed Number of impulses min 128 max 16384 default 1024 Electrical interface Channels A B Sin Cos 0 6 V Vpp 1 2 V typ 1 0 V Channel I 0 2 V Vpp 0 8 V Load capacity Channels A B I 8 mA 1 0 Vpp Zin 120Ω Channels Sin Cos 1 mA 1 0 Vpp Zin 1kΩ Programmable internal power supply min 5 2 V max 6 0 V default 5 2 V Imax 150 mA See table 1 Cable length max ...
Page 97: ...able internal power supply min 5 2 V max 6 0 V default 5 2 V Imax 150 mA See table 1 Cable length max 50m see encoder cable length section Absolute channels CK CK DT DT differential RS 485 Management of loss of encoder signals Interface EnDat 2 1 2 2 single multi turn command set managed only compatible with 2 1 SSI Standard Sick Stegman single multi turn Max frequency EnDat 1 MHz with delay compe...
Page 98: ...f impulses min 128 max 16384 automatic recognition at initialisation Electrical interface 0 8V Vpp 1 2V typ 1 0V Load capacity 8mA 1 0Vpp Zin 120Ω Programmable internal power supply 7 0V 8 0V 12 0V See table 1 Cable length max 50m Absolute channels DT DT differential RS 485 Management of loss of encoder signals Interface Standard Sick Stegman single multi turn Max frequency 9600baud not programmab...
Page 99: ...al interface TTL ref GND Ulow 0 5 V Uhigh 2 5 V HTL Ulow 3 0 V Uhigh Venc 3 0 V only with DE encoder Load capacity TTL 20mA 5 5V Zin 120Ω for each channel HTL 50mA max for each channel Power supply Venc encoder signals are repeated on the same value of the primary encoder the supply value for the repeat is always that set for the primary encoder Cable length max 50m 1 The internal power supply of ...
Page 100: ...nit 7 Brook Business Centre 54a Cowley Mill Road Uxbridge UB8 2FX Ph 44 0 8452 604555 Fax 44 0 8452 604556 sales gefran co uk GEFRAN SIEI ASIA 31 Ubi Road 1 02 07 Aztech Building Singapore 408694 Ph 65 6 8418300 Fax 65 6 7428300 info gefran com sg GEFRAN INC 8 Lowell Avenue WINCHESTER MA 01890 Toll Free 1 888 888 4474 Fax 1 781 7291468 info us gefran com SENSORMATE AG Steigweg 8 CH 8355 Aadorf Swi...