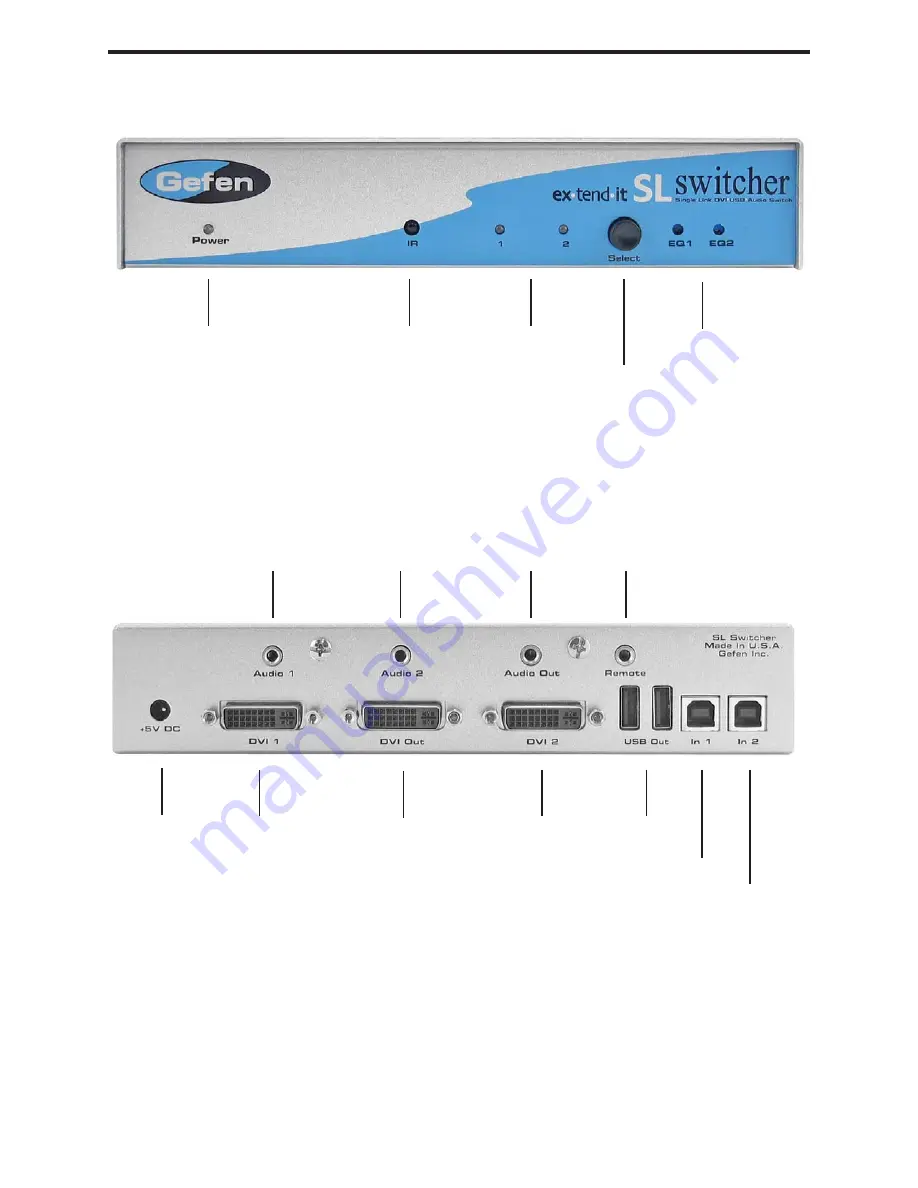
Gefen ex-tend-it SL Switcher User Manual Download Page 6

PANEL DESCRIPTIONS

3

Power Indicator

Selector

Indicates which 

input is selected

Audio In 1

Audio In 2

Audio Out

Contact Closure Interface 
- Connects to optional wired 
RMT-2 remote control

5VDC Input

DVI In 1

DVI In 2

DVI Out

USB 

Output

USB In 1

USB In 2

IR Eye

Equalization 

Knobs

Summary of Contents for ex-tend-it SL Switcher

Page 1: ...SL Switcher U S E R M A N U A L www gefen com...

Page 2: ...iday Write To Gefen Inc C O Customer Service 6265 Variel Ave Woodland Hills CA 91367 9897 Notice Gefen Inc reserves the right to make changes in the hardware packaging and any accompanying documentati...

Page 3: ...TABLE OF CONTENTS Introduction Features Panel Descriptions Connecting and Operating the SL Switcher RMT2 IR Installation IR Extender Installation Specifications Warranty 1 2 3 4 5 6 7 8...

Page 4: ...distribution conference room presen tation and school and corporate training environments Our Commitment Gefen will always offer the finest quality product at the best possible price Included in that...

Page 5: ...1200 x 60Hz resolution video No loss of quality Use either PC or Mac with USB keyboard mouse Switches easily between any two DVI computers Switch between two DVI USB 2 0 and Audio Sources Rackmountab...

Page 6: ...lector Indicates which input is selected Audio In 1 Audio In 2 Audio Out Contact Closure Interface Connects to optional wired RMT 2 remote control 5VDC Input DVI In 1 DVI In 2 DVI Out USB Output USB I...

Page 7: ...wer supply into the SL Switcher How to Operate the SL Switcher 1 Use the front panel push button to switch between sources 2 Use the RMT 2IR wireless remote control to remotely switch between sources...

Page 8: ...d must be facing down 4 Test the RMT2 IR remote by pressing ONLY one button at a time The indicator light on the remote will flash once each time you press a button WARNING Do not press multiple butto...

Page 9: ...rom Local to Remote 2 In the bank of switches labeled SERVICE SWITCH pictured as Step 2 below flip Service Switch 1 top most switch to the ON position 3 Reassemble the unit 4 Plug the IR extender into...

Page 10: ...Signal 5 volts p p TTL Single Link Range 1920 x 1200 x 60hz DVI Input Output Connector Type DVI I USB 2 0 Input Connection Type B USB 2 0 Output Connection Type A Power Consumption 15 Watts max Power...

Page 11: ...e day of reshipment to the Buyer This warranty is in lieu of all other warranties expressed or implied including without limitation any implied warranty or merchantability or fitness for any particula...

Reviews: