background image

7

6

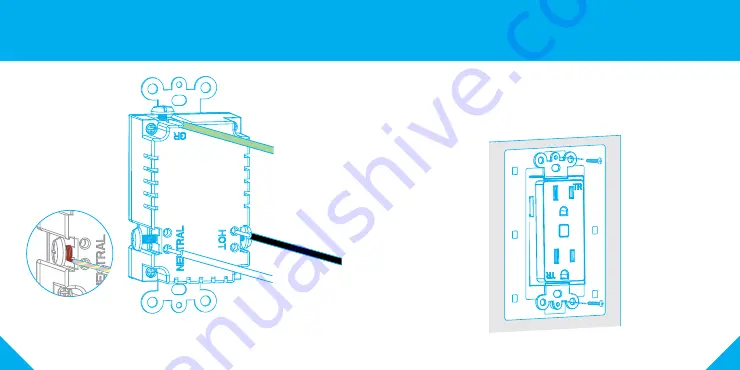
Install (cont’d)

Install (cont’d)

STEP 4

A

Use the two A screws to secure  
the CURRENT to the junction box.

GREEN/GROUND

BLACK/HOT

WHITE/NEUTRAL

STEP 3

Connect CURRENT’s 
neutral wire (white) to 
your home’s neutral wire. 

Connect CURRENT’s  line 
(Black), Neutral (White), 
and Ground  (Green) 
wires as shown .

Place stripped wire into 
the hole and tighten 
down the screw

Summary of Contents for SMART WI-FI OUTLET

Page 1: ...SMART WI FI OUTLET START GUIDE ...

Page 2: ...t Ready to get started Download the Geeni app to manage your CURRENT and all other Geeni devices straight from your phone or tablet Easily connect to your home Wi Fi and control multiple devices with the touch of your fingertips CAUTION Use only copper wire Do not operate with the faceplate removed This product should only be installed by a qualified electrician and in compliance with local and na...

Page 3: ...3 2 2 Register a Geeni account STEP 1 Enter your mobile phone number or email address STEP 2 Enter the verification code and create a password 1 Download the Geeni app ...

Page 4: ... Shut off power at the circuit breaker for the outlet that you are replacing More than one disconnection may be required to turn off power Use a noncontact voltage tester to ensure that power is off STEP 2 Remove old outlet by disconnecting all wires ON OFF Disconnect all wires ...

Page 5: ...e the CURRENT to the junction box GREEN GROUND BLACK HOT WHITE NEUTRAL STEP3 Connect CURRENT s neutral wire white to your home s neutral wire Connect CURRENT s line Black Neutral White and Ground Green wires as shown Place stripped wire into the hole and tighten down the screw ...

Page 6: ...ds until the indicator light is flashing rapidly Reset one time press and hold to reach Easy mode Fast blinking blue 2x per second Reset again press and hold to reach AP Mode Slow blinking blue every 3 seconds STEP 4 B Use the two B screws provided to secure the faceplate bracket to the CURRENT STEP 5 Restore power by turning the breaker back on STEP 6 Once power is connected the blue indicator li...

Page 7: ...RENT s light is rapidly flashing blue If not reset to reach Easy Mode to connect Page 9 Press Next Step in the app STEP 3 Enter your Wi Fi network and password NOTE Geeni can t connect to 5GHz networks If the connection fails try to connect using AP Mode STEP 4 The Geeni app will connect to CURRENT 5 Connect Easy Mode ...

Page 8: ...2 Open the Geeni app In the top corner of the Devices screen click Choose Smart Power Choose AP Mode in the top corner STEP 3 Press Next and enter your Wi Fi details STEP 4 Follow the instructions to choose the device from your Wi Fi list STEP 5 The Geeni app will connect to CURRENT NOTE Geeni can t connect to 5GHz networks ...

Page 9: ...i s app can control an unlimited amount of devices in an unlimited amount of locations Your router may have a limit of how many devices can be connected to one router 4 My Geeni device has a funny name How do I rename it From your main device list click on one of the devices you want to rename press the button on the top right for advanced settings and click Modify Device Name or Modify Group Name...

Page 10: ...rk of Merkury Innovations LLC iPhone Apple and the Apple logo are trademarks of Apple Inc registered in the U S and other countries App Store is a service mark of Apple Inc Galaxy S is a registered trademark of Samsung Electronics Co Ltd Google Google Play and related marks and logos are trademarks of Google LLC iOS is a registered trademark of Cisco in the U S and other countries and is used unde...

Page 11: ...Can t connect Need help DO NOT RETURN THIS PRODUCT TO THE STORE Geeni support support mygeeni com 1 888 232 3143 Tap Support in the Geeni app ...

Reviews: