background image

9

Memory Feature

STORING TELEPHONE NUMBERS

M1 and 911 keys
Your phone can store 2 direct memories (one touch)  through M1 &
911 keys (like for  emergency numbers ).

Others memories
10 memories can be used for programming your most frequently
dialed telephone numbers. You can store up to 16 digits  in the
priority key button or in each of the numeric key button (0 through 9),
by following the steps outlined below:

1. Slide the «normal» / «one touch» switch to NORM position.
2. Lift the handset (releasing hook switch).
3. Press STORE button.
4. Dial the number.
5. Press STORE button.
6.Press the priority key M1 or (0-9) (pictures) you want that
telephone number stored in.
7. Your number is now stored.
8. To change a stored number, repeat the same process. The new
number will store over the old stored number.

NOTE : A Memory Index Card is provided for your use in writing
down the persons name.

Summary of Contents for AmpliPHOTO50

Page 1: ...AmpliPHOTO50TM EASY DIAL PHONE WITH VOLUME CONTROL TELEPHONE MULTIFONCTIONS A GRANDES TOUCHES TELEFONO MULTIFUNCTIONES CON TECLA GRANDES English Français Español ...

Page 2: ...audition Il possède un écouteur à volume variable A la première utilisation assurez vous que le bouton de réglage du volume soit positionné sur la position volume minimum Les personnes malentendantes pourront par la suite augmenter le volume pour l adapter a leur audition Precaucion Este producto telefónico ha sido especificamente diseñado para personas con dificultades de audición y lleva un cont...

Page 3: ...ng up Ringer settings 6 Using the phone Answering incoming call 7 Making a call 7 Last number redial 7 Flash key 8 Receiver volume controle 8 Memory feature Storing telephone numbers 9 Dialling stored number 10 Inserting pictures 11 Regulatory Compliance 12 Guarantee 14 ...

Page 4: ...Switch 4 Memory Index Card 5 M1 Button 6 Normal One touch switch 7 Ringer Off Lo Hi Switch 8 Ringer Indicator 9 911 Button 10 Store Button 11 Key Button 1 9 0 12 Redial Button 13 Photocall Button 14 Receiving Volume Control Handset 15 Flash Button ...

Page 5: ...f the straight cord into the rear side of base unit then insert the other end of RJ11C into the telephone wall socket Classified TNV 3 according to EN60950 standard Wall mounting Your phone is also designed to be mounted on a wall Make 2 holes in the wall insert the wall plugs and the wall mounting screws The screws should protrude from wall by 6 7 mm Place the phone onto the screw heads and slide...

Page 6: ... phone provides a ringer adjustment of High Low or Off The switch is located at the rear side of the telephone When you don t want to be disturbed slide the switch to the OFF posi tion Only the red lamp will flash Otherwise adjust to HI or LO position ...

Page 7: ...wait the dial tone and dial required number On completion of the call carefully replace the handset in the cradle Last Number Redial Your telephone remembers the last number dialed If the number you dial is busy or not being answered hang up To redial the last number automatically lift the handset then press the REDIAL button NOTE You can redial the same telephone number as many times as required ...

Page 8: ...lease and perform the custom call procedure NOTE Call waiting is a service of your local telephone company Receiver Volume Control On the front edge of your telephone you will find a slide volume control This control may be used to adjust the volume of received speech With the control set towards the right hand side of the phone the received volume will be at its maximum With the control set to th...

Page 9: ... the numeric key button 0 through 9 by following the steps outlined below 1 Slide the normal one touch switch to NORM position 2 Lift the handset releasing hook switch 3 Press STORE button 4 Dial the number 5 Press STORE button 6 Press the priority key M1 or 0 9 pictures you want that telephone number stored in 7 Your number is now stored 8 To change a stored number repeat the same process The new...

Page 10: ... dial tone Press PHOTOCALL button Press appropriate button 0 to 9 The stored number will be dialed automatically These stored numbers can also be dialed in one touch mode when the keys are equipped with pictures photos Move the normal one touch switch to ONE TOUCH Lift the handset and await the dial tone Press one of the picture buttons The stored number will be dialed automatically IMPORTANT IN A...

Page 11: ... picture into key 4 Replace plastic cover Extra Set of Plastic Picture Covers You will find an extra set of clear plastic picture covers this is to be used if you want to use the photo memories only 1 Remove numbered plastic cover from each key 0 9 and put them aside 2 You will need a picture approximately 1 x 1 inch 3 Place picture into key 4 Replace with new all clear plastic covers ...

Page 12: ...e Ringer Equivalence Numbers of all the devices does not exceed five 5 To be certain of the number of devices that may be connected to a line as determined by the total RENs contact the local telephonecompany For products approved after July 23 2001 the REN for this product is part of the product identifier that has the format US AAAEQ TXXXX The digits represented by are the REN without a decimal ...

Page 13: ...ction to party line service is subject to state tariffs Contact the state public utility commission public service commission or corporation for information If your home has specially wired alarm equipment connected to the telephone line ensure the installation of this telephone equipment does not disable your alarm equipment If you have questions about what will disable alarm equipment consult yo...

Page 14: ...ce or breakage to any parts This includes shipping damage failure to follow instructions misuse fire floods use of incompatible accessories Acts of God or failure in your phone service carrier s line service The product must not be tampered with or taken apart by anyone who is not an authorized Sonic Alert representative Tampering with the phone will void ant written or implied warranties Sonic Al...

Page 15: ... sonnerie 18 Utilisation Répondre à un appel 19 Appeler 19 Rappel du dernier numéro composé bis 19 Flash 20 Réglage du volume de réception 20 Fonction Mémoire Enregistrer des numéros en mémoires 21 Appeller un numéro en mémoire 22 Insérer des photos 23 Déclaration de conformité 24 Garantie 26 ...

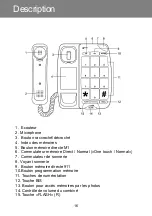
Page 16: ...te M1 6 Commutateur mémoire Direct Normal One touch Normal 7 Commutateur de sonnerie 8 Voyant sonnerie 9 Bouton mémoire directe 911 10 Bouton programmation mémoire 11 Touches de numérotation 12 Touche BIS 13 Bouton pour accès mémoires par les photos 14 Contrôle de volume du combiné 15 Touche FLASH R Description ...

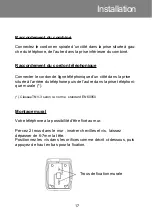
Page 17: ...côté dans la prise située à l arrière du téléphone puis de l autre dans la prise téléphoni que murale ClasséeTNV 3 selon la norme standard EN60950 Montage mural Votre téléphone a la possibilité d être fixé au mur Percez 2 trous dans le mur insérer chevilles et vis laissez dépasser de 6 7mm la tête Positionnez les vis dans les orifices comme décrit ci dessous puis appuyez de haut en bas pour la fix...

Page 18: ...Positionnez le commutateur situé à l arrière de l appareil La position OFF ne vous permettra pas d entendre la sonnerie seul le voyant rouge vous avertira d un appel Positionnez sur LO volume bas ou HI volume plus élevé selon votre souhait Réglages ...

Page 19: ...peler Décrochez le combiné Composez le numéro de votre correspondant La conversation terminée raccrochez le combiné pour libérer la li gne Rappel du dernier numéro composé Décrochez le combiné Appuyez sur la touche REDIAL le numéro de votre correspondant se recompose automatiquement ne fonctionne pas pour les numéros en mémoire NOTE Vous pouvez recomposer ce même numéro autant de fois que vous le ...

Page 20: ...en attente conférence à trois Rapprochez vous de celui ci pour obtenir les renseignements né cessaires Réglage du volume de réception A l avant du téléphone vous disposez d un bouton VOLUME vous permettant d ajuster en le déplaçant vers la droite ou la gauche le volume d écoute du combiné gauche volume mini droite volume maxi Utilisation ...

Page 21: ...cédure comme telle 1 Positionnez l interrupteur à l arrière sur NORM 2 Décrochez le combiné 3 Appuyez sur le bouton STORE 4 Composez le numéro à mémoriser 5 Appuyez sur le bouton STORE 6 Appuyez sur une des touches M1 ou 0 à 9 qui correspondra à la mémoire du numéro 7 Votre numéro est mémorisé 8 Pour remplacer un numéro procédez de la même manière L ancien numéro sera effacé Une carte index vous p...

Page 22: ...ouche 0 à 9 ou photo correspondant au numéro de la personne à appeler Le numéro se compose automatiquement Ces numéros peuvent aussi être appelés en mode Mémoire di recte pour se faire Basculez le commutateur à l arrière sur ONE TOUCH Décrochez le combiné Appuyez sur la touche ou photo correspondant au numéro de la personne à appeler Le numéro se compose automatiquement IMPORTANT QUELQUE SOIT LE M...

Page 23: ...uche choisie Placer la photo Remettre le cache plastique avec son numéro Cas 2 Il est fourni en plus des caches transparents vierges dans le cas où vous desirez utiliser votre téléphone qu en mode Mémoires di rectes Seule la photo apparaîtra sur la touche Retirer le cache plastique transparent de la touche choisie Placer la photo Remettre le cache plastique vierge Insertiondephotos ...

Page 24: ...ie IES sert à indiquer le nombre maximal de terminaux qui peuvent être raccordés à une interface téléphonique La terminaison d une interface peut consister en une combinaison quelconque de dispositifs à la seule condition que la somme d indices d équivalence de la sonnerie de tous les dispositifs n excède pas 5 Pour connaître précisément le nombre d appareils qui peuvent être connectés à une ligne...

Page 25: ... réparer quelque pièce que ce soit de l appareil sauf suivant la procédure spécifiée La connexion à un service de ligne partagée est assujettie aux tarifs établis dans chaque région Pour en savoir voir avec les autorités responsables des services d utilité publique dans votre région Le présent materiel est conforme aux specifications techniques applicables d Industrie Canada NOTE Si votre résidenc...

Page 26: ...par les surtensions électriques la foudre ou par un choc sur l appareil ne peuvent en aucun cas être couverts par la garantie En cas de problème fonctionnel rapprochez vous de votre point de vente Retourner simplement votreAmpliPHOTO50 port dû avec une copie de votre preuve d achat à Sonic Alert Inc 1050 E Maple Road Troy MI 48083 Sonic Alert 1050 East Maple Rd Troy MI 48083 Ph 248577 5400 Fax 248...

Page 27: ...a 30 Uso del teléfono Responder a la llamada entrante 31 Hacer una llamada 31 Rellamada al último número marcado 31 Tecla flash 32 Control del volumen del receptor 32 Función de memoria Guardar los números de teléfono 33 Marcación de número guardado 34 Inserción de imágenes 35 Cumplimiento del reglamento 36 Garantía 38 ...

Page 28: ...M1 6 Interruptor normal una pulsación 7 Interruptor del timbre desconectado bajo alto 8 Indicador del timbre 9 Botón 911 10 Botón para memorizar 11 Botón de tecla 1 9 0 12 Botón de rellamada 13 Botón de fotollamada 14 Auricular con control del volumen de recepción 15 Botón flash Descriptión ...

Page 29: ...inuación inserter el otro extreme del RJ11C en la roseta telefónica de la pared Clasificación TNV 3 según la norma EN60950 Instalación en pared El TELÉFONO que acaba de adquirir tiene un diseño que también permite su instalación en la pared Practicar dos orificios en la pared insertar los tacos y los tornillos para poder sujetarlo en la pared Los tornillos deberán sobresalir de la pared unos 6 7 m...

Page 30: ...mada en alto bajo o desconectado El interruptor correspondiente se encuentra en la parte posterior del teléfono Si no se desea sonido alguno se desliza el interruptor a la posición de OFF desconectado Sólo parpadeará la lámpara roja Si no es así habrá que ponerlo en la posición HI o LO alto o bajo Configuración ...

Page 31: ...olicitado Una vez finalizada la llamada volver a colocar el auricular en la consola Volver a marcar el último número El teléfono tiene memoria y recuerda el último número marcado Si el número al que se está llamando está comunicando o no recibe respuesta deberá colgar Para volver a marcar el último número de forma automática levantar el auricular y pulsar el botón REDIAL volver a marcar NOTA Puede...

Page 32: ...el procedimiento de llamada habitual NOTA La llamada en espera es un servicio prestado por su compañía telefónica local Control del volumen del receptor En la parte anterior del teléfono se encuentra el control de volumen deslizable Se puede utilizar este control para ajustar el volumen de recepción de voz Con el control puesto hacia la derecha del teléfono el volumen recibido estará al máximo Con...

Page 33: ...0 a 9 siguiendo los pasos que se señalan a continuación 1 Ponga el interruptor normal una pulsación en la posición NORM norma 2 Levantar el auricular soltando el interruptor de colgar 3 Pulsar el botón STORE guardar 4 Marcar el número 5 Pulsar el botón STORE guardar 6 Pulsar la tecla prioritaria M1 o 0 9 imágenes en la que desee guardar el número de teléfono 7 Ya está guardado el número 8 Para cam...

Page 34: ...rcación Pulsar el botón PHOTOCALL fotollamada Pulsar el botón adecuado 0 a 9 Se marcará el número guardado automáticamente También se pueden marcar estos números guardados en el modo una pulsación cuando las teclas lleven imágenes fotos Pasar el interruptor normal una pulsación a ONE TOUCH una pulsación Levantar el auricular y esperar a oír el tono de marcación Pulsar uno de los botones con imágen...

Page 35: ...pa de plástico Lote extra de tapas de plástico para imágenes Se facilita un lote extra de tapas de plástico transparente para imágenes que se deberá utilizar si sólo se desean utilizar las memorias con fotos 1 Quitar la tapa de plástico que tiene el número de cada una de las teclas 0 9 y retirarlas 2 Las fotos deberán tener aproximadamente 1 x 1 pulgadas 3 Colocar la imagen en la tecla 4 Cambiar t...

Page 36: ... conexión que cumple las normas Está diseñado para ser conectado en una roseta telefónica compatible que también cumpla las normas En las instrucciones de instalación se encontrará información detallada El REN número equivalente a timbrado sirve para determinar el número de aparatos que pueden ser conectados a una línea telefónica Un REN muy alto en una línea telefónica podría ocasionar que los ap...

Page 37: ...l problema Observe las instrucciones de reparación que se hayan dado p ej las contenidas en la sección sobre cambio de baterías de no existir instrucciones limítese a modificar o reparar las partes del aparato en la forma especificada La conexión al servicio de línea de varios abonados está sujeta a las tarifas aplicables localmente Si desea información al respecto comuníquese con la autoridad de ...

Page 38: ...re accidentes negligencias ni la rotura de ninguna de sus piezas No deberá modificar ni desmontar el producto nadie que no sea un representante autorizado de Sonic Alert La garantía Sonic Alert marca límite alguno a sus derechos legales Devuelva su Ampli200 en portes debidos con una copia de la prueba de compra a Sonic Alert Inc 1050 E Maple Road Troy MI 48083 IMPORTANTE EL RECIBO FORMA PARTE DE L...

Reviews: