Geeetech A10M User Manual Download Page 16


16 


SHENZHEN GETECH TECHNOLOGY CO LTD


(Picture 3-18) 

When print PLA, set the target nozzle temperature about 180-210

. When the temp is stable, 

control  the  extruder  filament  feeding  on  LCD  screen  (“Move  axis”),  feed  until  there  is  molten 
material flowing from the nozzle. 
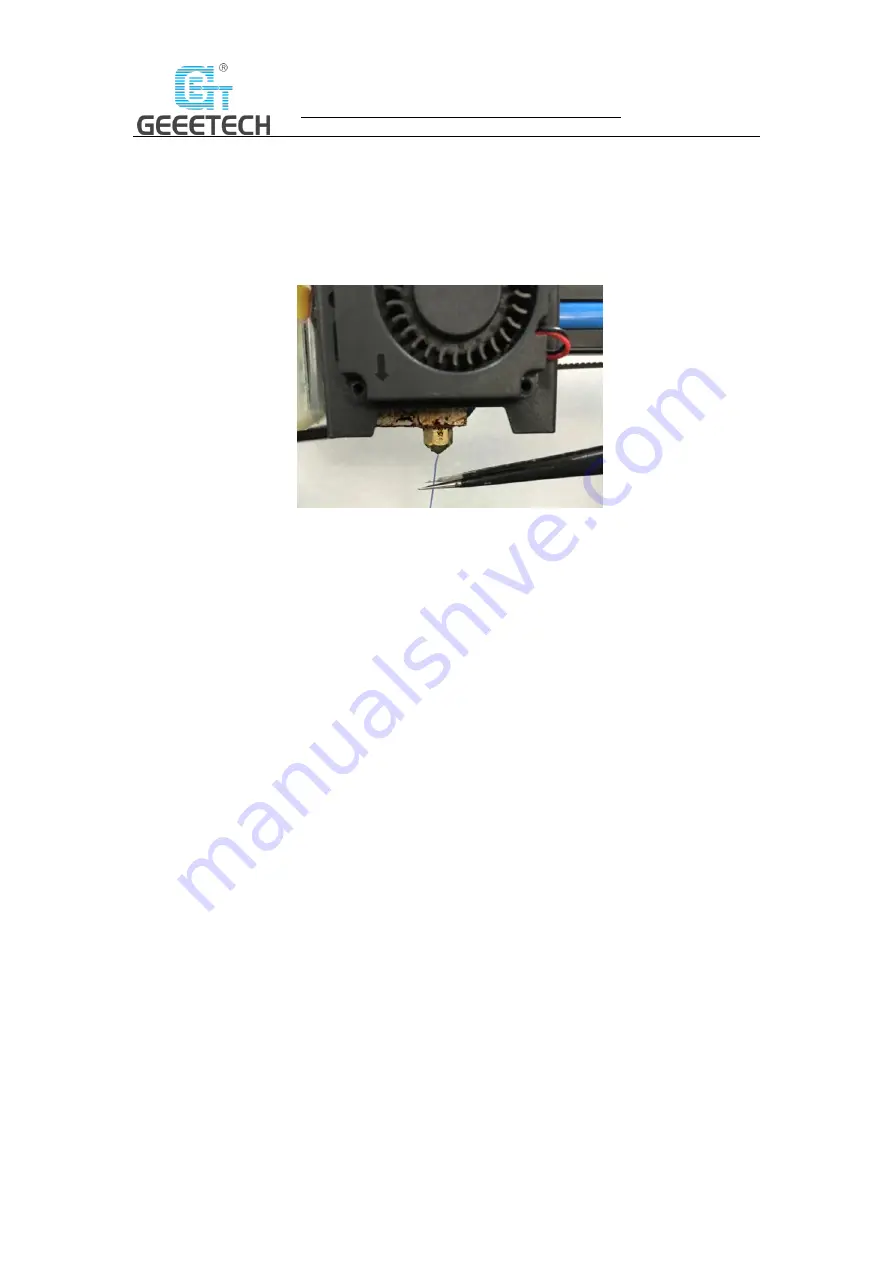
Observe the nozzle, if there is no filament stuck and the filament is coming out smoothly, then 
stop filament feeding, clear the nozzle with tweezers. See picture (3-19). 


(Picture 3-19) 


Summary of Contents for A10M

Page 1: ...1 SHENZHEN GETECH TECHNOLOGY CO LTD Geeetech A10M 3D Printer User Manual v2 0...

Page 2: ...re setting 29 6 1 Install driver 29 6 2 Install slicing software 31 6 3 USB printing 39 6 4 SD card printing 44 7 Color Mixer 46 7 1 Download 46 7 2 Introduction 46 8 Function introduction 51 8 1 Powe...

Page 3: ...cted before turning on the printer Don t touch the extruder head or hot bed when printing as they generate high temperature which may cause burn Don t leave the printer unattended when printing 1 2 Fa...

Page 4: ...4 SHENZHEN GETECH TECHNOLOGY CO LTD 2 Printer display Picture 2 1...

Page 5: ...5 SHENZHEN GETECH TECHNOLOGY CO LTD Picture 2 2...

Page 6: ...Base 6 Z axis end stop 7 X axis end stop 8 Filament spool holder 9 Teflon tube 10 Extruder head 11 Hot bed 12 LCD2004 screen 13 Knob 14 X axis motor 15 Z axis motor 16 Y axis motor 17 Y axis end stop...

Page 7: ...ve received the printer Refer to picture 2 4 If missing any spare part please contact your sales representative Picture 2 4 3 Assembling 3 1 Assembling the main frame The main frame consists of the ga...

Page 8: ...HNOLOGY CO LTD Picture 3 1 Assemble the gantry frame and base from bottom to top with 4 M5x45 screws and 4 M5 spring washers See picture 3 2 Picture 3 2 Fix the PSU to the gantry frame with 2 M4x20 sc...

Page 9: ...TD Picture 3 3 Fix the LCD to the correct holes on the right side of the base with 2 M5x10 screws See picture 3 4 Picture 3 4 Assemble and fix the two sets of extruder units to the back side of the to...

Page 10: ...ix the spool holders to the top gantry with 2 M3x6 and 2 M3 T shape nuts Details see picture 3 6 Picture 3 6 3 2 Wire connection Insert the two Teflon tubes into the quick insert connector of the two...

Page 11: ...at ribbon cable blue side facing you in to LCD socket behind the LCD screen See picture 3 8 Picture 3 8 Connect the PSU cable See picture 3 9 Picture 3 9 Plug the extruder cables into the molex socket...

Page 12: ...CO LTD Picture 3 10 Connect the motor wires of E0 and E1 See picture 3 11 Picture 3 11 Connect the wires of X axis motor and end stop See picture 3 12 Picture 3 12 Connect the wires of Y axis motor a...

Page 13: ...13 SHENZHEN GETECH TECHNOLOGY CO LTD Picture 3 13 Connect the wires of Z axis motor and end stop See picture 3 14 3 15 Picture 3 14 Picture 3 15...

Page 14: ...u need to choose the correct voltage according to your local standard requirement See picture 3 16 Note Be sure the voltage is switched to the correct one Picture 3 16 3 4 Check the filament Put the f...

Page 15: ...bent the first section of it needs to be straightened by hand and trimmed to make it easier to insert the filament into the feeder Press down the lever handle of the extruder and insert the filament i...

Page 16: ...the temp is stable control the extruder filament feeding on LCD screen Move axis feed until there is molten material flowing from the nozzle Observe the nozzle if there is no filament stuck and the fi...

Page 17: ...t a piece of A4 paper on the platform click Next corner the extruder head moves counterclockwise from the bottom left corner to the four corners of the platform See picture 4 1 Picture 4 1 When the ex...

Page 18: ...picture 4 4 Picture 4 4 c Moderate Extrude the filament properly and evenly stick on the bed See picture 4 5 Picture 4 5 In the case of too low and too high adjust the knobs under the platform till th...

Page 19: ...card into the slot See picture 4 7 Picture 4 7 Press and rotate the knob to enter the main menu Select the option of Print from SD See picture 4 8 Picture 4 8 Choose the files in the SD card See pictu...

Page 20: ...20 SHENZHEN GETECH TECHNOLOGY CO LTD Picture 4 10 When heating done the printer will start printing See picture 4 11 4 12 Picture 4 11 Picture 4 12...

Page 21: ...21 SHENZHEN GETECH TECHNOLOGY CO LTD 5 Introduction to the LCD menu 5 1 Tree diagram Picture 5 1...

Page 22: ...Feed rate Current printing speed 5 Current Z axis value 6 Current printing process Picture 5 2 Note Rotating the knob can change the printing feed rate during printing We suggest users not changing t...

Page 23: ...truder before printing ABS Picture 5 5 Picture 5 6 The main functions of Control menu Picture 5 7 5 8 Temperature Change the temp of the hot bed and extruder in real time during printing Customize the...

Page 24: ...ure 5 9 Picture 5 9 Mx Automatically change mix ratio see picture 5 10 Picture 5 10 Mixer menu offers two mix printing options namely fixed mix ratio printing and variable mix ratio printing The detai...

Page 25: ...le mix If you need to quickly switch the ratio between E0 and E1 you can select this function to switch see picture 5 14 Picture 5 14 Set variable mix ratio First you need to get the current z axis co...

Page 26: ...rting position z axis height of automatic change of mixing automatically change the mix based on the current Z height obtained in the previous step end Z The end of automatic change of mixing z axis h...

Page 27: ...to home to home the printer see picture 5 21 Picture 5 21 Choose Move axis to move motors See picture 5 22 Picture 5 22 Choose from Move X Y Z Extruder1 Extruder2 and rotate the knob to move them See...

Page 28: ...Picture 5 24 Note we suggest using 1mm to test X Y Z axis After axis testing finished if you want to unlock the motor choose Prepare Disable steppers see picture 5 25 Picture 5 25 When the motors are...

Page 29: ...such as signal interference the USB printing prone to fail So we suggest choosing SD card printing The details of USB printing are as follows Firstly turn on the printer and connect the printer to com...

Page 30: ...load link for CH340 https www geeetech com index php main_page download download_id 40 After the driver is installed check the Device manager and see if it is same as the picture below 6 3 If so it me...

Page 31: ...inter parameters When Repetier Host is installed turn on the printer and open the Repetier Host Repetier Host supports several languages You can choose your native language from Config Language Pictur...

Page 32: ...ecting Click Printer settings on the top right corner see picture 6 6 Picture 6 6 It pops up the content as the picture below 6 7 Write down the relevant info accordingly Pay attention to the highligh...

Page 33: ...33 SHENZHEN GETECH TECHNOLOGY CO LTD b Printer dialog Picture 6 8 Picture 6 8 c Extruder dialog Picture 6 9 Picture 6 9...

Page 34: ...meters are set Note The baud rate is still 250000 Set slicing parameters After setting the printer parameters click Connect on the top left corner The color of the icon changed to green means the prin...

Page 35: ...n the configuration menu See picture 6 12 Picture 6 12 It pops up dialog as picture below 6 13 Picture 6 13 Printer parameters are important to print quality Customers need to run tests to find the be...

Page 36: ...the steps as follows The following is an example of parameters for PLA Picture 6 14 Click Print Import Picture 6 14 It pops up the dialog as below Picture 6 15 Choose Geeetech A10M PLA high rcp and op...

Page 37: ...37 SHENZHEN GETECH TECHNOLOGY CO LTD Picture 6 16 Click Filament Import see picture 6 17 Picture 6 17 It pops up dialog as below Picture 6 18 choose Geeetech A10M PLA high fi rcf...

Page 38: ...Picture 6 18 Now the configuration file is imported Click Save See picture 6 19 Picture 6 19 Choose Geeetech A10M PLA high as print configuration and Geeetech A10M PLA high fi as printing material se...

Page 39: ...rt USB printing when the parameters setting are finished The model file format is stl for 3D printer You can download free models from websites such as thingiverse com You can also design your own mod...

Page 40: ...40 SHENZHEN GETECH TECHNOLOGY CO LTD Picture 6 21 Picture 6 22...

Page 41: ...oom out or rotate the model Picture 6 23 Adjust the direction of the model so that the flat part of the model is touching the hot bed See picture below 6 24 Picture 6 24 Note If the model loaded is to...

Page 42: ...5 Or zoom in out them separately see picture 6 26 Picture 6 26 You need to combine the models for dual color printing Drag mouse to merge one model into another see picture 6 27 Picture 6 27 Below com...

Page 43: ...EN GETECH TECHNOLOGY CO LTD Picture 6 28 Model slicing When the size and direction of the model are set choose the imported slicing parameters and click Slice with CuraEngine See picture 6 29 6 30 Pic...

Page 44: ...printing Refer to picture 6 31 The printer will heat to the target temp and then start printing Under high temperature the filament will flow out of the nozzle which is normal You can use tweezers to...

Page 45: ...on the right side of the LCD screen Press the knob to enter the main menu and choose Print from SD See picture 6 33 Picture 6 33 Choose the corresponding gcode file to start printing Note The printer...

Page 46: ...m viewtopic php f 92 t 61760 7 2 Introduction Free and easy to use color mixer can mix your original single color gcode file You can create thousands program of mixing as you could Click Import G to i...

Page 47: ...ECHNOLOGY CO LTD Picture 7 2 After importing the Gco file you can set the start and end layer and the percentage of E0 E1 start layer to end layer You can adjust by dragging the slider or entering a v...

Page 48: ...You can click Add to set several start and end layer value and the percentage of E0 E1 start layer to end layer See picture 7 4 Picture 7 4 When you finished configuration you need to click Mixer colo...

Page 49: ...SHENZHEN GETECH TECHNOLOGY CO LTD Picture 7 5 Click Export G to export the mixed gcode file which is named with a suffix _colored Copy the file to the SD card and start to print See picture 7 6 and 7...

Page 50: ...50 SHENZHEN GETECH TECHNOLOGY CO LTD Picture 7 6 Picture 7 7...

Page 51: ...he X and Y axes will auto home The extruder will extrude the residue in the nozzle Use a tweezers to clean the nozzle before starting printing again Note When power outage move the nozzle away from th...

Page 52: ...is function please check whether it is turned on or not Choose Control Filament Runout sensors and make sure it shows ON See pictures 8 3 8 4 Picture 8 3 Picture 8 4 It will pop up the notification Er...

Page 53: ...clean the nozzle Press the knob to enter the main menu and choose Resume print to re start the printing See picture 8 6 Picture 8 6 8 4 3D touch for auto bed leveling Optional This printer supports au...

Page 54: ...wood polymer PVA HIPS PETG etc Temperature parameters Environment temperature 10 40 Nozzle temperature Max temp 250 Hotbed temperature Max temp 110 Software parameters Operating system Windows Mac Lin...

Page 55: ...55 SHENZHEN GETECH TECHNOLOGY CO LTD 10 Contact Official website https www geeetech com Facebook Group Email us for technical support https www geeetech com contact_us html...

Page 56: ...eed can t match it Please reduce the printing speed 11 2 The gear of the extruder skips and makes an abnormal noise The nozzle is clogged please refer to 10 1 abnormal extrusion Check whether the fric...

Page 57: ...power supply voltage in the area is not stable please print after the voltage is stable Visit our official forum for more information http www geeetech com forum viewtopic php f 98 t 61864 12 Declarat...

Page 58: ...are due to normal wear product misuse or abuse product modification improper product selection noncompliance with any codes or misappropriation To the fullest extent permissible by the applicable law...

Page 59: ...59 SHENZHEN GETECH TECHNOLOGY CO LTD Shenzhen Getech Technology Co ltd www geeetech com...

Reviews: