Gebesa PRIME Assembly Manual Download Page 8

STEPS

8

ASCEND | 

“L” SHAPE

5.

Add the flat bracket (H) to the worksurface (A) using wood screws (I) as 
is shown in the image

PRIME 

DESK

6.

Move the return to the desk that you will join as is shown on 
the image. Desk is not included

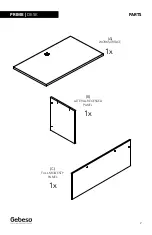
Summary of Contents for PRIME

Page 1: ...PRIME RETURN WITH FULL MODESTY PANEL ASSEMBLY MANUAL COD GBR615090L Questions Call Toll Free 1 844 2GEBESA or email warranty gebesa com...

Page 2: ...PARTS 2 ASCEND L SHAPE A WORKSURFACE 1x B LATERAL RECESSED PANEL 1x C FULL MODESTY PANEL 1x PRIME DESK...

Page 3: ...L SHAPE SCREWS 3 PRIME DESK D MINIFIX TITUS E MINIFIX BOLT F MINIFIX CAP 6x 6x 6x REQUIRED ASSEMBLY TOOLS NOT INCLUDED H FLAT BRACKET 2x I 8x5 8 WOOD SCREW G ADJUSTABLE LEVELER J 8x1 1 2 WOOD SCREW 2x...

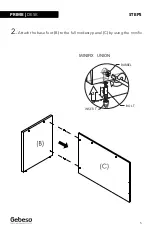
Page 4: ...STEPS 4 ASCEND L SHAPE 1 Set leveler G to the lateral recessed panel B PRIME DESK...

Page 5: ...STEPS 5 ASCEND L SHAPE 2 Attach the base foot B to the full modesty panel C by using the minifix PRIME DESK BARREL BOL T INSER T MINIFIX 3 2 1 BARREL BOL T INSER T MINIFIX UNION 3 2 1...

Page 6: ...EPS 6 ASCEND L SHAPE 3 Place the worksurface A on the previously installed base support and fasten by using the minifix PRIME DESK BARREL BOL T INSER T MINIF 3 2 1 BARREL BOL T INSER T MINIFIX UNION 3...

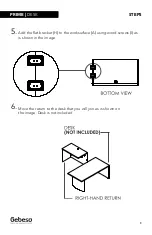
Page 7: ...UNION STEPS 7 ASCEND L SHAPE 4 Verify structure and assembly integrity PRIME DESK...

Page 8: ...CEND L SHAPE 5 Add the flat bracket H to the worksurface A using wood screws I as is shown in the image PRIME DESK 6 Move the return to the desk that you will join as is shown on the image Desk is not...

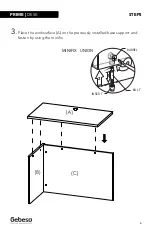
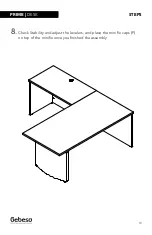
Page 9: ...STEPS 9 ASCEND L SHAPE 7 Secure the return to the desk using wood screws PRIME DESK I J...

Page 10: ...STEPS 10 ASCEND L SHAPE 8 Check Stability and adjust the levelers and place the mini fix caps F on top of the minifix once you finished the assembly PRIME DESK...

Page 11: ...Questions Call Toll Free 1 844 2GEBESA or email warranty gebesa com...

Page 12: ......

Reviews: