background image

8826670000

_2019-10-25

FI
SE
NO
GB
EE
LT
LV

Asennus- ja hoito-ohje
Monterings och skötselanvsning
Monterings-og vedlikeholdsanvisning
Operating and maintenance instruction
Paigaldus- ja hooldusjuhend 
Naudojimo ir priežiūros instrukcija
Montāžas un apokopes instrukcija

GLOW

-WC

Geberit Group

Geberit Group

GLOW 

WC-60

WC-61

WC-62

WC-63

WC-64

WC-67

Summary of Contents for IDO GLOW-WC Series

Page 1: ...ings och sk tselanvsning Monterings og vedlikeholdsanvisning Operating and maintenance instruction Paigaldus ja hooldusjuhend Naudojimo ir prie i ros instrukcija Mont as un apokopes instrukcija GLOW W...

Page 2: ...V Tehniskie Z m jumi 4 16 FI Asennus SE Montering NO Montering GB Installation EE Paigaldus LV Montavimas LT Uzst d ana 5 13 16 FI Huolto SE Sk tsel NO Vedlikeholdsanvisning GB Maintanance advice EE H...

Page 3: ...1 2 12 3 4 6 7 8 9 5 19 20 21 24 22 23 13 14 29 28 27 WC 62 WC 63 WC 67 L R 30 WC 60 WC 61 i FI https varaosat ido fi SE https reservdelar ido se Export https spareparts idobathroom com NO https reser...

Page 4: ...285 340 10 440 445 265 635 860 420 180 90 102 250 20 355 420 155 420 34 105 285 340 10 440 525 365 65 75 635 860 420 260 25 245 355 420 9 15 32 102 155 420 34 105 250 385 10 480 540 390 65 60 635 900...

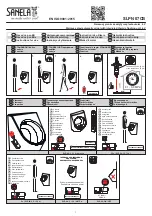
Page 5: ...5 16 10 1 2 Before Installation Installation ON OFF a c b d min 400 min 100...

Page 6: ...stisk limmassa rekommendras ej om golvet r lagt med plastmatta Montering med lim anbefales ikke med gulv som har v tromsbelegg Fastening with elastic adhensive is not recommended if the floor is cover...

Page 7: ...OW WC 60 61 GLOW WC 60 SILICONE EN 15651 3 Class XS1 1 2 3 SILICONE EN 15651 3 Class XS1 SILICONE EN 15651 3 Class XS1 WC kulhon kiinnitys lattiaan WC stolens montering p golv Klosettets montering p g...

Page 8: ...8 16 1 2 4 3 5 SILICONE EN 15651 3 Class XS1 15 Torx 25 S I L I C O N E E N 1 5 6 5 1 3 C l a s s X S 1 1 2 SILICONE EN 15651 3 Class XS1 15 8 15 GLOW WC 62 WC 63 WC 67...

Page 9: ...9 16 NOTES 850 Siphon min 20 mm Norway 40 32 GLOW WC 63 WC 67...

Page 10: ...10 16 1 2 4 3 1 2 1 1 Torx T25 Maintenance Replacing the flush valve sealing...

Page 11: ...11 16 2 3 2 1 3 a b c 14 Disconnecting the inlet valve...

Page 12: ...12 16 1 1 2 2 CLICK 2 3 L CLICK 4 6 L 4 6L Adjust the amount of flush water valve Water supply pipe connected to the left side Single flush...

Page 13: ...13 16 3 7 5 4 8 6 max 1 0 Nm 3 1 2 4 Torx T25 max 1 5 Nm...

Page 14: ...gagents Clean regularly to prevent cleaning problems However avoid using cleaning agents on the flush button instead use hot water and soap and wipe dry with a cloth This is because cleaning agents fo...

Page 15: ...15 16 NOTES...

Page 16: ...tuki geberit com www ido SVERIGE Geberit AB Box 140 SE 295 22 Brom lla T 46 456 480 00 info ido se www ido se EXPORT www idobathroom com NORGE Geberit AS Luhrtoppen 2 NO 1470 L renskog T 47 67 97 82 0...

Reviews: