1905-CP and 1907-CP Thermostatic Valves
Installation Instructions
(continued)
2
CHICAGO FAUCETS LIMITED WARRANTY
TO WHOM DOES THIS WARRANTY APPLY?
— The Company extends the following limited warranty to the original user only.
WHAT DOES THIS WARRANTY COVER AND HOW LONG DOES IT LAST?
This warranty covers the following Commercial Products:
LIFETIME FAUCET WARRANTY
— The “Faucet,” defined as any metal cast, forged, stamped or formed portion of the Product, not including electronic or moving parts or other
products separately covered by this Limited Warranty or water restricting components or other components, is warranted against material manufacturing defects for the life of the Product.
FIVE YEAR FAUCET WARRANTY
— Certain Products and portions of the Product are warranted against material manufacturing defects for a period of five (5) years from the date of Product purchase. Products warranted against material
manufacturing defects for a period of five (5) years from the date of Product purchase are referred to by the product numbers 42X, 43X, 15XX and E-Tronic
®
- 4X, 5X, 6X, 7X, 8X and 9X. All zinc die cast portions of Product are warranted against
material manufacturing defects for a period of five (5) years from the date of Product purchase.
THREE YEAR ELECTRONICS WARRANTY
— Electronic components, including the solenoid, are warranted for three (3) years from the date of installation.
FIVE YEAR CARTRIDGE WARRANTY
— The “Cartridge”, defined as the metal portion of any Product typically referred to by the product numbers containing 1-099, 1-100, 377X,
217X and 274X, excluding any rubber or plastic components, is warranted against material manufacturing defects for a period of five (5) years from the date of Product purchase.
All Cartridges included in the Company’s Single Control or Shower Products also are warranted against material manufacturing defects for a period of five (5) years from the date of Product purchase.
ONE YEAR FINISH WARRANTY – COMMERCIAL
— For Products used in commercial applications, the finish of the Product is warranted against material manufacturing defects for a period
of one (1) year from the date of Product purchase.
OTHER WARRANTIES
— All other Products not covered above are warranted against material manufacturing defects for a period of one (1) year from the date of Product purchase.
Other restrictions and limitations apply. For complete warranty details, call Chicago Faucets Customer Service at 847-803-5000 or visit chicagofaucets.com.
© 2021 Chicago Faucet Company TAG-1905 05/21
The Chicago Faucet Company
2100 South Clearwater Drive
Des Plaines, IL 60018
Phone: 847/803-5000
Fax: 847/849-1845
Technical: 800/832-8783
www.chicagofaucets.com
Care and Maintenance
Periodic inspection and yearly maintenance by a licensed contractor is required for all thermostatic mixing elements. Corrosive water conditions and/or unauthorized adjustments or repair could render the
thermostatic valve ineffective for service intended. Regular checking and cleaning of the valve’s internal components and check stops helps assure maximum life and proper product function. Frequency
of cleaning and inspection depends on local water conditions. All Chicago Faucets fittings are designed and engineered to meet or exceed industry performance standards. Care should be taken when
cleaning this product. Do not use abrasive cleaners, chemicals, or solvents as they can result in surface damage. Use mild soap with warm water for cleaning and protecting the surface of Chicago Faucets
fittings.
WARNING
: Before servicing checkstops or piping, always turn off the upstream water supply.
EVERY 12 MONTHS:
• Open up the checkstops and check for free movement of the poppet. To access the checkstops, remove the handle assembly and trim plate.
• Before servicing the valve, turn off the water supply upstream OR close the checkstops. To close the checkstops, turn the adjustment screw fully clockwise on each checkstop.
• Remove the valve bonnet and rinse all grit and impurities from the cartridges.
• Winterize valves that are used outdoors. Remove and store the internal components and drain all water from the valve.
For additional technical assistance, call 800/TEC-TRUE (800-832-8783) or visit our website at chicagofaucets.com.
Troubleshooting
What to look for if:
The Maximum Temperature Cannot Be Obtained:
a. Lime deposits may have accumulated in the hot water pipes,
restricting the hot water supply.
b. The hot water supply temperature may be too low.
c. The handle rotation setting may be too low. Remove valve handle,
and readjust the high temperature limit stop.
Flow Of Water Is Less Than Desired:
a. The upstream supply valves may not be fully open.
b. The inlet supply pressure(s) may be low.
c. The showerhead may be clogged. Remove and clean the
showerhead.
d. The checkstops may be clogged. Refer to Preventative
Maintenance section.
The Valve Opens With Hot Water Flow Rather Than Cold
Water Flow:
a. The inlet water supplies are connected to the wrong ports or
cartridge is installed improperly.
The Tempered Water Is Too Cold, Although Cartridge Has
Been Replaced, 0r The Hot Water Temperature Is Below
115°F:
a. Raise the temperature of the hot water supply.
Flow Of Water Is Completely Shut Off:
a. The upstream supply valves may be completely closed.
b. The hot or cold water supply pressure may have failed. The 1905
and 1907 valves are designed to close down upon cold water
supply pressure failure.
c. The checkstops may be closed. Access the checkstops and
open by turning the adjustment screw fully counterclockwise.
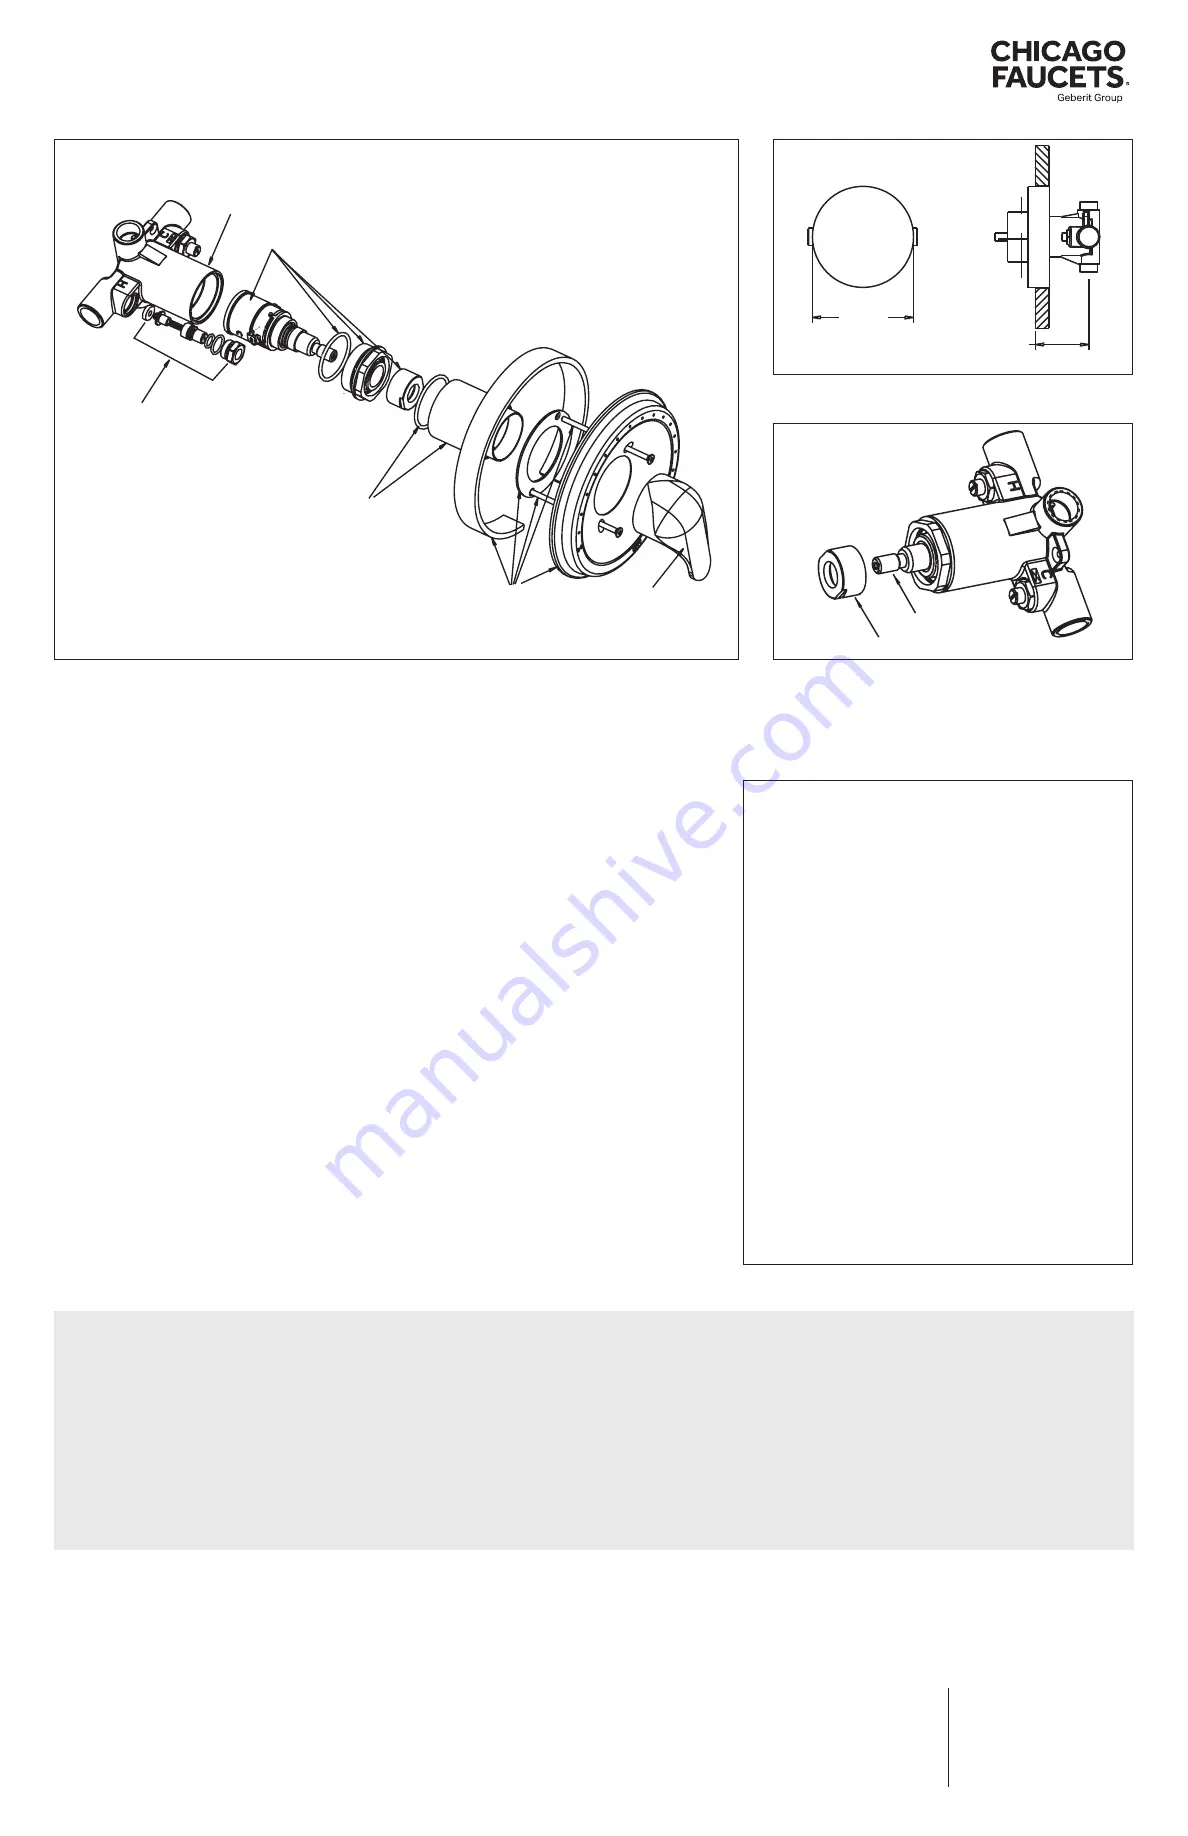
Cartridge Replacement Instructions
Disassembly:
1. Turn off hot & cold water supply-stops.
2. Remove the handle and trim plate.
3. Remove bonnet.
4. Remove all internal components from the valve body.
5. At this point you should have an empty valve body.
You are now ready to put the new cartridge into your existing valve.
Reassembly:
1. Ensure the inside of the valve body is free of deposits and debris. Clean as necessary.
2. Place the cartridge into the body ensuring following:
a) “C” on the cartridge should be on the cold inlet side.
b) Align tab on the back of the cartridge to the groove in the body.
3. While holding cartridge firmly, screw bonnet into body; tighten to 100 + 20/-0 in-lbs.
4. Turn the hot and cold water supplies back on and verify there is no leakage.
Maximum Temperature Setting/Handle Rotation Stop:
The handle rotation setting must be adjusted to limit the distance the user can rotate the handle towards the
full hot water position.
CAUTION
: Any repair or modification of the valve may affect the high temperature setting. The maximum
temperature setting must be checked by the installer before use.
5. Adjust the valve to the desired maximum outlet temperature [110°F (43°C) max]. Screw on the high temp.
limit stop until it touches the stem shoulder.
6. Turn the stem clockwise until the water stops. Open valve to full hot position and verify max outlet
temperature setting.
7.
(a) For 1905
1. Install the trim plate.
2. Snap-on the indicator plate. Guide on the back of the plate goes into the locator hole.
3. Install O-ring on the bonnet, slide sleeve on the bonnet.
4. Install handle and tighten the set screw.
CAUTION: Indicator plate must be installed before sleeve.
7.
(b) For 1907
1. Place sleeve O-ring on the bonnet shoulder. Slide sleeve over the O-ring until it stops and replace trim
plate and handle.
Valve
Body
Cartridge
Kit
Checkstop
Replacement Kit
Sleeve Kit
Handle Kit
2-7/16” Max.
1-7/16” Min.
4-5/8”
High Temp. Stop
Stem
Trim Plate Kit
Valve
Body
Cartridge
Kit
Checkstop
Replacement Kit
Sleeve Kit
Handle Kit
2-7/16” Max.
1-7/16” Min.
4-5/8”
High Temp. Stop
Stem
Trim Plate Kit
Valve
Body
Cartridge
Kit
Checkstop
Replacement Kit
Sleeve Kit
Handle Kit
2-7/16” Max.
1-7/16” Min.
4-5/8”
High Temp. Stop
Stem
Trim Plate Kit
Figure 3
Figure 5: Max. Temperature Setting
Figure 4: Rough-In Guide