background image

FUNCTIONS

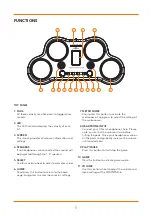
TOP PANEL

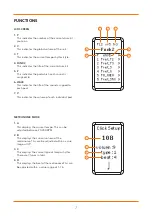
1.   PADS 

Hit these velocity sensitive pads to trigger drum 
sounds. 

2.   LED


This LED indicator displays the velocity of each 
hit. 

3.   SCREEN


This screen provides all relevant information and 
settings. 

4.   SPEAKERS


If no headphones are connected then sound will 
be projected through the 1.5” speakers. 

5.   SELECT


Use this control wheel to adjust parameter values.

6.   HOME


Short press this button to return to the home 
page. Long press to enter the drum kit settings.


7.   METRONOME


Short press this button to activate the 
metronome. Long press to adjust the setting of 
the metronome. 


8.  HEADPHONE INPUT


Connect your 3.5mm headphones here. Please 
note, ensure that the volume is low before 
hitting the pads. Once your headphones are on 
hit the pads and gradually increase the volume 
until comfortable. 


9.   PLAY/PAUSE


Press this button to start/stop the game. 

10.   GAME


Press this button to activate game mode. 

11.   VOLUME


Use this control wheel to adjust the volume and 
some settings of the VISIONPAD-6.

5

6

10

5

4

3

11

7

9

1

1

2

3

1

1

8

Summary of Contents for VISIONPAD-6

Page 1: ...ELECTRONIC DRUMPAD USERMANUAL VISIONPAD 6 VISIONPAD6 GR VISIONPAD6 OR...

Page 2: ...onregelmatigheid ondervindt VAROITUS FI l avaa kantta Ei sis ll k ytt j huollettavia osia Huollot saa suorittaa vain p tev huoltomies l s ilyt tuotetta mink n kuuman l hell kuten patteri tai suorassa...

Page 3: ...k m vibr ci m alebo okom Produkt nesmie pr s do kontaktu s vodou a iadny objekt naplnen vodou ako napr v za nesmie by umiestnen na produkt iadne v robky s otvoren m oh om ako napr svie ky by nemali by...

Page 4: ...ity sensitive pads provide realistic drumming experience Includes kick and hi hat pedals Achieve great drum tones with 30 fully customisable kits and 163 sounds Master the basics of rhythm and track y...

Page 5: ...o the home page Long press to enter the drum kit settings 7 METRONOME Short press this button to activate the metronome Long press to adjust the setting of the metronome 8 HEADPHONE INPUT Connect your...

Page 6: ...IONPAD 6 to a power source here 13 POWER Press this button to turn the VISIONPAD 6 on off 14 PEDAL Connect the hi hat and kick pedals here using the 6 3mm Jack 15 BATTERY COMPARTMENT Insert 6 x AA alk...

Page 7: ...his indicates the volume of each individual pad METRONOME MODE 1 A This displays the current tempo This can be adjusted between 20 240 BPM 2 B This displays the current volume of the metronome This ca...

Page 8: ...that column 6 represents the kick pad When the column 4 blocks have a hollow middle this indicates represents the hi hat pedal should be pressed at the same time as pad 4 4 D Notes will make their way...

Page 9: ...game begins On the LCD screen you ll see various blocks making their way downwards When they reach the bottom of the screen you hit the corresponding pad to score points 1 Press GAME to enter game mo...

Page 10: ...3 DFk_HHCH 044 DFk_HHOH 045 ED8_HHCH 046 ED8_HHOH 047 ED9_HHCH 048 ED9_HHF 049 Hip_HHCH 050 Hip_HHFR 051 Jazz_HHF 052 Jazz_HHP 053 Pay_HHCH 054 Pay_HHF 055 PDC_HHCH 056 PDC_HHF 057 PH_HHCH 058 PH_HHF...

Page 11: ...Owl 140 Phone 141 Plate 142 Poyo 143 Rain 144 Rain1 145 Select 146 Snaps 147 Snoring 148 Soda 149 Starwar DRUM GROUP NUMBER DRUM GROUP 001 Acoustic 002 Bossa 003 Child 004 ChaCha 005 Little 006 Classi...

Page 12: ...o not hesitate to contact the Gear4music Customer Service Team on 44 0 330 365 4444 or info gear4music com KETTLESTRING LANE YORK YO30 4XF UNITED KINGDOM METALLV GEN 45A 195 72 ROSERSBERG STOCKHOLM SV...

Reviews: