background image

HARDWARE INSTALLATION: 

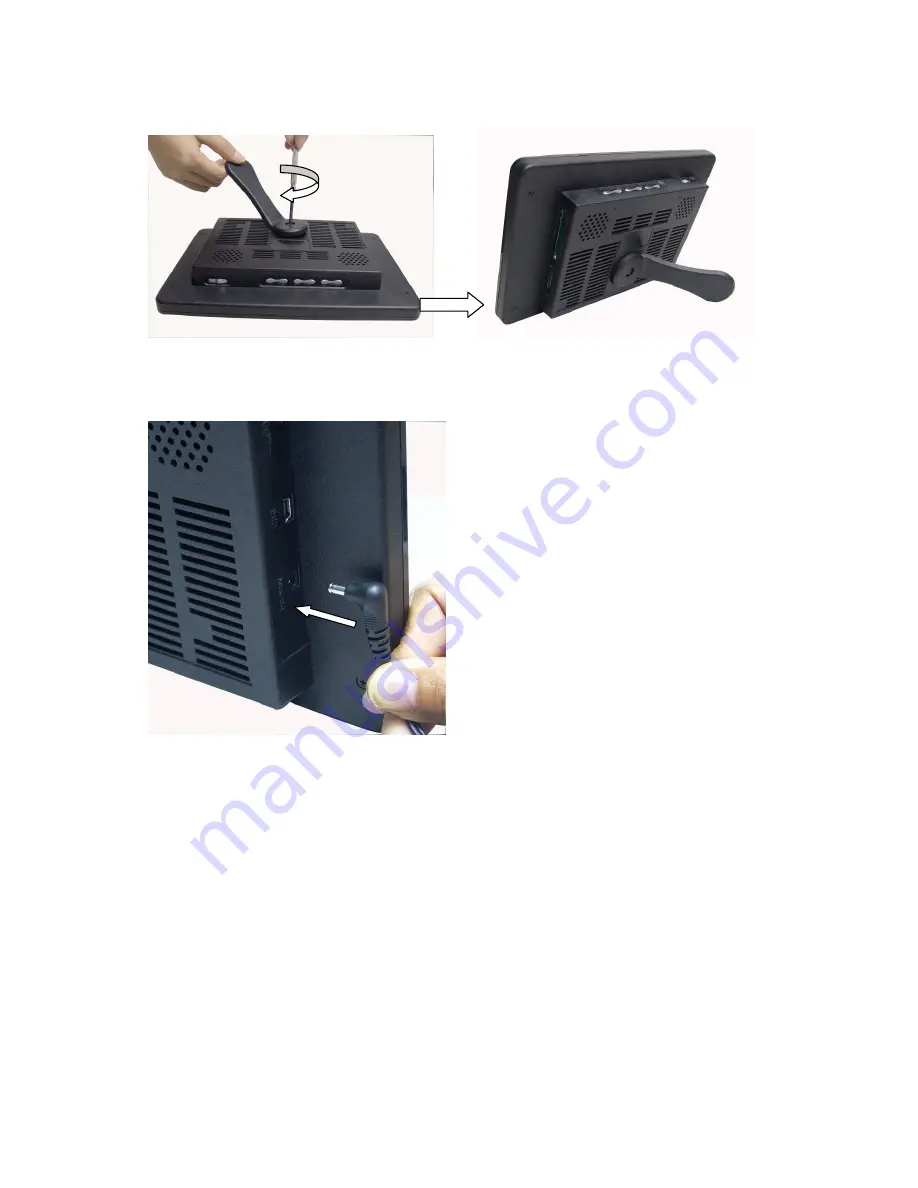
1.  Attach the enclosed Stand onto the back of your Digital Photo Frame with a screw driver 

(not included). 


2.  Connect the power jack of the enclosed AC Power Adapter to your Digital Photo Frame, 

and plug the other end into an electrical outlet.   


3.  Place your Digital Photo Frame on a flat and steady surface. 

4.  Your Digital Photo Frame is now ready to be used. 


Summary of Contents for 8-4DPF100

Page 1: ...PID 161311 109239 Rev 070830 Digital Photo Frame 8 4 LCD Model 8 4DPF100 User s Manual ...

Page 2: ...2 ...

Page 3: ...ction against frequency interference in residential installation This equipment generates uses and can radiate radio frequency energy and if not installed or used in accordance with the instructions may cause harmful interference to radio communication However there is no guarantee that interference will not occur in television reception which can be determined by turning the equipment off and on ...

Page 4: ...w Digital Photo Frame complies with the following specifications Screen Dimensions 8 4 inches Resolution 480 x 234 Brightness 300 cd m2 Contrast 350 1 Photo File Format JPEG Memory Card Formats SD MMC MS or CF Usage Options Manual Remote Control or Slideshow Power Supply AC 100 240V DC 12V Operating Temperature 5C to 50C Max Power Consumption 12W Supported Operating Systems Windows 2000 XP Vista M...

Page 5: ...5 HARDWARE DESCRIPTION Display Screen Photo Frame Stand USB Cable AC Adapter Remote Control CF Card Slot SD MMC MS Card Slot USB Port Power Jack ...

Page 6: ...uttons can also be used to move the photo up or down after a photo has been zoomed in Press to navigate left and right or move the photo to the right or left after a photo has been zoomed in Built in Control ON OFF SWITCH Power ON OFF ENTER Press to select an option or a photo Press to save a changed setting in the setup screen MENU ESC Press and hold to open the setup screen or the control menu w...

Page 7: ...o Frame with a screw driver not included 2 Connect the power jack of the enclosed AC Power Adapter to your Digital Photo Frame and plug the other end into an electrical outlet 3 Place your Digital Photo Frame on a flat and steady surface 4 Your Digital Photo Frame is now ready to be used ...

Page 8: ...as shown below following the orientation guide on the memory card 3 Turn on your Digital Photo Frame and the below screen will appear 4 Use the enclosed Remote Control or the Built in Control buttons and select the icon on the left to enter the Card Selection Menu Choose the media card you would like to view the photos stored in the selected card will be displayed on the screen as thumbnails 12 th...

Page 9: ...he memory instead of displaying all of the photos as thumbnails at the same time Aspect Ratio Select this to have the photos displayed at the ratio of the picture or by expanding to the full screen size of your Digital Photo Frame LCD Power Saving Select this to set the LCD power saving mode Select the time for your Digital Photo Frame to turn off automatically according to the time limit or selec...

Page 10: ...mputer 3 Plug the USB mini B connector end of the enclosed USB Cable to your Digital Photo Frame 4 Plug the USB A connector end of the USB Cable into an available USB port on your computer 5 Your computer will detect and install the necessary drivers automatically 6 Your Digital Photo Frame can now be used as a card reader ...

Page 11: ...11 ...

Page 12: ...r damages and claims or damages related to loss of or damage to your records or data This warranty does not apply to any product the exterior of which has been damaged or defaced This warranty will be voided by misuse improper physical environment improper repair acts of God war or terror commercial use and improper service operation or handling Technical Support Gear Head provides Technical Suppo...

Reviews: