Gear Head 1-4DPF200 User Manual Download Page 5

INSTALLATION: 

NOTE:  

Please be sure that you close all the applications on your computer before you begin the 

installation.  Please charge you Digital Keychain by connecting the enclosed USB cable to your 
computer following the instruction below for minimum of 4 hours prior of first use.  Each full charge 
will last for 2 hours of viewing time.  The actual charging time varies depending the level of 
discharge.  The life cycle of the internal rechargeable battery is 400 charges. 
 

1.  Turn on your computer. 

2.  Insert the enclosed drive CD into the CD-ROM drive of your computer. 

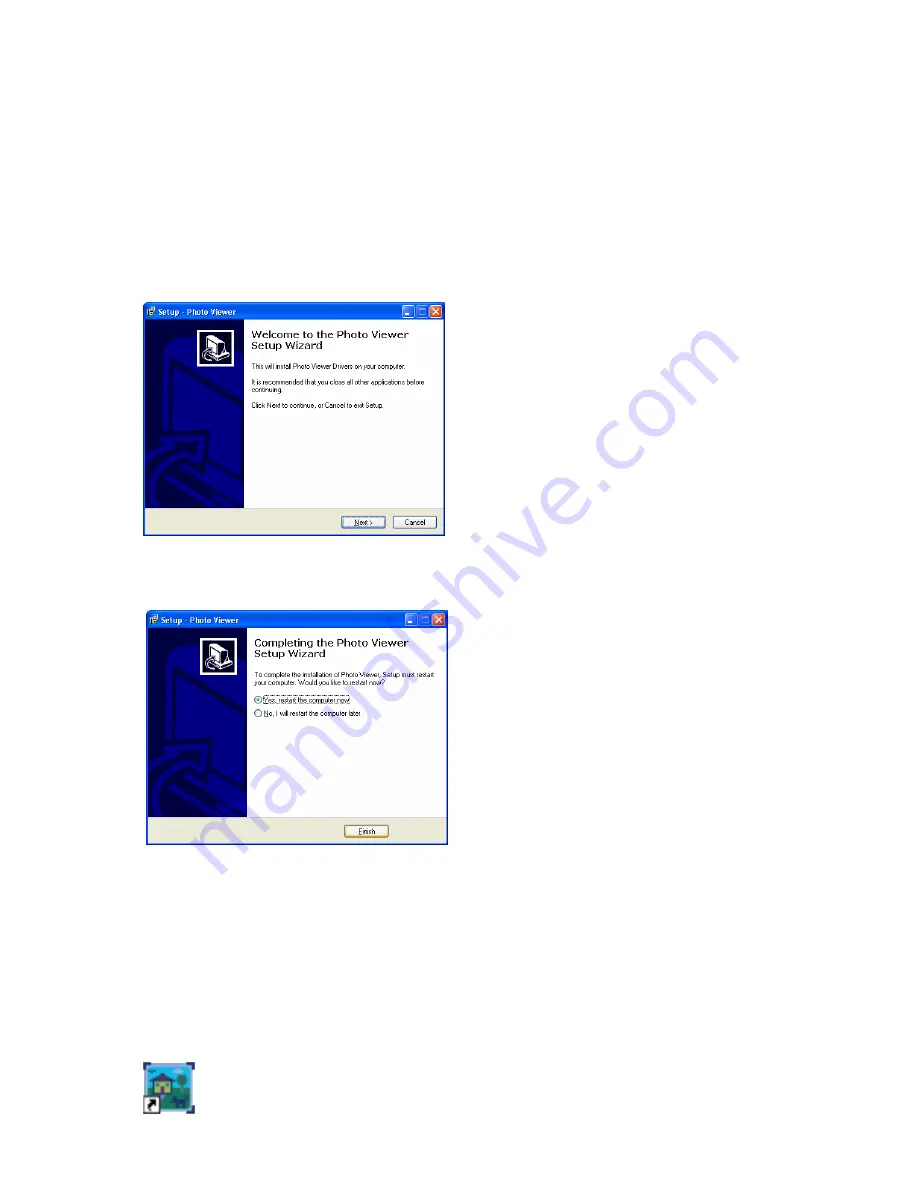
3.  The Photo Viewer Setup Wizard will appear automatically, follow the onscreen instructions 

to complete the installation.       


4.  When the following interface appear for the last step, please click “

Yes, restart the 

computer now” 

to restart your computer. 


5.  After your computer has restarted, pug the USB mini-B connector of the enclosed USB 

cable to your digital photo frame. 

6.  Plug the USB-A connector of the enclosed USB cable into an available USB port on your 

computer. 

7.  Your computer will automatically detect and install the necessary drivers.  

8.  Your new digital photo frame is now ready to be used. 

9. The “

Photo Transfer Application

” icon as shown below will appear on your desktop. 


Summary of Contents for 1-4DPF200

Page 1: ...PID 161302 109241 Rev 070731 Digital Keychain 1 4 LCD Model 1 4DPF200 User s Manual ...

Page 2: ...ction against frequency interference in residential installation This equipment generates uses and can radiate radio frequency energy and if not installed or used in accordance with the instructions may cause harmful interference to radio communication However there is no guarantee that interference will not occur in television reception which can be determined by turning the equipment off and on ...

Page 3: ...ECIFICATIONS Your new Digital Keychain complies with the following specifications USB Interface HARDWARE DESCRIPTION Press to turn on your digital photo frame or press and hold for 5 seconds while your digital photo frame is running to turn off your photo frame POWER ENTER SWITCH While the digital photo frame is turned on press this switch to open the control menu This button also acts as an Enter...

Page 4: ...ack 4 installed You can determine if you have Service Pack 4 by right clicking My Computer and then selecting Properties Select the General tab and the Service Pack you have will be listed under System If Service Pack 4 is not listed please visit www windowsupdate com and install it For Windows XP Windows XP users are recommended to have Service Pack 2 You can determine if you have Service Pack 2 ...

Page 5: ... drive CD into the CD ROM drive of your computer 3 The Photo Viewer Setup Wizard will appear automatically follow the onscreen instructions to complete the installation 4 When the following interface appear for the last step please click Yes restart the computer now to restart your computer 5 After your computer has restarted pug the USB mini B connector of the enclosed USB cable to your digital p...

Page 6: ...hoto Transfer Application will not keep record of the photos that is currently stored in you digital photo frame Note If No is selected all existing photos will be lost after you have transferred new photos to your digital photo frame 3 The screen below will appear 4 Some basic information is shown in the box on the upper right of the Photo viewer interface including the quantity of photos current...

Page 7: ...s displayed normally on the screen of your digital photo frame Select Keep aspect ratio to make photos displayed by ratio on the screen of your digital photo frame Click Transfer photos to transfer the photos to your digital photo frame A Photo transfer completely box will show onscreen Click to view previous page of photos selected Click to view next page of photos selected NOTE The Transfer phot...

Page 8: ...ncluding for any loss or damages and claims or damages related to loss of or damage to your records or data This warranty does not apply to any product the exterior of which has been damaged or defaced This warranty will be voided by misuse improper physical environment improper repair acts of God war or terror commercial use and improper service operation or handling Technical Support Gear Head p...

Reviews: