background image

49-90581-2

15

USING THE DR

YER

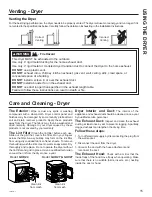
Venting - Dryer

Venting the Dryer

For the best drying performance, the dryer needs to be properly vented. The dryer will use more energy and run longer if it is 
not vented to the specifications below. Carefully follow the details on Exhausting in the Installation Instructions.

This dryer MUST be exhausted to the outdoors.
Use only 4” rigid metal ducting for the home exhaust duct.
Use only 4” rigid metal or UL-listed dryer transition duct to connect the dryer to the home exhaust.

DO NOT

 use a plastic vent.

DO NOT

 exhaust into a chimney, kitchen exhaust, gas vent, wall, ceiling, attic, crawl space, or 

concealed space of a building.

DO NOT

 install a screen in or over the exhaust duct.

DO NOT

 install a booster fan in the exhaust duct.

DO NOT

 use duct longer than specified in the exhaust length table.

Failure to follow these instructions can result in death or fire.

The  Exterior:

  Wipe  or  dust  any  spills  or  washing 

compounds  with  a  damp  cloth.  Dryer  control  panel  and 
finishes may be damaged by some laundry pretreatment 
soil  and  stain  remover  products.  Apply  these  products 
away from the dryer. The fabric may then be washed and 
dried  normally.  Damage  to  your  dryer  caused  by  these 
products is not covered by your warranty.

The Lint Filter:

 Clean the lint filter before each use. 

Slide  out  the  grid  that  covers  the  filter.  Run  your  fingers 
across the filter. A waxy buildup may form on the lint filter 
from using dryer-added fabric softener sheets. To remove 
this buildup, wash the lint screen in warm, soapy water. Dry 
thoroughly and replace. Do not operate the dryer without 
the lint filter and grid in place. Have a qualified technician 
vacuum the lint from the dryer once a year.

Dryer  Interior  and  Duct:


The  interior  of  the 

appliance and exhaust duct should be cleaned once a year 
by qualified service personnel.

The Exhaust Duct:


Inspect and clean the exhaust 

ducting at least once a year to prevent clogging. A partially 
clogged exhaust can lengthen the drying time.

Follow these steps:

1. Turn off electrical supply by disconnecting the plug from 

the wall socket.

2. Disconnect the duct from the dryer.

3. Vacuum the duct with the hose attachment and 

reconnect the duct.

The  Exhaust  Hood:


Check  with  a  mirror


that  the 

inside flaps of the hood move freely when operating. Make 
sure that there is no wildlife (birds, insects, etc.) nesting 
inside the duct or hood.

Model: 

GUD27 & GUV27

Clean lint 

from mesh

Model: 

GUD24

Clean lint 

from mesh

WARNING

- Fire Hazard

Care and Cleaning - Dryer

Correct 

Venting

Incorrect 

Venting

Summary of Contents for GUV27

Page 1: ...UPPORT Warranty 23 Consumer Support 24 GUV27 GUD27 GUD24 Write the model and serial numbers here Model _________________ Serial _________________ Open dryer door for model and serial number tag 49 905...

Page 2: ...nto every GE Appliances product and we think you will too Among other things registration of your appliance ensures that we can deliver important product information and warranty details when you need...

Page 3: ...and lid to the drying and washing compartments Failure to follow these instructions may result in death or injury to persons DO NOT reach into the appliance if the drum tub or agitator is moving to p...

Page 4: ...continuing If the lid is opened during this period the washer will pause You will have to push the Start button again to restart the cycle WHEN NOT IN USE Turn off water faucets to minimize leakage i...

Page 5: ...from a neighbor s phone Follow the gas supplier s instructions If you cannot reach your gas supplier call the fire department Installation and service must be performed by a qualified installer servic...

Page 6: ...curity system that prevents opening the lid during the spin cycle The lid lock prevents anyone especially children from reaching into the washer while the basket is spinning The lid lock will release...

Page 7: ...e fills and wash periods to provide optimal fabric care Whites and household linens Whites Hot Warm Colors Cool Cold Tap Cold Cycle tailored to clean and brighten your whites Large coats bed spreads m...

Page 8: ...he washer is in When the selector knob is set to a new cycle the Status lights will flash momentarily showing the stages the cycle will go through Temperature Select the water temperature for the wash...

Page 9: ...n up to full speed If you notice the load is more wet than normal at the end of the cycle redistribute the load evenly in the wash basket and run a Drain Spin cycle Wash and Rinse lights blinking Wate...

Page 10: ...per dispersion of the fabric softener Do not pour anything into the agitator if the dispenser is removed Liquid Bleach Funnel The water fill dilutes liquid chlorine bleach as the washer fills for the...

Page 11: ...ift the lid and submerge additional items next to the agitator Do not wrap long items like sheets or pants around the agitator Do not wash fabrics containing flammable materials waxes cleaning fluids...

Page 12: ...ppliances ConnectPlus will allow your appliance to communicate with your smartphone for remote appliance monitoring control and notifications Please visit www GEAppliances com connect to learn more ab...

Page 13: ...ing Do not use a stiff brush you may roughen the surface of the dispenser 5 Rinse and reassemble dispenser Place dispenser back on the agitator Exterior of the Washer Immediately wipe off any spills w...

Page 14: ...The timer does not rotate during the cycle until the thermostats sense that the clothes are dry then the timer rotates automatically to Off Select Less Dry if you want your clothes slightly damp at th...

Page 15: ...mally Damage to your dryer caused by these products is not covered by your warranty The Lint Filter Clean the lint filter before each use Slide out the grid that covers the filter Run your fingers acr...

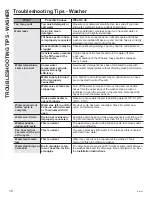
Page 16: ...nected to correct faucets Water valve screens are stopped up Turn off the water source and remove the water connection hoses from the upper back of the washer Use a brush or toothpick to clean the scr...

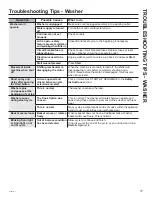
Page 17: ...r before completely shutting down If lid is raised before the motor is disengaged it will resume when lid is closed Short spray and delay after pushing the Start button Lid was opened and closed betwe...

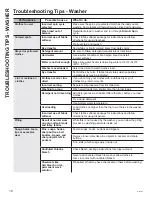
Page 18: ...o not dry your clothes with a clothes dryer your clothes may retain more lint Incorrect sorting Separate lint producers from lint collectors Washing too long Wash small loads for a shorter time than l...

Page 19: ...a click sound when activated The water level activates the relay and stops filling Clicking behind Control Panel during fill Automatic Temperature Control Valve This valve mixes in cold and hot water...

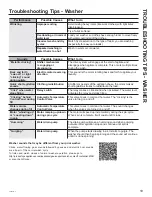
Page 20: ...y items can stain clean items and the dryer Clothes were not completely clean Sometimes stains which cannot be seen when the clothes are wet appear after drying Use proper washing procedures before dr...

Page 21: ...fuses or tripped circuit breaker Replace fuses or reset circuit breakers Since most dryers use 2 fuses breakers make sure both are operating Overloading combining loads Do not put more than one washer...

Page 22: ...22 49 90581 2 NOTES Notes...

Page 23: ...which vary from state to state To know what your legal rights are consult your local or state consumer affairs office or your state s Attorney General Warrantor GE Appliances a Haier company EXCLUSIO...

Page 24: ...in effect You can purchase it on line anytime GE Appliances Services will still be there after your warranty expires In the US GEAppliances com ge service and support shop for extended service plans h...

Page 25: ...use 20 AIDE AU CONSOMMATEUR Garantie 23 Aide au consommateur 24 Ecrivez le model et le Num ro de S rie ci dessous Mod le ________________ S rie __________________ Ouvrez la porte de la s cheuse pourtr...

Page 26: ...Appliances et nous pensons que vous le serez aussi Dans cette optique nous vous rappelons que l enregistrement de votre lectrom nager vous assure la communication de renseignements importants sur le...

Page 27: ...ents L omission d observer ces instructions peut causer le d c s ou des blessures NE vous penchez PAS dans l appareil si le tambour est en rotation la cuve ou l agitateur est en mouvement afin de pr v...

Page 28: ...laveuse effectuera une pause Il vous faudra rappuyer sur le bouton Start D marrer pour red marrer le programme LORSQUE L APPAREIL N EST PAS UTILIS Fermez les robinets d eau pour r duire les fuites en...

Page 29: ...ur de gaz Si vous ne pouvez pas joindre votre fournisseur de gaz appelez le service d incendie L installation l entretien et les r parations doivent tre ex cut s par un installateur agr un organisme d...

Page 30: ...e fonctionnement simultan de la laveuse et de la s cheuse si d sir Votre Laveuse poss de un syst me de s curite qui emp che l ouverture du couvercle pendant le cycle Cet te s curit emp che surtout les...

Page 31: ...hites Blancs Tr s chaude Chaude Couleurs Fra che Froide Froide du robinet Cycle adapt nettoyer et faire vos blancs plus brillants Grands manteaux jet s de lit couvre matelas sacs de couchage et autres...

Page 32: ...and le bouton s lecteur indique le d but d un nouveau cycle les voyants lumineux s allument momentan ment en montrant les tapes du cycle qui vont tre travers es Voyant Statut S allume On Active Quand...

Page 33: ...s humide que normalement la fin du cycle r partissez la charge uniform ment dans le panier de lavage et commencez un cycle de Drain Spin Drainer et Essorer Les voyants de Wash Lavage et Rinse Rin age...

Page 34: ...l adoucissant Ne rien verser dans l agitateur si le diffuser n est pas sa place Entonnoir pour la Javel liquide De la javel au chlore liquide est dilu e pendant le remplissage de la laveuse avant le...

Page 35: ...s enrouler de longs articles tels que draps ou pantalons autour de l agitateur Ne pas laver de v tements imbib s de produits inflammables waxs nettoyants fluides etc L agitation ne d butera pas tant q...

Page 36: ...12 49 90581 2 Notes NOTES...

Page 37: ...s prolong es Coupez l alimentation en eau au niveau des robinets Vidangez l eau des tuyaux et de la zone de la pompe de filtration de l eau en cas de risque de gel Nettoyage du Diffuseur d Adoucissant...

Page 38: ...leur La s cheuse fonctionne pendant dix minutes sans chaleur Les cycles automatiques d terminent seuls le niveau de s chage et fournir un s chage automatique programm Le minuteur ne tourne pas pendant...

Page 39: ...Risque d incendie AVERTISSEMENT L ext rieur Nettoyez ou d poussi rer les r sidus de lavage avec un linge humide Le tableau des commandes pourrait tre endommag par certaines salet s ou terre ou par ce...

Page 40: ...ement aux robinets Les crans des valves d eau sont stopp s Eteignez l arriv e d eau et d connectez les tuyaux de connection d eau de la partie arri re sup rieure de la laveuse Utilisez une brosse ou u...

Page 41: ...st lev avant l arr t du moteur cette proc dure se compl tera une fois le couvercle ferm Br ve pulv risation et d lai apr s l appui sur Start D marrer Le couvercle a t ouvert et ferm entre la s lection...

Page 42: ...inge les habits peuvent retenir plus de charpie Triage incorrect S parez les linges qui font de la charpie de ceux qui les attirent Lavage dure trop longtemps Lavez de plus petites charges moins de te...

Page 43: ...k derri re le tableaudes com pendant le remplissage Temp rature automatique Valve de Contr le Cette valve m lange l eau chaude et l eau froide Ce click repr sente la valve qui s allume et s etteint Le...

Page 44: ...tements et aussi la s cheuse Les habits n taient pas compl tement propres Parfois la salet qui ne se voit pas quand les habits sont mouill s se voit apr s le s chage Lavez bien le linge avant de le s...

Page 45: ...se se fait correctment Fusibles ou disjoncteurs ont saut Remplacez les fusibles ou rallumez les disjoncteurs La plupart des s cheuses utilisent 2 fusibles disjoncteurs v rifiez l tat de tous Surcharge...

Page 46: ...22 49 90581 2 NOTES Notes...

Page 47: ...qui varient d un tat ou d une province l autre Pour conna tre les droits dont vous b n ficiez communiquez avec le bureau des Relations avec les consommateurs de votre r gion ou de votre province Garan...

Page 48: ...ts Unis GEAppliances com ge service and support shop for extended service plans htm ou composez le 800 626 2224 durant les heures normales de bureau Au Canada GEAppliances ca en support purchase exten...

Page 49: ...a 20 ATENCI N AL CLIENTE Garant a 23 Atenci n al Cliente 24 Escriba los n meros de modelo y de serie aqu Model _________________ Serial _________________ Abra la puerta de la secadora para consultar l...

Page 50: ...creemos que usted tambi n Entre otras cosas el registro de su electrodom stico asegura que podamos entregarle informaci n importante del producto y detalles de la garant a cuando los necesite Registre...

Page 51: ...nes personales NO introduzca las manos en el electrodom stico si el tambor el tambor o agitador se encuentra en movimiento a fin de evitar enredos accidentales NO secar art culos que contengan gomaesp...

Page 52: ...tapa es abierta durante este per odo la lavadora se pausar Se deber presionar el bot n Start Iniciar nuevamente para reiniciar el ciclo CUANDO NO EST EN USO Cierre las llaves de paso minimizar las fug...

Page 53: ...gas Si no se puede comunicar con su proveedor de gas llame al departamento de bomberos La instalaci n y las reparaciones deber n ser realizadas por un instalador calificado agencia de servicios o el p...

Page 54: ...apertura de la tapa durante el ciclo de centrifugado El cierre de la tapa evita que cualquier persona especialmente los ni os llegue a la lavadora mientras la canasta est girando El bloqueo de la tapa...

Page 55: ...Fresca Fr a Fr a del Grifo Ciclo adaptado para limpiar y dar brillo a sus blancos Abrigos grandes acolchados cobertores de colchones bolsas de dormir y prendas voluminosas similares Prendas Volumi nos...

Page 56: ...s sea seleccionado como el tama o de la carga La tapa se deber cerrar a fin de continuar el llenado cuando Precise Fill Llenado Preciso en algunos modelos sea seleccionado Si la tapa se abre durante e...

Page 57: ...librar la carga y girar a plena velocidad Si se observa que la carga es m s h medo de lo normal al fin del ciclo redistribuye la carga de manera uniforme en el tambor de lavado y ejecute un ciclo de D...

Page 58: ...i n adecuada del suavizante para tela No vierta nada en el agitador si se retir el dispensador Embudo del Blanqueador L quido El llenado de agua diluye el blanqueador de cloro a medida que la lavadora...

Page 59: ...banas o pantalones alrededor del agitador No lave telas que contengan materiales inflamables ceras l quidos de limpieza etc La agitaci n no comenzar cuando la tapa se encuentre levantada Riesgo de in...

Page 60: ...nectPlus permitir que su electrodom stico tenga comunicaci n con su tel fono inteligente para un monitoreo remoto control y recepci n de notificaciones del electrodom stico Para aprender m s sobre las...

Page 61: ...Enjuague y vuelva a montar el dosificador Vuelva a colocarlo sobre el agitador Separe para la limpieza La parte exterior de la lavadora Limpie inmediatamente cualquier clase de derrame con un pa o h m...

Page 62: ...utom ticos determinan inmediatamente el nivel de secado de las telas y proporcionar un secado con sensor autom tico El temporizador no rota durante el ciclo hasta que el sensor del termostato indica q...

Page 63: ...panel de control de la secadora y los acabados podr n ser da ados por algunos productos de tratamiento para quitar suciedad y manchas Aplique estos productos lejos de la secadora Luego la tela podr s...

Page 64: ...ltros de malla de la v lvula de agua est n obstruidos Cierre la llave de agua y quite la las mangueras de conexi n de agua de la parte superior trasera de la lavadora Use un cepillo o mondadientes par...

Page 65: ...sconectar el motor antes de que se apague completamente Si se levanta la tapa antes de que el motor est desconectado el funcionamiento se reiniciar cuando se cierre la tapa Espray corto y retraso lueg...

Page 66: ...la ropa con un secador de ropa es posible que las prendas retengan m s pelusa Orden incorrecto Separe los productores de pelusa de los recolectores de pelusa Lavado demasiado prolongado Lave cantidade...

Page 67: ...o de centrifugado Una vez completado el centrifugado continuar en movimiento hasta que se detenga Zumbido Bomba de desag e La bomba de desag e har un zumbido cuando elimine el agua tras la agitaci n y...

Page 68: ...s sucias podr n ensuciar las prendas limpias y la secadora La ropa no estaba completamente limpia A veces algunas manchas que no se pueden ver cuando la ropa est mojada aparecen luego del secado Use l...

Page 69: ...cuente con la ventilaci n correcta Fusibles quemados o disyuntores desactivados Reemplace los fusibles o reinicie los disyuntores Debido a que la mayor a de las secadoras usan 2 fusibles disyuntores a...

Page 70: ...22 49 90581 2 NOTAS Notas...

Page 71: ...a de su Procurador General Garante GE Appliances a Haier company EXCLUSI N DE GARANT AS IMPL CITAS Su nica y exclusiva alternativa es la reparaci n del producto como se indica en la Garant a Limitada...

Page 72: ...adquirir en cualquier momento a trav s de Internet Los servicios de GE Appliances a n estar n all cuando su garant a caduque En EE UU GEAppliances com ge service and support shop for extended service...

Reviews: