


12
19
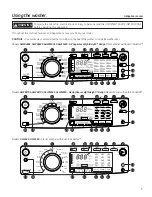
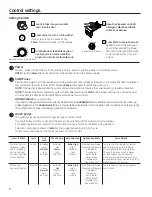
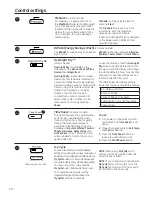
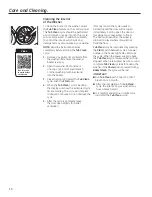
Control settings.
20
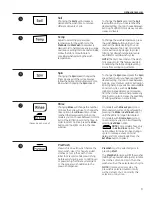
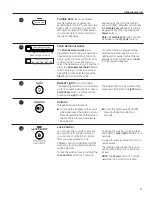
Add Steam
Add Steam
adds steam into the washer
early in the cycle to assist with loosening
stains on the
Towels/Sheets
,
Normal
,
Whites
,
Bulky
,
Active Wear
,
Power
Clean
,
Sanitize
or
Allergen
cycles.
To use:
1.
Turn power
ON
and select a wash
cycle. The
Add Steam
option is only
available on
Towels/Sheets
,
Normal
,
Whites
,
Bulky
,
Active Wear
,
Power
Clean
,
Sanitize
or
Allergen
cycles.
2.
Select the
Add Steam
button to
activate
steam.
3.
Press the
Start/Pause
button.
Delay Wash
You can delay the start of a wash cycle
for up to 24 hours. Press the
Delay
Wash
button to choose the amount
of time you want to delay the start of
the wash cycle. Once the desired time
is reached, press the
Start
button. The
machine will count down and start
automatically at the correct time.
NOTE:
If you forget to fully close the
door, a reminder signal will beep
reminding you to do so.
NOTE:
If you open the door when the
delay is counting down, the machine will
enter the pause state. You must close
the door and press
Start
again in order
to restart the countdown.
21
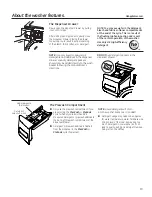
eMonitor
(on some models)
The
eMonitor
lights display the relative
energy use of your selected cycle and
options. They are provided as an energy
guide and range from Good (1 light) to
Better (5 lights). Some special cycles will
not provide a display.
22
Display
Displays the approximate time
remaining until the end of the cycle.
NOTE:
The cycle time is affected by how
long it takes the washer to fill. This depends
on the water pressure in your home. The
“smart” timer “learns” the amount of time
it takes to fill your washer and adjusts the
total time accordingly.
Cycle status is also displayed and certain
features such as
Delay Wash
or
Steam
are
shown indicating they have been selected.
If an out-of-balance condition is
detected by the washer, the
Spin
light
will blink during the remaining portion of
the cycle and will stay illuminated for a
short time after cycle completion. When
this occurs, the washer is taking actions
to correct the out-of-balance condition
and complete the cycle normally. In
some cases, the washer may not be
able to balance the load and spin up to
full speed. If you notice the load is more
wet than usual at the end of the cycle,
redistribute the load evenly in the wash
tub and run a
Drain + Spin
cycle.
In addition, the display will, “scroll” the
washer status:
•
dOOr
The washer door is open,
causing the machine to be in
PAUSE
mode until the door is properly closed.
•
LOAd SenSE
Sensing load size prior to
fill (normal operation). Cycles that do
not perform
LOAD SENSE
are
Active
Wear
,
Delicates
,
Speed Wash
,
Single
Item
,
Rinse & Spin
and
Tub Clean
.
•
PAUSE
Cycle paused because the
Start/Pause
or
Add Garment
button
was pressed and the washer was set
to
Pause
. Press
Start
button again to
restart the cycle.
•
End
End of current cycle.
•
OFF
Washer is shutting down. The
washer may need to drain the water
prior to unlocking the door and shutting
down.