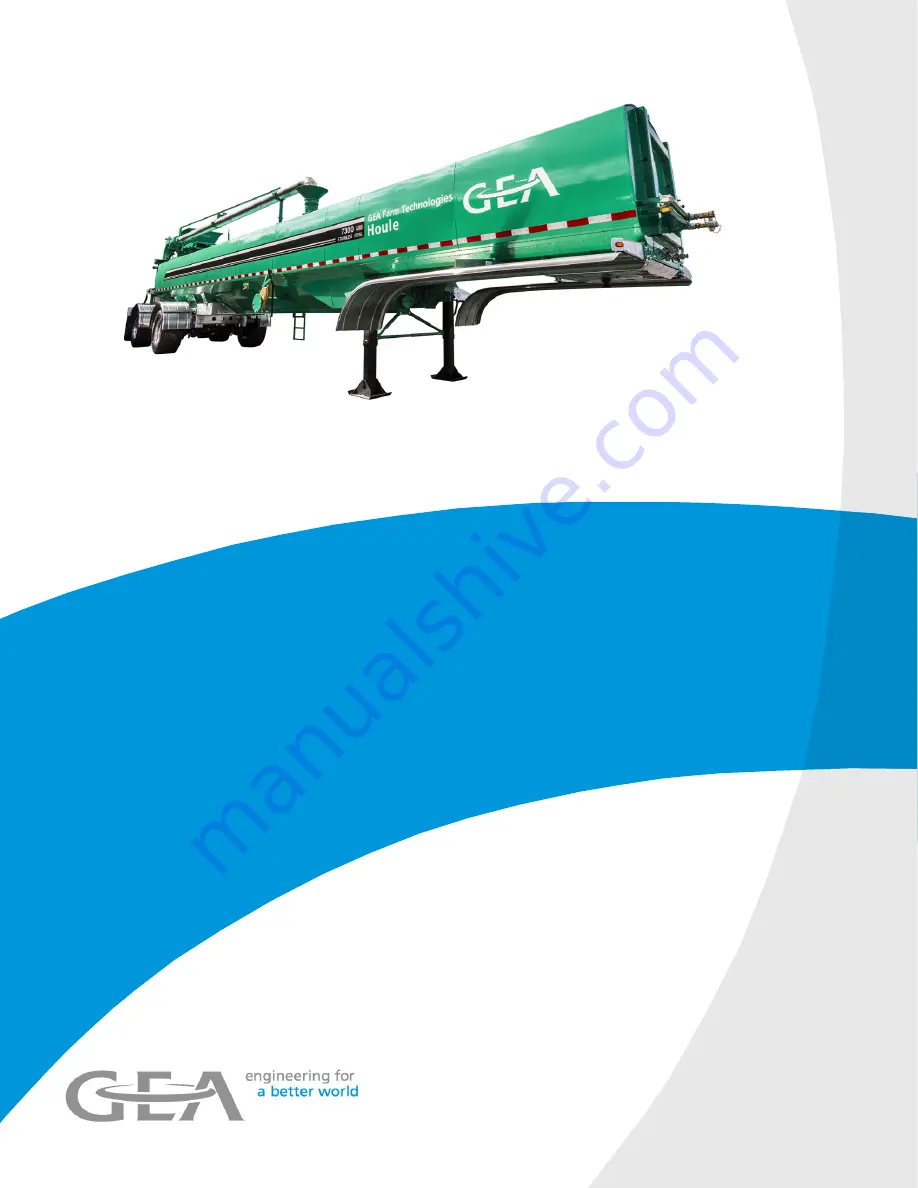
STR series
Semi-tanker
Operation Manual / Parts List(Original operating instructions)
2018-9015-00801. July 2018
gea.com
Page 1: ...STR series Semi tanker Operation Manual Parts List Original operating instructions 2018 9015 008 01 July 2018 gea com...
Page 2: ...before installation 33 4 4 Product handling 34 4 5 Hopper assembly 35 4 6 Top fill opening ball valve 36 4 7 Articulated transfer pipe assembly 37 4 8 Antenna positioning 42 4 9 Top fill indicator as...
Page 3: ...Safety Instructions 129 8 3 Troubleshooting possible faults 129 9 Decommissioning 135 9 1 Special Qualification 135 9 2 Safety Instructions 135 9 3 Temporary decommissioning 135 9 4 Disposal 136 10 U...
Page 4: ...ealer or directly from the manufacturer Layout elements Pictograms used Note The signaling word indicates information that is important for the product and environment This pictogram refers to an info...
Page 5: ...ts in material or workmanship for a period of twelve 12 months from the date of delivery of the equipment to the Purchaser This written warranty takes precedence over any other written warranty includ...
Page 6: ...defective parts of the equipment free of charge where installed or at the business place of the Authorized Dealer or the Company at its sole discretion 1 2 3 Extent of Limited Warranty This limited wa...
Page 7: ...thout limitation labor costs and costs related to concrete or excavation Claims arising from repairs or replacements made by the Purchaser without the prior written consent of the Company The Purchase...
Page 8: ...IRECT CONSEQUENTIAL INCIDENTAL PUNITIVE OR EXEMPLARY DAMAGES IN ANY KIND OR CHARACTER INCLUDING INDIRECT COSTS LOSS OF PRODUCTION LOSS OF REVENUES OR PROFITS AND OTHER DISBURSEMENTS WHICH MAY OCCUR So...
Page 9: ...e Company 3 The semi tanker is stored inside a building and protected from the weather in accordance with the recommendations prescribed by the Company Stainless steel reservoir The warranty period fo...
Page 10: ...819 477 7444 1 819 477 5565 geahoule gea com www gea com 1 5 Customer service Dealer If necessary contact your nearest dealer There is a comprehensive dealer Internet search function on our website at...
Page 11: ...r s address Canadian contact information Manac 270 chemin Du Tremblay Boucherville Qc J4B 5X9 1 800 361 7900 Parts hotline 1 800 545 5086 www manac ca US contact information Manac 1001 LYN ROAD SARVER...
Page 12: ...manufacturer supplier is not liable for any resulting damage The user alone bears the risk Correct use also includes reading the instructions and observing the inspection and maintenance conditions Th...
Page 13: ...re to implement these safety measures and make sure they are carried out at all times The owner must ensure the following this instruction manual with this product Everyone performing activities in co...
Page 14: ...rsonal safety gear such as hearing eye feet protection etc when performing activities in connection with this product Inspect the personal gear and replace if worn and or defective Familiarize yoursel...
Page 15: ...a truck driver having a valid class licence qualifying him to operate a semi truck on the road Qualified personnel Qualified personnel refers to those having obtained the academic knowledge of a spec...
Page 16: ...iculated transfer pipe part no 2018 7715 910 Safety grid on fill opening part no 2018 7627 510 Bearing housing cover part no 2018 1404 230 Anti slip tape part no 2018 3902 540 2 7 1 Safety labels The...
Page 17: ...manure produces heavy toxic gases that can cause loss of consciousness asphyxia or death in few seconds Follow the safety procedures for confined spaces before operating or servicing this equipment in...
Page 18: ...ription 3 1 Structural description 1 2 3 5 6 7 7 8 9 Front view 4 1 Articulated transfer pipe cylinder 6 Electric outlet J560 2 Top fill indicator 7 Pneumatic glad hands 3 Top beam light 8 Kingpin 4 R...
Page 19: ...using 2 Gear guard on articulated transfer pipe 9 Hydraulic motor of the HE impeller 3 Hydraulic motor of the articulated transfer pipe 10 Bearing housing cover 4 Pressure relief valve 11 Rotative val...
Page 20: ...penings 4 Auto steer lift axle 2 Side opening with guillotine valve 5 Control box 3 Undercarriage serial number 6 Hydraulic levers The undercarriage serial number is normally welded at the front of th...
Page 21: ...1 July 2018 21 162 1 2 7 9 Left side view 6 5 2 3 4 8 1 Nameplate 6 ABS brake light 2 Lifting rings 7 Pneumatic FRL valve 3 Antenna 8 Side opening 4 Receptacle of the articulated transfer pipe 9 landi...
Page 22: ...mi Tanker is filled with water liquid manure either through the fill opening 1 or through the side opening 2 Once filled the impeller 3 pumps the liquid through the rotative valve 6 which directs the...
Page 23: ...Maximum transmitting range 400 ft 122 m Battery type LiPo Recharge time hours 9 5 The maximum transmitting range is achievable when the climatic conditions are favorable Clear sky and when there are n...
Page 24: ...pressure 3000 psi 206 8 bar 3 3 7 Hydraulic motor impeller Capacity 40 9 US GPM 155 LPM Revolution 900 RPM Max power 58 HP Maximum operating pressure 3000 psi 206 8 bar 3 3 8 Hydraulic HE impeller Ca...
Page 25: ...e destruction which can cause damage injury and or death Warning Risk of suspension malfunction When changing the semi tanker tires always use the same tire brand and model Using other brands and or m...
Page 26: ...i Maximum speed 75 mph 120 km h 75 mph 120 km h Bolt torque 450 500 lb ft 610 677Nm 450 500 lb ft 610 677Nm 3 3 11 Lubricant specifications Lubricant type Product name Grade Purpose Wax Automotive wax...
Page 27: ...0H 7000 us gal 5800 UK gal 26500 Liters Super single 455 55R22 5 20020 lbs 9100 kg 15705 lbs 7124 kg 72620 lbs 32940 kg 98 2 48m 11 7 3 5 m Dual 11R22 5 23000 lbs 10433 kg 16105 lbs 7305 kg 82800 lbs...
Page 28: ...0 UK gal 28000 Liters Super single 455 55R22 5 20020 lbs 9100 kg 16120 lbs 7312 kg 72620 lbs 32940 kg 98 2 48m 11 7 3 5 m Dual 11R22 5 23000 lbs 10433 kg 16720 lbs 7584 kg 82800 lbs 35365 kg 101 2 58...
Page 29: ...3 7 m Dual 11R22 5 23000 lbs 10433 kg 20725 lbs 9400 kg 109000 lbs 49445 kg 101 2 58 m STR 342HH 7800 us gal 9400 UK gal 35500 Liters Super single 455 55R22 5 20020 lbs 9100 kg 20425 lbs 9264 kg 97500...
Page 30: ...UK gal 35500 Liters Super single 455 55R22 5 20020 lbs 9100 kg 21590 lbs 9793 kg 97500 lbs 44225 kg 98 2 48m 12 7 3 83 m Dual 11R22 5 23000 lbs 10433 kg 22190 lbs 10065 kg 109000 lbs 49445 kg 101 2 58...
Page 31: ...3 83 m Dual 11R22 5 23000 lbs 10433 kg 24405 lbs 11069 kg 125970 lbs 57140 kg 101 2 58 m Unladen weight is estimated Weight does not include optional features up to 1100 lbs 500 kg GAWR Gross Axle We...
Page 32: ...e safety instructions See also the section on Personnel qualification 4 2 Safety Instructions To prevent damage to property and or life threatening injury to personnel always observe the following Alw...
Page 33: ...he semi tanker Boom truck minimum lifting capacity 30 000 lbs 15 000 kg To lift the semi tanker Safety chains To lift accessories Eye eye sling 2x To lift accessories Wrench set To tighten bolts Ratch...
Page 34: ...his product use a lifting device with a minimum lifting capacity of 30000 lbs 15 000 kg The lifting capacity only includes the weight of the product Attach chains to the lifting rings as illustrated R...
Page 35: ...ion Risk of fall The antenna post is not designed to provide a grip to anyone on top of the tank The post can be damaged by the weight applied Do not grip or apply pressure to the post Attention To li...
Page 36: ...sk of fall The semi tanker surface can be very slippery Always walk on the nonslip tape installed on the product Caution Risk of fall The antenna post is not designed to provide a grip to anyone on to...
Page 37: ...ention To lift the semi tanker components use a lifting device with a minimum capacity of 1000 lbs 500kg 1 2 3 Assemble the post 1 on the tank using 4 bolts lock washers and nuts Apply PRECISION gener...
Page 38: ...lines inside the retaining rings 4 Connect the hydraulic hoses together Match the tie wrap colors for proper connection Apply grease over the motor gear 5 Assemble the retainers 6 on each side of the...
Page 39: ...ssemble the collar 8 and the LED light 9 over the articulated transfer pipe using bolts and nylon lock nuts The LED light must face the elbow 10 of the pipe Assemble the second collar 11 using bolts a...
Page 40: ...culated transfer pipe using a half collar 15 bolts and nylon lock nuts Fasten the tension rod 14 using a bolt and a nylon lock nut Align the tension rods and collars to the articulated transfer pipe S...
Page 41: ...ansfer pipe assembly 2018 9015 008 01 July 2018 41 162 15 15 16 17 17 Place 2 collars 15 on the 24 61cm flexible hose 16 and assemble it over the ribbed ends 17 Position the collars in order to secure...
Page 42: ...to provide a grip to anyone on top of the tank The post can be damaged by the weight applied Do not grip or apply pressure to the post Unscrew the hardware 1 Place the post in vertical position Insta...
Page 43: ...1 July 2018 43 162 Remove the O ring 3 fastened to the top fill indicator 3 Place the O ring over the lid 4 of the top fill indicator 4 Turn the top fill indicator 2 upside down and insert it into the...
Page 44: ...e circle lock clamp 3 from the discharge pipe end 1 Remove the end cap 4 Make sure the seal 2 remains inside the end cap groove Store the end cap in a dry area 4 3 2 1 Step 2 Install the spreading noz...
Page 45: ...perate this product until the initial commissioning checklist is completed Read the Safety section as well 5 3 First start The first start steps intend to test the product in order to validate its fun...
Page 46: ...n or defective parts The top fill opening ball valve is open The top fill opening opens and closes automatically The air braking system is operational The air suspension system is operational The remo...
Page 47: ...grids covers chains etc are in perfect working condition and remain in place to ensure safety the lubricants such as grease oil etc are at an appropriate level there are no leaks all bolts are tight t...
Page 48: ...this product at a speed exceeding its maximum speed Refer to section 3 3 1 Semi tanker Do not use the remote control while driving Do not operate this product if a person is on top Always adapt drivi...
Page 49: ...n both openings 3 Transmitting indicator light green The LED flashes every 5 seconds when the remote communicates with the control box 4 Connection indicator light yellow The LED turns on when the rem...
Page 50: ...green Blinks every 5 seconds when the remote is connected to the control box Fast blinking when a function is being performed 3 Reset button Allows to erase and program a remote control 4 Antenna 6 3...
Page 51: ...mote control 1 2 3 Press the connection button on the remote control When the green LED indicator 1 turns off the remote is ready to use 6 3 5 Wireless remote control reset if required Note The remote...
Page 52: ...utomatic lock position Lock the sliding fifth wheel if applicable Visually inspect the semi tanker kingpin for damages and wear Clear the area around the semi tanker 6 4 2 STEP 2 Wheel chock installat...
Page 53: ...rstraining efforts Attention Risk of premature wear Too high or too low coupling can cause premature wear of the wheels bearings and brakes Attention Risk of damage If the semi tanker height is too lo...
Page 54: ...en for air leaks for air release and for brake movement check the air pressure gage for signs of air loss Inspect air lines for damage and wear Verify that air pressure is up to normal Verify that the...
Page 55: ...en the fifth wheel and the upper coupler indicates that the kingpin may be on top of the closed fifth wheel jaws which can loosen easily Recouple properly Using a flashlight check the coupling Make su...
Page 56: ...constantly powered for ABS application Contact the truck supplier to make sure the wiring complies with safety standards Plug the truck electrical cord to the semi tanker Fasten the safety catch of t...
Page 57: ...gs Attention Risk of damage Make sure the rear of the truck does not contact the landing gears and or bracing when turning sharply Raise the landing gears using the low gear range and switch to high g...
Page 58: ...erformed on the truck and semi tanker while taking into account the procedures instructed by the country province state of operation If the country province state requires additional pre trip verifica...
Page 59: ...Check that the crank handle of the landing gears is lock in place Check that the pneumatic door of the fill opening is closed Check that the remote control is stored Check that the bearing housing gu...
Page 60: ...imits and or the outstanding handling of the tires Refer to section 3 3 1 Semi tanker The following verifications should be performed on the truck and semi tanker while taking into account the procedu...
Page 61: ...automatically If the top fill opening does not open refer to section 7 6 Manual opening of the top fill opening Attention Risk of spillage Make sure the top fill opening is open before loading manure...
Page 62: ...i tanker on a flat and level surface It will allow the semi tanker to be filled completely A light slope may considerably reduce the filling capacity Apply the parking brakes Verify that the drains an...
Page 63: ...om the side opening stop the pump and wait a few seconds to release the pressure inside the hose Close the gate valve Lock the gate valve by pivoting the lock bar Wait a few minutes for the hose to dr...
Page 64: ...here the semi tanker operates Caution Risk of rupture Never exceed the maximum load per tire Refer to the load rating indicated on the tire sidewall 1 2 3 Find the axle rating sticker 1 affixed inside...
Page 65: ...kingpin adjustment options Caution Property damage personal injury and or death can occur Improper kingpin adjustment can cause improper weight distribution resulting in poor handling of the semi tank...
Page 66: ...cation 2018 9015 008 01 July 2018 66 162 Triple axe with auto steer axle semi tanker FST Front of the semi tanker A Original kingpin setting from the factory adjustable position B Kingpin when rotatin...
Page 67: ...sure this product is operated in a secure environment Danger Risk of fatal injury A vehicle could collide with the articulated transfer pipe Never position the semi tanker articulated transfer pipe a...
Page 68: ...ed transfer pipe rotation range is limited to 270 Attention Risk of spillage Liquid manure can be discharged by both articulated transfer pipe and spreading nozzle if the rotative valve is not correct...
Page 69: ...sfer pipe is in position before engaging the impeller Toggle up this switch to engage the pump Monitor the manure level inside the spreader or reservoir while transferring Toggle down this switch to d...
Page 70: ...of the truck Attention Risk of spillage Liquid manure can be discharged by both articulated transfer pipe and spreading nozzle if the rotative valve is not correctly positioned Always hold the toggle...
Page 71: ...l injury A vehicle could collide with the articulated transfer pipe Never position the semi tanker articulated transfer pipe across a road or path where vehicles travel Place the semi tanker on a flat...
Page 72: ...ulated transfer pipe rotation range is limited to 270 2 Attention Risk of spillage Liquid manure can be discharged by both articulated transfer pipe and spreading nozzle if the rotative valve is not c...
Page 73: ...l and turn clockwise the knob 4 to engage the pump Turn the knob until the override tooth is completely out of the detent base Monitor the manure level inside the spreader or reservoir while transferr...
Page 74: ...ds to place the rotative valve in spreading position 1 Attention Risk of spillage Disengage the hydraulic system of the truck before performing the next step otherwise manure will discharge immediatel...
Page 75: ...e through the side opening Place the semi tanker on a flat and level surface Apply the parking brakes Connect the discharge hose to the quick connect adaptor previously installed over the gate valve P...
Page 76: ...n order to make easier the fifth wheel unlatching and make easier the next coupling Shut off the semi tanker air supply to lock the braking system Release pressure on the fifth wheel jaws by gently mo...
Page 77: ...vent injuries in case the vehicle moves when unlocking the fifth wheel Raise the release handle lock of the fifth wheel Pull the release handle to open position Move the truck forward until the fifth...
Page 78: ...re not in perfect condition Read the Safety section as well Before carrying out any maintenance work ensure the following Always secure the semi tanker by installing wheel chocks The area for the main...
Page 79: ...using other manufacturer s components and or products such as a PTO a truck a motor a pump etc ALWAYS perform maintenance of the component and or product as recommended by its manufacturer Note To co...
Page 80: ...10 000 miles Wheel nut torque verification O O O Tire inspection O Rim inspection O Wheel end oil level verification O Air tank purge and inspection O Glad hands inspection O General inspection O Gene...
Page 81: ...d end inspection and lubrication M Bolt torque verification M Tri functional bushing and component inspection M M Ride height measurement and adjustment O O Shock components inspection O O Self steer...
Page 82: ...nstallation of wheels to hub assembly Caution Risk of injury Insufficient mounting torque can cause wheel shimmy cause damage to parts and extreme tire tread wear which can result in serious injury an...
Page 83: ...r at once to perform a complete tire inspection Warning Possible injury Any inflated tire mounted on a wheel contains explosive energy The use of damaged mismatched or improperly assembled tire and wh...
Page 84: ...res use only the tires specified in section 3 3 10 Tires Note Do not rely on the aspect of a Michelin X One tire to determine proper inflation Use a properly calibrated gage to verify the pressure Not...
Page 85: ...other objects lodged between duals any breaks or other defects 4 Check tires for uneven wear If the inside shoulder wears faster than the rest of the tread the vehicle may be out of alignment Have the...
Page 86: ...Rim inspection Daily 1 2 3 Place the semi tanker on a flat and level surface Apply the parking brakes Chock the wheels of the semi tanker Check damaged lugs 1 Check for missing lugs 2 Check for damag...
Page 87: ...emi tanker Check oil level at hubcap window Add oil if required Follow steps below Oil refill steps Attention Follow the TMC RP 631 practice for wheel end lubrication Do not over fill Wipe clean the s...
Page 88: ...and air tanks which can result in improper braking efficiency causing damages injuries and or death Note Cold weather conditions high humidity conditions and rain season can cause condensation In suc...
Page 89: ...d and or waste comes out of an air tank when purging immediately contact a truck maintenance center for inspection repair Run the truck engine until the air brake system pressure gage shows at least 1...
Page 90: ...contact a truck maintenance center for repair 7 4 8 General inspection Daily Note In addition to standard inspections below also perform daily vehicle inspections as regulated by the country state and...
Page 91: ...il and lithium thickener having a NLGI rating of 2 or 3 without MOLY Note Ensure lubricant is fresh and moisture free Place the semi tanker on a flat and level surface Apply the parking brakes Chock t...
Page 92: ...mineral oil and lithium thickener having a NLGI rating of 2 or 3 without MOLY Note Ensure lubricant is fresh and moisture free Place the semi tanker on a flat and level surface Apply the parking brak...
Page 93: ...thickener having a NLGI rating of 2 or 3 without MOLY Note Ensure lubricant is fresh and moisture free Place the semi tanker on a flat and level surface Apply the parking brakes Chock the wheels of th...
Page 94: ...aring housing Place the semi tanker on a flat and level surface Apply the parking brakes Chock the wheels of the semi tanker Open the chain coupling cover 1 Wipe clean the fill plug 2 Remove fill plug...
Page 95: ...eel chocks Release parking brakes Move the semi tanker back and forth a few times to stir the water inside Move to an area to dispose of the liquid Follow local rules and regulation on waste water dis...
Page 96: ...08 01 July 2018 96 162 2 3 Open the stone collector drain 2 by turning the pivot bolt 3 using the wheel nut wrench Open the front cleaning opening 4 by unscrewing both handles 4 Note When storing the...
Page 97: ...to clean this product Do not exceed 2000 psi 105 bar when using a pressure washer and keep the nozzle at a distance of 1ft 30 cm from the surface to prevent damaging the paint Attention Risk of damage...
Page 98: ...f damage Do not pressure wash the following components Only use tap water 11 12 13 15 14 11 Hi flow hydraulic block valve and hoses 12 Rotative valve cylinder and hoses 13 Pressure relief valve and ho...
Page 99: ...ive cleaners and or solvents to clean the undercarriage Attention Risk of damage Do not use solvents abrasives products nor steam cleaning methods for cleaning the air springs Attention Risk of damage...
Page 100: ...015 008 01 July 2018 100 162 Note To apply a corrosion preventative coating contact a truck maintenance center The manufacturer of the undercarriage recommends using a soft coat SG 500 from Scharpf Gr...
Page 101: ...e semi tanker Open the chain coupling cover 1 Place a container under the bearing housing drain plug 2 Remove the drain plug 2 Remove the fill plug 3 to drain the housing Once the housing is completel...
Page 102: ...the wheels of the semi tanker Inspect the outside diameter of the air spring for signs of irregular wear heat cracking age cracking punctures chafing or horizontal splits Check for air leaks Make sure...
Page 103: ...or improperly adjusted Always wear personal safety gear STEP 1 Purge Place the semi tanker on a flat and level surface Apply the parking brakes Chock the wheels of the semi tanker Locate the FRL valve...
Page 104: ...18 9015 008 01 July 2018 104 162 STEP 2 General inspection Inspect FRL valve to find any signs of Air leaks Pressure drop Corrosion Damages to the bowls Sludge build up in bowls Damages to the compone...
Page 105: ...he bowl properly before applying air pressure in the line Disconnect electrical supply Shut off air supply and screw the knob to open the valve 4 and depressurize air lines Remove plastic cover 1 from...
Page 106: ...ap and water Dry out component using low compressed air Reassemble When reassembling make sure the seat is firmly in place and that the stem fits into the center hole of the diaphragm assembly 1 3 2 T...
Page 107: ...which is compatible with most hydrocarbon based synthetic lubricants Always check compatibility and never mix lubricant types 1 2 3 4 5 6 7 Keep the air system depressurized before performing the foll...
Page 108: ...z 100 ml of synthetic air tool ISO 32 oil Filling can also be done by removing the filling plug 1 Install and hand tighten the bowl properly Reinstall the plastic cover Turn on air supply Screw in kno...
Page 109: ...ssurize all air lines connected to the valve Unscrew the exhausts 1 from the valve Remove all thread sealant tape Clean the exhaust by applying pressurized air into the exhausts Wipe clean the ports o...
Page 110: ...2018 110 162 7 4 18 Articulated transfer pipe lubrication Monthly Note Grease must contain mineral oil and lithium thickener having a NLGI rating of 2 or 3 without MOLY Apply PRECISION general purpos...
Page 111: ...2 grease or equivalent to the pivot points of the gate valve 7 4 20 Brake chamber and push rod inspection Monthly Note If any defect is found immediately contact a truck maintenance center for repair...
Page 112: ...truck maintenance center for repair Note Ensure lubricant is fresh and moisture free Place the semi tanker on a flat and level surface Apply the parking brake Chock the wheels of the semi tanker Wipe...
Page 113: ...ately contact a truck maintenance center for repair Place the semi tanker on a flat and level surface Apply the parking brakes Chock the wheels of the semi tanker Exhaust air from the semi tanker susp...
Page 114: ...rings Do not pressure wash or steam clean the hub assembly Place the semi tanker on a flat and level surface Apply the parking brakes Chock the wheels of the semi tanker Inspect the back of the hub se...
Page 115: ...the wheels of the semi tanker Exhaust air from the semi tanker suspension Visually inspect the slack adjuster integrity 1 the bracket 2 and control arm 3 Never operate the product if damaged repair I...
Page 116: ...ght must be at the same designed kingpin height 48 1 22m as the semi tanker If not uncouple the semi tanker to measure the ride height Place the semi tanker on a flat and level surface Chock the wheel...
Page 117: ...nter of the axle to the mounting surface of the suspension Compare the measure to the values in the following table 2 Designed ride height Minimum ride height Maximum ride height 14 35 5 cm 13 33 6 cm...
Page 118: ...e add air the ride height or push down to lower remove air the ride height until the distance between the suspension mounting surface and the center of the axle equals the designed ride height Measure...
Page 119: ...for at least 15 minutes Park the semi tanker on a flat and level surface Chock the wheels of the semi tanker Touch each shock absorber carefully on its body below the dust cover or tube after first t...
Page 120: ...unpredictable connection clamp loads and unreliable axle alignments Note Grease must contain mineral oil and lithium thickener having a NLGI rating of 2 or 3 without MOLY Lock straight pivot arms Kin...
Page 121: ...ry 9650 km 6000 miles Note If any defect is found immediately contact a truck maintenance center for repair Place the semi tanker on a flat and level surface Apply the parking brakes Chock the wheels...
Page 122: ...he vehicle to move When the semi tanker completes 3 wheel revolutions the RM 70 sends the signal for closing the fill opening If the semi tanker stops more than 1 5 seconds between wheel revolution th...
Page 123: ...ction Every 6400 km 4000 miles Every 9650 km 6000 miles Note If any defect is found immediately contact a truck maintenance center for repair Place the semi tanker on a flat and level surface Apply th...
Page 124: ...Attention Any bump valley or warping in the coupler plate will cause uneven loading of the fifth wheel which can result in damages to the top plate and poor lock life Place the semi tanker on a flat a...
Page 125: ...king Using a square or kingpin gage check to see if the kingpin is bent Replace the kingpin if the bent exceeds 1 from square in any direction STEP 3 Inspect the kingpin for proper length Note If a lu...
Page 126: ...wear Replace the kingpin STEP 5 Check the kingpin mounting Caution Safety hazard A loose mounting will cause excessive chucking and rapid lock wear Make sure the kingpin is securely mounted If the kin...
Page 127: ...54 C 65 F C A B C A Fully retract the landing gear then using high gear lower the leg 2 3 turns Lubricate the following grease points labelled using specified grease white blue grease gun label only L...
Page 128: ...x use fingers Note Do not perform work inside the control box other than replacing the fuse 1 2 Remove control box cover 1 using a screwdriver Locate the fuse socket 2 Flip tab using fingers Remove an...
Page 129: ...ion The ABS brake light indicator on the semi tanker does not turn on within 3 seconds of ignition The truck power outlet is not connected to the semi tanker Connect the power outlet of the truck to t...
Page 130: ...ling the semi tanker The brake pads are worn Contact a truck maintenance center for inspection repair Water in the air braking system Purge the air reservoirs Refer to section 7 4 5 Air tank purge and...
Page 131: ...s obstructed Contact your dealer The impeller or the housing is worn out Contact your dealer Manure keeps discharging from the spreading nozzle The rotative valve is in spreading position Press and ho...
Page 132: ...acing the switch to O position Reconnect the remote to the control box The remote control is not programmed Program the remote control Refer to section 6 3 4 Wireless remote control programming The re...
Page 133: ...ically disconnect from the control box after a few minutes The impeller is turned on The remote disconnection indicator light flashes Turn off the impeller by placing the switch to O position and disc...
Page 134: ...lve Refer to section 11 4 16 FRL valve purge and maintenance lubricator cleaning The exhaust ports on the cylinder pneumatic valve are clogged or not properly adjusted Perform steps in section 7 4 17...
Page 135: ...hose couplings clear of dirt and sand when disconnected from the truck Always hook them on their supports STEP 1 Purge the air system 2 1 3 Remove the guard of the FRL valve located at the rear 1 of t...
Page 136: ...Refer to section 7 Maintenance STEP 3 Lubricate the equipment Perform complete lubrication Refer to section 7 Maintenance 9 4 Disposal After final decommissioning handle all components properly and di...
Page 137: ...whl hm518445 castdrum mtb 2117905 Stl H D long 10st alu whl hm518445 castdrum mtb 21179055 Stl H D long 10st alu whl hm518445 castdrum mtb w ABS Landing gear 273503 Landing gear brace gear 273511 Lan...
Page 138: ...und lubricating lok cease brush top Electrical 2280062 Lift system module RM 70 H 2280064 Cable wheel sensor brake drum RM 70 2280065 Adapter 4 way leads autodeploy system 22801516 ABS Wabco cable sup...
Page 139: ...d grey 253469 Unit marker led red female pin supernova 2534735 Lamp signal led red male pin grommet mt next gen 2535688 Side flasher lp unit led amber oval grommet mt 2537011 Lamp grommet flushmount 2...
Page 140: ...tyle 263311 Nut hex stl zinc plated 2634021 Nylon stop nut hex stl zinc plated 263403 Nylon stop nut hex stl zinc plated 263405 Nylon stop nut hex stl zinc plated 263407 Nylon stop nut hex stl zinc pl...
Page 141: ...ill w logo 73007 Valve leveling w mt kit 73060 Linkage kit adjustable flat type multi hole 734912 Hcv mounting kit 2221042 Hose air brake rigid swivel D O T 2221061 Hose air brake rigid swivel D O T 2...
Page 142: ...ass nipple long 223502 Fitting brass bushing 2235021 Fitting brass bushing 223504 Fitting brass bushing 223505 Fitting brass bushing 223552 Plastic tubing air brake flexible black 2235528 Plastic tubi...
Page 143: ...ow extruded c w insert D O T 223760 Fitting brass plug hex socket hd 2237624 Fitting brass plug hex head cored 2237625 Fitting brass plug hex head cored 223777 Fitting brass connector SAE J844D nylon...
Page 144: ...bolt on dust shield hardware for mounting to torque plate 15 3 21 3 Air spring nut lower 58 2 79 2 Air spring nut upper 90 10 125 10 Air spring nut upper 45 5 61 6 Body rail clip bolt 100 10 135 12 Br...
Page 145: ...lb 130Nm 155ft lb 210Nm 206ft lb 279Nm 310ft lb 420Nm SAE 5 MCS HT 10ft lb 14Nm 19ft lb 26Nm 33ft lb 45Nm 54ft lb 73Nm 78ft lb 106Nm 114ft lb 155Nm 154ft lb 209Nm 257ft lb 349Nm 382ft lb 518Nm 587ft...
Page 146: ...r C 2099 4721 020 Warning sign Always stop the equipment before servicing and maintenance D 2099 4725 820 Control sign Articulated transfer pipe up left E 2099 4725 830 Control sign Articulated transf...
Page 147: ...e reservoir 2018 9015 008 01 July 2018 147 162 A A A A B C C D D Item Part No Description A 2003 4701 240 Lubrication Lubrication point B 2010 4701 590 Instruction Drain after use C 2007 4700 390 Flow...
Page 148: ...034 Notice Information about ABS indicator lamp Manac C 3038587 Instruction How to exhaust suspension air springs Manac D 3038596 psi load scale table Hendrickson E 3038161 Weight conversion table Man...
Page 149: ...Appendix Safety labels and labels position on the undercarriage 2018 9015 008 01 July 2018 149 162 This page intentionally left blank...
Page 150: ...Appendix Electric wiring diagram 2018 9015 008 01 July 2018 150 162 11 4 Electric wiring diagram...
Page 151: ...nt orange parking light 15 4 way flasher input 23 Left parking light 8 Control box 16 Wheel sensor 24 RM 70 For a tandem semi tanker part 5 is removed from the wiring diagram as well as the wiring dot...
Page 152: ...4 Articulated transfer pipe hydraulic motor Left and right rotation 2 Hi flow hydraulic block valve 5 Rotative valve cylinder transfer or spread 3 Articulated transfer pipe cylinder up and down motio...
Page 153: ...ndem semi tanker pneumatic diagram FST Front semi tanker Service line RST Rear semi tanker Emergency line 1 Toggle switch Suspension line 2 Beam lights Brake line 3 FRL valve Electric wire 4 Fill open...
Page 154: ...tanker pneumatic diagram FST Front semi tanker Service line RST Center semi tanker Emergency line 1 Beam lights Suspension line 2 Toggle switch Brake line 3 FRL valve Electric wire 4 Fill opening pneu...
Page 155: ...5 008 01 July 2018 155 162 11 6 3 Triple axle with auto steer axle semi tanker pneumatic diagram FST Front semi tanker Service line 1 Locking cylinder Emergency line 2 Service Suspension line 3 Emerge...
Page 156: ...015 008 01 July 2018 156 162 CST Center semi tanker Service line 4 Beam lights Emergency line 5 Toggle switch Suspension line 6 FRL valve Brake line 7 Fill opening pneumatic cylinder Electric wire 8 P...
Page 157: ...endix Pneumatic diagram 2018 9015 008 01 July 2018 157 162 RST Rear semi tanker Service line 9 Wabco valve Emergency line 10 Ride height valve Suspension line BR Brown wire Brake line Electric wire Ot...
Page 158: ...is product 1 Set a pail on a level surface and install a 24 60cm round plate at the center of the pail 2 Fill a second pail with homogenized liquid manure and slowly pour it in the center of the plate...
Page 159: ...8 Directories Abbreviations Term Explanation at Diameter CW clockwise CCW counterclockwise fax facsimile I D inside diameter Inc Incorporated O D outside diameter QC Quebec SAE Society of Automotive...
Page 160: ...nute in Inch 25 4 mm mm Millimeters cm Centimeters m Meters g Gram kg Kilogram kPa Kilo pascal ft Foot ft lb Foot pound NM Newton meter gal Gallon gpm Gallons per minute km h Kilometers per hour mph M...
Page 161: ...Appendix Directories 2018 9015 008 01 July 2018 161 162 This page intentionally left blank...
Page 162: ...Qc J2A 0C6 1 819 477 5565 www gea com We live our values Excellence Passion Integrity Responsibility GEA versity GEA Group is a global engineering company with multi billion euro sales and operations...