


5
Consumer Support
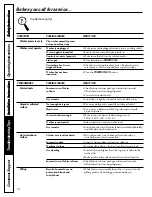
Troubleshooting T
ips
Operating Instructions
Safety Instructions
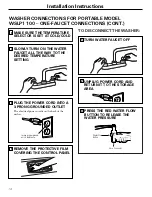
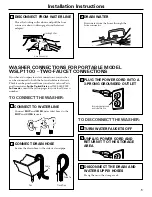
Installation Instructions
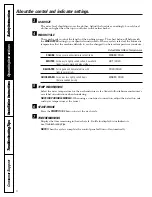
CLOTHES CARE CYCLE SELECTION
PRESOAK
NORMAL
WASH
RINSE ONLY
MEDIUM
LARGE
EXTRA LARGE
COLORS
HOT/COLD
TIME
REMAINING
WHITES
WARM/WARM
WARM/COLD
COLD/COLD
MIN
QUICK WASH
DELICATES
LOAD SENSING
SPIN ONLY
SMALL
LOAD
SIZE
WASH
CYCLE
TEMP
WASH/RINSE
WASH
OPTIONS
START
PAUSE
POWER
ON/OFF
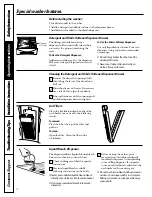
About the control and indicator settings.
www.GEAppliances.com
POWER ON/OFF
Press the
POWER ON/
OFF
button to turn on the control panel.
WASH OPTIONS
Choose the wash options you would like to include in the cycle. Press the
WASH OPTIONS
button until all the options you want to include are lit. More than one option can be selected.
PRESOAK
For heavily soiled clothes that need to be soaked before washing. This option can be used as
part of the
WASH CYCLE
you select.
NORMAL
This option is automatically selected when you press
POWER ON/
OFF
.
WASH
RINSE ONLY
This option gives one rinse cycle only. For example: Use this cycle when you need to remove
excess detergent from your clothing.
SPIN ONLY
This option gives one spin cycle only. For example: Use this cycle when you need to remove
excess water from your clothing.
2
1
To Use Automatic One-Touch Washing
START
PAUSE
The
LOAD SENSING
feature automatically senses the size of your load, fills with the appropriate
amount of water, and calculates the amount of wash time required to complete the cycle.
NOTE:
When using the
LOAD SENSING
feature, it is normal for the agitator to rotate before water fills in
the tub.
To choose the automatic
LOAD SENSING
feature, press
POWER ON/
OFF
.
The following indicators will light up automatically:
NORMAL WASH, LOAD SENSING
and
COLD/COLD.
Then simply press
START/
PAUSE.
To Choose Your Own Cycle Selections
Before starting the washer:
•
Load the laundry in the washer.
•
Add the detergent and fabric softener to the dispenser drawer.
•
Add bleach (if needed) to the bleach dispenser.