


Installation Instructions
WR49X10044 Kit
1. Horizontal tower
2. Vertical tower
3. Two self-adhesive foam strips (1/2" x 1/2" x 4 1/2"),
goes on top edge of left and right Styrofoam™
blocks.
4. Two self-adhesive foam strips (1/2" x 1/2" x 6 1/4"),
goes on bottom edge of left and right Styrofoam
blocks.
5. Air deflector (1 1/2" x 1/4" x 18" foam strip with
aluminum wrap), goes between rear of
evaporator and liner.
6. Aluminum tape (6" by 2" wide), to hold air deflec-
tor in place.
DISCONNECT POWER TO
THE REFRIGERATOR BEFORE
BEGINNING KIT INSTALLATION
Before you begin…
Read these instructions completely and carefully for
the correct installation of kit WR49X10044.
1. Remove icemaker or ice tray.
2. Remove light lens.
Note:
If unit is equipped
with a light bulb, discard
translucent lens. Save
lens if no light bulb
is present.
3. Remove horizontal air tower.
7. Metal bracket assembly (19" metal bracket with
foam strip attached), to be screwed to top of left
and right evaporator end brackets.
8. Two screws (1/2" long)
9. Foam block (3/4" x 1 1/2" x 3 1/2"), to go at top of
left corner of evaporator.
10. Self-adhesives foam strip (1/2" x 1/2" x 25 1/2"), to
go on the front surface of the metal bracket.
11. Two plastic wire ties
12. Electronic Main Board
13. Freezer light lens cover
14. Icemaker grille.
Parts Included in Kit:
162D3539P233
WR00X2134
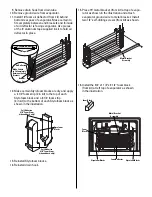
4. Remove and discard
vertical air tower.
5. Remove louvered icemaker grille in evaporator
cover and discard. If equipped with icemaker,
remove scoop and discard.
6. Disconnect icemaker receptacle from evaporator
cover.
7. Remove evaporator cover
(note 2 clips in fan housing
and ground wire). Defrost
evaporator and wipe off
moisture if necessary.
8. Remove Styrofoam block
from each side of
evaporator.
Note:
Remove light socket from tower (if applicable)
and discard horizontal tower.
Lense
Horizontal Tower
Light
Socket
Vertical Tower
Styrofoam Blocks


