background image

5

EN

Setting the Clock

1. Press 

SET CLOCK 

     to enter clock setting

mode.
The clock icon       lights on the display.

2. While the clock icon is still displayed, use the

TUNING/CLOCK SET

 arrows             to select

current clock time.
Press and hold 

TUNING/CLOCK SET

 arrows

          to fast forward and fast reverse clock
time.
The clock is in 12 hour format. AM and PM
indicator will light to show AM or PM time
respectively.

3. Press 

SET CLOCK

        to save clock settings.

Setting the Countdown
Timer

1. Press 

TIMER ON/OFF      

to enter timer setting

mode.
The Timer         icon flashes on the display.

2. While the icon is still flashing, use the 

TUNING/

CLOCK SET

 arrows             to select the timer

duration.

Settings

Display

3. Press 

TIMER ON/OFF

       again to start

countdown.
A beep will sound indicating countdown has
started.

4. The alarm will sound once countdown has

reached 0:00.
Press 

TIMER ON/OFF

        or 

FUNCTION OFF

 to

turn the timer off.

Tip: You can turn off timer at any time by
pressing 

TIMER ON/OFF

TIMER ON/OFF

TIMER ON/OFF

TIMER ON/OFF

TIMER ON/OFF

.

Setting Display Brightness

Press the 

BRIGHTNESS 

button on the side of the

unit to select among the three brightness levels.
Observe the changes on the display.

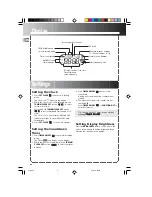
FM/AM radio band

Instant weather channel

In clock setting mode

Weather channel number
TV channel number (2-13)

Timer is activated

Preset Station Number

Displays current clock time,
timer time and
radio frequency

Radio frequency unit

AM/PM Clock
time indicator

TV Band

Untitled-2

3/5/03, 9:38 AM

7

Summary of Contents for Spacemaker 7-4235

Page 1: ...oblems This booklet is available from the U S Government Printing Office Washington DC 20402 Please specify stock number 004 000 00345 4 when ordering copies For Your Safety The AC power plug is polarized one blade is wider than the other and only fits into AC power outlets one way If the plug will not go into the outlet completely turn the plug over and try to insert it the other way If it still ...

Page 2: ...rchase Place of Purchase Table of Content FCC Information First Things First 1 Tools Required 1 Parts Packed with Your Unit 1 Before Mounting 1 Mounting Procedure 2 General Controls 4 Front View 4 Side Views 4 Display 5 Settings 5 Setting the Clock 5 Setting the Countdown Timer 5 Setting Display Brightness 5 Operating the Radio 6 Built In AFC 6 Turning On the Radio 6 Turning Off the Radio 6 Select...

Page 3: ...ntral lines for drilling the 1 4 mounting holes The shim can be located between the cabinet shelf bottom and spacers Make sure the wood is at least as thick as the excess over 1 3 4 If a shim is necessary longer screws are required Longer screws Type 10 32 are available at most local hardware stores Cut out the Template on the line indicated The Template size and screw hole positions are identical...

Page 4: ...icated on the Template CAUTION CAUTION CAUTION CAUTION CAUTION It is recommended that safety glasses be worn while drilling screw holes to prevent the possibility of eye injury 2 Drill 1 4 inch diameter holes through the underside of the cabinet bottom shelf using the 3 points marked on the Template Helpful Hints On wooden cabinets you may want to mark and start the drill holes with a nail or an a...

Page 5: ...used 7 Align radio under the screws Hold the screw holes in the top of the clock radio against the mounting screws and partially tighten the screws Do not fully tighten until all 3 screws have been started The top front edge of the clock radio should clear the overhang 8 Extend cord towards electrical outlet and secure by using the Cord Hooks to hold cord out of the way For most attractive appeara...

Page 6: ...ND 1 2 3 4 5 TIMER ON OFF MEMORY STATIONS ON BAND Turns the unit on Selects radio band FUNCTION OFF Turns the unit off SET CLOCK Enters clock setting mode INSTANT WEATHER Selects weather broadcast stations given by U S Government Weather Stations MEMORY STATIONS 1 to 5 Directly accesses preset stations for FM AM and TV bands Side Views LIGHT OFF LO HIGH Slide the switch to OFF to switch off counte...

Page 7: ...elect the timer duration Settings Display 3 Press TIMER ON OFF again to start countdown A beep will sound indicating countdown has started 4 The alarm will sound once countdown has reached 0 00 Press TIMER ON OFF or FUNCTION OFF to turn the timer off Tip You can turn off timer at any time by pressing TIMER ON OFF TIMER ON OFF TIMER ON OFF TIMER ON OFF TIMER ON OFF Setting Display Brightness Press ...

Page 8: ...tion is found Setting Memory Stations FM AM and TV bands each has 5 memory locations available 1 Tune to the desired station using the TUNING CLOCK SET arrow buttons 2 Press and hold the MEMORY STATION number where you want to store the station icon flashes on the display and the memory station you have selected lights on the display Hold the button down until the icon stops flashing Memory Recall...

Page 9: ...off place Light switch to OFF DIGITAL 2 BAND RADIO RECEIVER TUNING CLOCK SET 3 4 5 TIMER ON OFF EMORY STATIONS Cleaning the Exterior Prior to cleaning the exterior be sure to unplug the power cord from the AC power outlet Wipe the exterior with a soft clean and slightly water dampened cloth Precautions Never open the cabinet under any circumstances Any repairs or internal adjustments should be mad...

Page 10: ...iginal carton and packing materials Include evidence of purchase date such as the bill of sale Also print your name and address and a description of the defect Send via standard UPS or its equivalent to Thomson Inc Product Exchange Center 11721 B Alameda Avenue Socorro Texas 79927 Insure your shipment for of loss or damage Thomson accepts no liability in case of damage or loss en route to Thomson ...

Page 11: ...XPRESS OR IMPLIED WARRANTY ON THIS PRODUCT THIS DISCLAIMER OF WARRANTIES AND LIMITED WARRANTY ARE GOVERNED BY THE LAWS OF THE STATE OF INDIANA EXCEPT TO THE EXTENT PROHIBITED BY APPLICABLE LAW ANY IMPLIED WARRANTY OF MERCHANTABILITY OR FITNESS FOR A PARTICULAR PURPOSE ON THIS PRODUCT IS LIMITED TO THE APPLICABLE WARRANTY PERIOD SET FORTH ABOVE How state law relates to this warranty Some states do ...

Page 12: ...e and insured to Thomson multimedia Ltd 6200 Edwards Blvd Mississauga Ontario L5T 2V7 Canada The provisions of this written warranty are in addition to and not a modification of or subtraction from the statutory warranties and other rights and remedies contained in any applicable legislation and to the extent that any such provisions purport to disclaim exclude or limit any such statutory warranti...

Reviews: