GE RBS360 series Owner'S Manual Download Page 46

14

49-2001027   Rev. 3

Funciones Especiales 

USO DE LA

 ESTUF

A:

)

XQFLRQHV

(VSHFLDOHV

0

RGR

6DEiWLFR

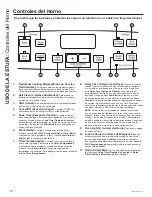
Su estufa cuenta con varias funciones especiales diferentes. Para modificar las configuraciones de estas funciones especiales:

Ŷ 0DQWHQJDSUHVLRQDGDVODVWHFODV

Bake (Hornear)

 y 

Broil (Asar)

 al mismo tiempo durante tres segundos.

Ŷ ³6)´DSDUHFHUiHQODSDQWDOOD
Ŷ 3DUDDFFHGHUDLQVWUXFFLRQHVVREUHFyPRVHOHFFLRQDUGLIHUHQWHVIXQFLRQHVFRQVXOWHPiVDEDMRODVHFFLyQTXHFRUUHVSRQGHDO

interés o la función especial.

Ŷ &XDQGRHOFDPELRKD\DVLGRUHDOL]DGRSUHVLRQHODWHFOD

Start (Iniciar)

 para guardar el cambio y salga de las funciones 

especiales.

Ajuste de la Temperatura del Horno

Esta función permite que la temperatura de horneado del 
horno sea ajustada hasta 35ºF más caliente o 35ºF más fría. 

8VHHVWDIXQFLyQVLSLHQVDTXHODWHPSHUDWXUDGHVXKRUQR

está demasiado caliente o demasiado fría y desea modificarla. 
Este ajuste afecta cada modo de cocción excepto el de asar.

Luego de ingresar el menú de funciones especiales, presione 
la tecla 

Bake (Hornear)

 para ingresar el modo de ajuste de 

WHPSHUDWXUD6HH[KLELUiXQQ~PHURHQWUH\8VH

las teclas 

+

 o 

-

 para configurar el ajuste de temperatura 

deseado. Presione la tecla 

Start (Iniciar)

 para guardar el 

ajuste de temperatura.

Apagado automático de 12 horas

El apagado automático de 12 horas apaga el horno luego de 
12 horas de funcionamiento continuo. El apagado automático 
de 12 horas puede estar en “on” (encendido) o en “oFF” 
(apagado). Ingrese al menú de funciones especiales, como se 
detalla más arriba y de forma repetida presione la tecla 

Set 

Clock (Configurar Reloj)

 hasta que la configuración deseada 

sea mostrada. Si su modelo no cuenta con la tecla 

Set Clock 

(Configurar Reloj)

, entonces presione de forma repetida la 

tecla 

Clock Time (Hora del Reloj)

 hasta que la configuración 

deseada sea mostrada. Presione la tecla 

Start (Iniciar)

 para 

guardar la configuración.

Pantalla del Reloj (en algunos modelos)

Esta Función especifica si la hora del día es exhibida. La 
pantalla del reloj puede estar en “on” (encendida) o en “oFF” 
(apagada). Si su modelo cuenta con la tecla 

Set Clock 

(Configurar Reloj)

, consulte la sección Oven Controls 

(Controles del Horno) para acceder a instrucciones sobre 
cómo ajustar la pantalla. Si su modelo no cuenta con la 
tecla 

Set Clock (Configurar Reloj)

 al menú de funciones 

especiales como se detalla más arriba. Presione la tecla 

Timer (Temporizador)

 para visualizar la configuración actual. 

Presione la tecla 

Timer (Temporizador)

 nuevamente para 

cambiar la configuración. Presione la tecla 

Start (Iniciar)

 para 

guardar la configuración de la pantalla.

Incrementar/ Reducir la Velocidad

8QDFRQILJXUDFLyQSRUHMHPSORWHPSHUDWXUHSXHGHVHU

ajustada de forma rápida manteniendo presionada la tecla 

+

 o 

la tecla 

-

3DUDDMXVWDUHOLQFUHPHQWRUHGXFFLyQGHODYHORFLGDG

ingrese al menú de funciones especiales como se detalla más 
arriba. Presione la tecla 

+

 para incrementar la velocidad o 

presione la tecla 

-

 para reducir la velocidad. Las configuraciones 

varían entre 1 (más lenta) y 5 (más rápida). Presione la tecla 

Start (Iniciar)

 para guardar la configuración de velocidad.

El modo Sabbath (Sabático) incluye la desactivación de tonos, desactivación de luces del horno, y retrasos de aproximadamente 
30 segundos a un minuto en los cambios de pantalla. Sólo el horneado continuo o los horneados con temporizador continúan 

DFWLYDGRVHQHOPRGR6DEEDWK6DEiWLFR/DFRFFLyQHQHOPRGRVDEiWLFRHVXQSURFHVRGHGRVSDVRVSULPHURHOPRGRVDEiWLFR

debe ser configurado y luego el modo hornear debe ser configurado.

Configuración del Modo Sabático

Mantenga presionadas las teclas 

Bake (Hornear)

 y 

Broil 

(Asar)

 al mismo tiempo durante tres segundos. “SF” aparecerá 

en la pantalla. Presione la tecla 

Set Clock (Configurar Reloj)


hasta que “SAb” aparezca en la pantalla, y luego presione 

Start (Iniciar)

. Si su modelo no cuenta con la tecla 

Set 

Clock (Configurar Reloj)

, entonces presione la tecla 

Cook 

Time (Cocinar por Tiempo)

 hasta que “SAb” aparezca en 

la pantalla y luego presione 

Start (Iniciar)

8QVRORFRUFKHWH

“]” aparecerá en la pantalla, indicando que el modo sabático 
fue configurado. Ahora pueden ser configurados el horneado 
continuo o el horneado por tiempo, como se detalla más abajo.

Inicie un Horneado Continuo

Presione 

Bake (Hornear)

 si desea una temperature diferente a 

ž)OXHJRSUHVLRQHODVWHFODV

+

 o

 -

 para ajustar la temperatura 

por incrementos de 25 grados, y luego presione 

Start (Iniciar)

Luego de una demora, un segundo corchete “] [“ aparecerá en la 
pantalla, indicando que el horno está horneando.

Ajuste de temperatura

Presione 

Bake (Hornear)

, luego presione las teclas 

+

 o 

-


para ajustar la temperatura por incrementos de 25 grados, 
y luego presione 

Start (Iniciar)

8QWHUPyPHWURSDUDKRUQR

puede ser usado si cierta indicación de configuración de 
temperatura es deseada.

Inicie un Horneado por Tiempo

Presione 

Cook Time (Tiempo de Cocción)

, luego presione 

las teclas 

+

 o 

-

 para ajustar el tiempo de cocción por 

incrementos de un minuto. Presione 

Bake (Hornear)

 si desea 

XQDWHPSHUDWXUDGLIHUHQWHDž)OXHJRSUHVLRQHODVWHFODV

+


-

 para ajustar la temperatura por incrementos de 25 grados, 

y luego presione 

Start (Iniciar)

. Luego de una demora, un 

segundo corchete “] [“ aparecerá en la pantalla, indicando que 
el horno está horneando. Cuando el tiempo de cocción finalice, 
la pantalla volverá a cambiar a un solo corchete “]”, indicando 
que el horno ya no está horneando.

Modo Sabático

Summary of Contents for RBS360 series

Page 1: ...rademark of the General Electric Company Manufactured under trademark license SAFETY INFORMATION 3 USING THE RANGE Surface Units 8 Oven Controls 12 Special Features 14 Sabbath Mode 14 Oven Racks 15 Al...

Page 2: ...s into every GE Appliances product and we think you will too Among other things registration of your appliance ensures that we can deliver important product information and warranty details when you n...

Page 3: ...cket if the range is moved Failure to do so can result in death or serious burns to children or adults Tip Over Hazard WARNING Anti Tip Bracket Leveling Leg Free Standing and Slide In Ranges WARNING G...

Page 4: ...or open Introduction of fresh air at self clean temperatures may lead to a burst of flame from the oven Failure to follow this instruction may result in severe burns IMPORTANT SAFETY INFORMATION READ...

Page 5: ...extending over nearby surface units KHQ SUHSDULQJ IODPLQJ IRRGV XQGHU D KRRG WXUQ the fan on I SRZHU LV ORVW WR DQ HOHFWULF FRRNWRS ZKLOH D surface unit is ON the surface unit will turn back on as soo...

Page 6: ...e still hot using an oven mitt and a scraper See the Cleaning the glass cooktop section for detailed instructions 5HDG DQG IROORZ DOO LQVWUXFWLRQV DQG ZDUQLQJV RQ WKH cleaning cream label WARNING OVEN...

Page 7: ...g self cleaning Failure to follow these instructions may cause burns HIRUH RSHUDWLQJ WKH VHOI FOHDQ F FOH UHPRYH SDQV shiny metal oven racks and other utensils from the oven Only gray porcelain coated...

Page 8: ...sh cooking Coil Cooktops Each coil surface unit uses SENSI TEMP TECHNOLOGY to reduce the risk of cooktop oil and grease fires This feature is located in the center of each surface unit Power to the su...

Page 9: ...it will cycle on and off to maintain your selected control setting It is safe to place hot cookware on the glass surface even when the cooktop is cool Even after the surface units are turned off the g...

Page 10: ...leave residues which can appear as scratches The residues can be removed as long as the cooktop is cleaned immediately However do not let these pots boil dry Overheated metal can bond to glass cookto...

Page 11: ...ing Tips Be sure the canner is centered over the surface unit Make sure the canner is flat on the bottom To prevent burns from steam or heat use caution when canning 8VH UHFLSHV DQG SURFHGXUHV IURP UH...

Page 12: ...O WXUQ RQ 8VH WKLV WR VHW D WLPH ZKHQ RX ZDQW WKH RYHQ WR VWDUW Press the Delay Time pad and use the pads to program the time of day for the oven to turn on then press Start Press the desired cooking...

Page 13: ...from the original setting and check oven performance before making any additional adjustments 3 After the adjustment is made retighten screws so they are snug but be careful not to overtighten 4 Repla...

Page 14: ...e display setting Increment Decrement Speed VHWWLQJ L H WHPSHUDWXUH PD EH UDSLGO DGMXVWHG by pressing and holding the or pad To adjust the LQFUHPHQW GHFUHPHQW VSHHG HQWHU LQWR WKH VSHFLDO features men...

Page 15: ...as pies and custards Air insulated pans heat slowly and can reduce bottom browning Keep cookware clean to promote even heating CAUTION Do not use any type of foil or oven liner to cover the oven botto...

Page 16: ...hrough should be broiled on a rack position farther from the broiler or by using Broil Lo Broil Hi The Traditional Broil Hi mode uses intense heat from the XSSHU HOHPHQW WR VHDU IRRGV 8VH URLO L IRU W...

Page 17: ...r coated in sauce avoid Broil Hi modes Broil skin side down first Watch food closely when broiling For best performance when broiling center food below the broil heating element Broil Lo Bake 1 or 2 B...

Page 18: ...t trim is persistent use a mild abrasive cleaner and a sponge scrubber for best results Spillage of marinades fruit juices tomato sauces and basting liquids containing acids may cause discoloration an...

Page 19: ...the drip pan when you plug it back in NOTE Repeated lifting of the surface unit more than 1 inch above the drip pan can permanently damage the receptacle To replace a surface unit 1 Replace the drip p...

Page 20: ...or gray porcelain coated drip pans they can be cleaned in the oven during the self cleaning cycle Before you begin a self cleaning cycle remove any heavy soil from the drip pans and SODFH WKHP RQ WKH...

Page 21: ...to use the default time press the Start pad immediately after pressing the Self Clean pad The oven will turn off automatically when the self clean cycle is complete and the self clean light will be o...

Page 22: ...QRQ VFUDWFK FOHDQLQJ SDG IRU FHUDPLF cooktops rub the residue area applying pressure as needed 4 If any residue remains repeat the steps listed above as needed 5 For additional protection after all re...

Page 23: ...and Melted Plastic Special care should be taken when removing hot substances to avoid permanent damage of the glass surface 6XJDU VSLOORYHUV VXFK DV MHOOLHV IXGJH FDQG V UXSV RU PHOWHG SODVWLFV FDQ FD...

Page 24: ...H WXUQ XQWLO the tabs of the glass cover clear the grooves of the socket Wearing latex gloves may offer a better grip 2 Remove the bulb by turning it counter clockwise To replace 1 Replace bulb with a...

Page 25: ...ar of the slots in the range frame To Replace the Door 1 Firmly grasp both sides of the door near the top 2 With the door at the same angle as the removal position rest the notch in the bottom of the...

Page 26: ...ds being used Scratches are not removable Tiny scratches will become less visible in time as a result of cleaning Cookware with rough bottoms being used RU FRDUVH SDUWLFOHV VDOW RU VDQG ZHUH between t...

Page 27: ...breaker Oven controls improperly set 6HH WKH 8VLQJ WKH 2YHQ VHFWLRQ VLQJOH EUDFNHW VKRZV LQ WKH GLVSOD Press Bake and Broil pads at the same time and hold for three seconds SF will appear in the disp...

Page 28: ...number or letter flash in the display You have a function error code Press the Cancel Off pad Allow the oven to cool for one hour Put the oven back into operation If the function code repeats LVFRQQH...

Page 29: ...Bake pad and desired temperature or the Self Clean pad and desired clean time Oven racks are difficult to slide The shiny silver colored racks were cleaned in a self clean cycle Apply a small amount o...

Page 30: ...surface units IIHFWLYH DQXDU FRVPHWLF GDPDJH WR WKH glass cooktop such as but not limited to chips scratches or baked on residue not reported within 90 days of installation IIHFWLYH DQXDU damage to t...

Page 31: ...lable Accessories 6PDOO URLOHU 3DQ DUJH URLOHU 3DQ URLOHU 3DQ Parts Oven racks Oven burners Light bulbs Cleaning Supplies CitruShine Stainless Steel Wipes Stainless Steel Appliance Cleaner Cleaning Pa...

Page 32: ...scounts that are available while your warranty is still in effect You can purchase it on line anytime GE Appliances Services will still be there after your ZDUUDQW H SLUHV Q WKH 86 GEAppliances com ex...

Page 33: ...3 USO DE LA ESTUFA Unidades de superficie 8 Controles del Horno 12 Funciones Especiales 14 Modo Sab tico 14 Estantes del Horno 15 Papel de Aluminio y Cobertores del Horno 15 Utensilios 15 Modos de Coc...

Page 34: ...y creemos que usted tambi n Entre otras cosas el registro de su electrodom stico asegura que podamos entregarle informaci n importante del producto y detalles de la garant a cuando los necesite Regis...

Page 35: ...a sea enganchada Vuelva a adherir el soporte anti volcaduras si la estufa se mueve de lugar Si esto no se hace se podr producir la muerte o quemaduras graves en ni os o adultos Riesgo de Ca da ADVERTE...

Page 36: ...mendaciones de seguridad m nima sobre la temperatura de la comida en IsItDoneYet gov y fsis usda gov 8WLOLFH XQ WHUPyPHWUR SDUD WRPDU OD temperatura de la comida y haga controles en diferentes ubicaci...

Page 37: ...re ninguna unidad de superficie cercana 6L IODPEHD DOLPHQWRV EDMR OD FDPSDQD HQFLHQGD HO ventilador 6L VH SURGXFH XQ FRUWH GH OX HQ XQD HVWXID HOpFWULFD mientras la unidad superficial est en ON Encend...

Page 38: ...Para instrucciones detalladas ver la secci n C mo limpiar la estufa de vidrio HD FXPSOD FRQ WRGDV ODV LQVWUXFFLRQHV DGYHUWHQFLDV de la etiqueta de la crema de limpieza ADVERTENCIA INSTRUCCIONES DE SE...

Page 39: ...sencial para un buen sellado Se debe tener cuidado de no frotar da ar ni mover la junta 1R XVH OLPSLDGRUHV SDUD KRUQR 1R VH GHEHUi XVDU limpiadores comerciales para horno ni revestimientos de protecci...

Page 40: ...inalice la cocci n Superficies de Cocci n con Bobinas Cada unidad de la superficie con bobinas utiliza SENSI TEMP TECHNOLOGY a fin de reducir el riesgo de incendios con aceite y grasa en la superficie...

Page 41: ...i n de control seleccionada Es seguro colocar utensilios calientes en la superficie de vidrio incluso cuando la estufa est fr a Aunque las unidades de superficie se hayan apagado la estufa de vidrio r...

Page 42: ...den eliminarse siempre y cuando la estufa se limpie de inmediato Sin embargo no permita que estas ollas hiervan en seco El metal sobrecalentado puede adherirse a las estufas de vidrio Si no se elimina...

Page 43: ...e que el producto enlatado se encuentre sobre la unidad superficial Aseg rese de que el producto enlatado sea plano en su parte inferior Para evitar quemadoras de vapor o calor tenga cuidado al enlata...

Page 44: ...era un retraso FXDQGR HO KRUQR HV HQFHQGLGR 8VH HVWD WHFOD SDUD FRQILJXUDU el momento en que desea que el horno se inicie Presione la tecla Delay Time Tiempo de Retraso y use las teclas para programar...

Page 45: ...ste adicional 8QD YH UHDOL DGR HO DMXVWH YXHOYD D DMXVWDU ORV WRUQLOORV de modo que est n firmes pero tenga cuidado de no ajustarlos en exceso 4 Reemplace la perilla enlazando el rea plana de la misma...

Page 46: ...de la pantalla Incrementar Reducir la Velocidad 8QD FRQILJXUDFLyQ SRU HMHPSOR WHPSHUDWXUH SXHGH VHU ajustada de forma r pida manteniendo presionada la tecla o la tecla 3DUD DMXVWDU HO LQFUHPHQWR UHGXF...

Page 47: ...de ollas funcionan bien con platos tales como tartas y postres con natilla Las ollas con aislante de aire calientan lentamente y pueden producir fondos dorados Mantenga los utensilios limpios para un...

Page 48: ...il Hi Asar Alto El modo Traditional Broil Hi Asado Tradicional Alto usa calor LQWHQVR GHO HOHPHQWR VXSHULRU SDUD VRDVDU ODV FRPLGDV 8VH la funci n Broil Hi Asado Alto para cortes m s delgados de FDUQH...

Page 49: ...con salsa evite los modos Broil Hi Asar Alto Ase del lado de la piel hacia abajo primero Preste atenci n a la comida al asarla Para un mejor rendimiento centre la comida debajo del elemento calentado...

Page 50: ...esultado El derrame de adobo jugos de fruta salsas de tomate y l quidos para humedecer que contengan cidos pueden ocasionar descoloraci n y se deber n limpiar de inmediato Deje que las superficies cal...

Page 51: ...hace es posible que no se apoye sobre la cubeta de goteo al volver a enchufar la misma NOTA Levantar de forma repetida la unidad de la superficie m s de 1 pulgada sobre la cubeta de goteo puede da ar...

Page 52: ...ada con cubetas de goteo negras o grises cubiertas de porcelana se podr n limpiar dentro del horno durante el ciclo de auto limpieza Antes de comenzar un ciclo de auto limpieza retire cualquier sucied...

Page 53: ...niciar Cuando el nivel de suciedad en el horno sea muy alto se recomienda usar el tiempo de limpieza m ximo de 5 horas Si desea usar el tiempo por omisi n presione la tecla Start Iniciar inmediatament...

Page 54: ...SLH D QR DEUDVLYD SDUD Superficies de Cocci n de Cer mica frote el rea sucia aplicando presi n seg n sea necesario 4 Si quedan restos repita los pasos indicados con anterioridad 5 Para protecci n adic...

Page 55: ...drio Los derrames azucarados como gelatinas dulce caramelo jarabes o pl sticos derretidos pueden marcar la superficie de la estufa no cubierto por la garant a a menos que el derrame se quite mientras...

Page 56: ...e las agujas del reloj hasta que las leng etas de la tapa de vidrio limpien las ranuras de la ficha Si usa guantes de l tex tendr un mejor agarre 2 Retire la l mpara girando la misma en direcci n cont...

Page 57: ...pletamente las aberturas en las partes inferiores de los brazos de las bisagras no se apoyaron de forma correcta sobre el extremo inferior de la ranura Retire la puerta de la estufa y repita el Paso 2...

Page 58: ...elemento de superficie que est utilizando La unidad de superficie deja de resplandecer cuando se cambia a una configuraci n menor La unidad sigue encendida y caliente Esto es normal Rayones pueden par...

Page 59: ...Reemplace el fusible o reinicie el disyuntor Controles del horno configurados de forma incorrecta RQVXOWH OD VHFFLyQ 8VR GHO RUQR En la pantalla se muestra un solo corchete 0DQWHQJD SUHVLRQDGDV ODV W...

Page 60: ...debido a que la temperatura interior del horno no descendi por debajo de la temperatura de bloqueo Presione la tecla Cancel Off Cancelar Apagar Deje que el horno se enfr e F y un n mero o letra titil...

Page 61: ...za de la estufa El caj n est muy cargado o la carga no est equilibrada Reduzca el peso Redistribuya el contenido del caj n Emisi n de vapor desde la ventilaci n Cuando se utilizan los hornos es normal...

Page 62: ...HPSOD DU ODV l mparas excepto las l mparas LED 6XPHUJLU R DOWHUDU ODV XQLGDGHV GH OD VXSHUILFLH FRQ ERELQDV con Sensi Temp Technology SDUWLU GH HQHUR GDxRV HVWpWLFRV VREUH OD SODFD GH cocci n de vidri...

Page 63: ...i n Cer micas Limpiador de la Placa de Cocci n de Cer mica Esp tula para Placa de Cocci n Cer mica LW HO NLW LQFOX H FUHPD HVSiWXOD SDUD SODFD GH FRFFLyQ D ROOD SDUD DVDU JUDQGH QR HQWUD HQ HVWXIDV GH...

Page 64: ...ntras su garant a a n est vigente La puede adquirir en cualquier momento a trav s de Internet Los servicios de GE Appliances a n estar n all cuando su garant a caduque Q 88 GEAppliances com extended w...

Reviews: