background image

24

49-2000376   Rev. 0

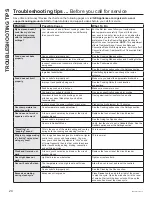
Save time and money! Review the charts on the following pages or visit 

GEAppliances.com/ge/service-and-

support/cookingproducts.htm

 for helpful articles and support videos before you call for service.

Problem

Possible Cause

What To Do

My new oven doesn't 
cook like my old one. 
Is something wrong 
with the temperature 
settings?

Your new oven has a different cooking system from 
your old oven and therefore may cook differently 
than your old oven.

For the first few uses, follow your recipe times 

DQGWHPSHUDWXUHVFDUHIXOO\,I\RXVWLOOWKLQN\RXU

new oven is too hot or too cold, you can adjust the 
temperature yourself to meet your specific cooking 
preference. See the Special Features Section to 
adjust the oven temperature. 

NOTE:

 This adjustment 

DIIHFWV7UDGLWLRQDO%DNH&RQYHFWLRQ%DNHDQG
&RQYHFWLRQ%DNH0XOWLWHPSHUDWXUHVLWZLOOQRWDIIHFW
&RQYHFWLRQ5RDVW7UDGLWLRQDO%URLO&RQYHFWLRQ%URLO

or Clean.

Food does not bake 
properly

Oven controls improperly set.

See the Cooking Modes section.

Rack position is incorrect or rack is not level.

See the Cooking Modes section and Cooking Guide.

,QFRUUHFWFRRNZDUHRUFRRNZDUHRILPSURSHUVL]H

being used.

See the Cookware section.

Oven temperature needs adjustment.

See the Cooking option under the Settings section.

,QJUHGLHQWVXEVWLWXWLRQ

Substituting ingredients can change the recipe 
outcome.

Food does not broil 
properly

Oven controls improperly set.

Make sure you select the appropriate broil mode.

,PSURSHUUDFNSRVLWLRQEHLQJXVHG

See the Cooking Guide for rack location 
suggestions.

Food being cooked in a hot pan.

Make sure cookware is cool

Cookware not suited for broiling.

8VHDSDQVSHFLILFDOO\GHVLJQHGIRUEURLOLQJ

Aluminum foil used on the broiling pan and 
grid has not been fitted properly and slit as 
recommended.

,IXVLQJDOXPLQXPIRLOFRQIRUPWRSDQVOLWV

,QVRPHDUHDVWKHSRZHUYROWDJHPD\EHORZ

Preheat the broil element for 10 minutes.

Oven temperature too 
hot or too cold

Oven temperature needs adjustment.

See the Cooking option under the Settings section.

Oven does not work or 
appears not to work

A fuse in your home may be blown or the circuit 
breaker tripped.

Replace the fuse or reset the circuit breaker.

Oven controls improperly set.

6HHWKH8VLQJWKH2YHQVHFWLRQ

Oven is in Sabbath Mode

9HULI\WKDWWKHRYHQLVQRWLQ6DEEDWK0RGH6HHWKH

Sabbath option under the Settings section.

“Crackling” or 
“popping” sound

This is the sound of the metal heating and cooling 
during both the cooking and cleaning functions.

This is normal. 

Why is my range making 
a "clicking" noise when 
using my oven?

Your range has been designed to maintain a tighter 
control over your oven's temperature. You may 
hear your oven's heating elements "click" on and 
off more frequently than in older ovens to achieve 
better results during baking, broiling, convection, 
and self-clean cycles.

This is normal.

Clock and timer do not 
work

A fuse in your home may be blown or the circuit 
breaker tripped.

Replace the fuse or reset the circuit breaker.

Oven light does not 
work

/LJKWEXOELVORRVHRUGHIHFWLYH

Tighten or replace bulb.

Oven will not self-clean

The temperature is too high to set a self-clean 
operation.

Allow the oven to cool and reset the controls.

Oven controls improperly set.

See the Cleaning the Oven section.

Excessive smoking 
during clean cycle

Excessive soil or grease.

Press 

Cancel

 on the pad to the right of the screen 

to stop the cycle. Open the windows to rid the room 
of smoke. Wait until the door unlocks. Wipe up the 
excess soil and reset the clean cycle.

Troubleshooting tips ...


%HIRUH\RXFDOOIRUVHUYLFH

TROUBLESHOOTING TIPS

Summary of Contents for PTS9000

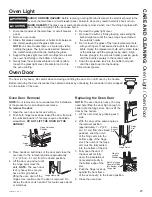
Page 1: ...00376 Rev 0 11 19 GEA GE is a trademark of the General Electric Company Manufactured under trademark license 30 Single Wall Oven PTS9000 30 Double Wall Oven PTD9000 SAFETY INFORMATION 3 USING THE OVEN...

Page 2: ...ry GE Appliances product and we think you will too Among other things registration of your appliance ensures that we can deliver important product information and warranty details when you need them R...

Page 3: ...time for cooling first Other surfaces of the appliance may become hot enough to cause burns Potentially hot surfaces include the oven vent opening surfaces near the opening and crevices around the ov...

Page 4: ...t in oven KHQ XVLQJ FRRNLQJ RU URDVWLQJ EDJV LQ WKH RYHQ follow the manufacturer s directions 3XOOLQJ RXW WKH VWDQGDUG UDFNV WR WKHLU VWRS ORFNV or the extension rack to its fully open position is D F...

Page 5: ...if it is baked on The remote enable equipment installed on this oven has been tested and found to comply with the limits for D ODVV GLJLWDO GHYLFH SXUVXDQW WR SDUW RI WKH Rules These limits are desig...

Page 6: ...to save their favorite cycles for easy access in the future After selecting a cooking mode and setting the temperature and any timers press the to save it as a favorite for future use After saving a c...

Page 7: ...EAppliances com connect to learn more about connected appliance features and to download the app to connect to your oven 4 Follow the onscreen instructions in the app to connect your GE Appliances ove...

Page 8: ...the cooking unit can be changed to Celsius Auto Recipe Conversion can be turned on in order to automatically reduce the programmed cooking WHPSHUDWXUH IRU RQYHFWLRQ DNH RU RQYHFWLRQ DNH 0XOWL 1RWH WKD...

Page 9: ...at RX SURJUDPPHG IRU RXU 6DEEDWK DNH Adjusting the Temperature During a Sabbath Bake I WKH WHPSHUDWXUH QHHGV WR EH DGMXVWHG DIWHU SURJUDPPLQJ WKH RYHQ IRU D 6DEEDWK DNH SUHVV RQH of the temperature ic...

Page 10: ...possible burns place the racks in the desired position before you turn the oven on Flat Racks When placing and removing cookware pull the rack out to the bump stop position on the rack support To remo...

Page 11: ...side paddles on the rack disengage from the oven support 2 Slide the rack toward you to the bump stop position on the rack support 3 Firmly grasp both sides of the rack frame and the sliding rack til...

Page 12: ...I XVLQJ GDUN DQG FRDWHG FRRNZDUH FKHFN IRRG HDUOLHU WKDQ PLQLPXP FRRN WLPH I XQGHVLUDEOH UHVXOWV DUH obtained with this type of cookware consider reducing oven temperature by 25 F next time Shiny pans...

Page 13: ...ess the Bake Multi Rack pad under Convection enter a temperature and then press Start Always preheat when using this mode Convection Roast with Direct Air The Convection Roast mode is intended for roa...

Page 14: ...pad and then press Start Cover dough well to prevent drying out UHDG ZLOO ULVH PRUH UDSLGO WKDQ DW URRP WHPSHUDWXUH Warm Warm mode is designed to keep hot foods hot for up to 3 hours To use this mode...

Page 15: ...into the center of the dish RU ILVK LQVHUW WKH SUREH IURP MXVW DERYH WKH JLOO LQWR the meatiest area parallel to the backbone Probe Usage To use the probe without preheating QVHUW WKH SUREH LQWR WKH I...

Page 16: ...Move food down for more doneness less searing and up for greater searing browning when broiling For best performance when broiling center food below the broil heating element Whole turkey 7UDGLWLRQDO...

Page 17: ...r greater searing browning when broiling For best performance when broiling center food below the broil heating element Whole turkey 7UDGLWLRQDO DNH Convection Roast 1 or 2 8VH D ORZ VLGHG SDQ VXFK DV...

Page 18: ...food ambient humidity temperature setting quantity of food etc Thinner smaller pieces of foods will dehydrate more quickly than thicker or larger pieces RU EHVW SHUIRUPDQFH ZKHQ XVLQJ WKH GHK GUDWH P...

Page 19: ...it juices tomato sauces and basting liquids containing acids may cause discoloration DQG VKRXOG EH ZLSHG XS LPPHGLDWHO HW KRW VXUIDFHV cool then clean and rinse Cleaning The Oven Exterior Painted Surf...

Page 20: ...you would like to clean Select the More option then Self Clean Choose a 3 4 or 5 hour cycle and select the illuminated Start pad to the right of the screen For heavily soiled ovens the maximum 5 hour...

Page 21: ...YDO LV QRW D UHTXLUHPHQW IRU LQVWDOODWLRQ of the product but is an added convenience To remove the door 1 Open the oven door as far as it will go 2 Push both hinge locks down toward the door frame to...

Page 22: ...22 49 2000376 Rev 0 Notes...

Page 23: ...49 2000376 Rev 0 23 Notes...

Page 24: ...used on the broiling pan and grid has not been fitted properly and slit as recommended I XVLQJ DOXPLQXP IRLO FRQIRUP WR SDQ VOLWV Q VRPH DUHDV WKH SRZHU YROWDJH PD EH ORZ Preheat the broil element fo...

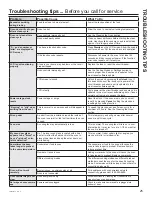
Page 25: ...function Burning or oily odor emitting from the vent This is normal in a new oven and will disappear in time To speed the process set a self clean cycle for a minimum of 3 hours See the Cleaning the...

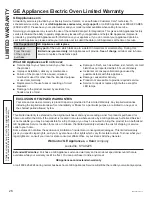
Page 26: ...WARRANTY GE Appliances Electric Oven Limited Warranty EXCLUSION OF IMPLIED WARRANTIES RXU VROH DQG H FOXVLYH UHPHG LV SURGXFW UHSDLU DV SURYLGHG LQ WKLV LPLWHG DUUDQW Q LPSOLHG ZDUUDQWLHV including th...

Page 27: ...numbers and website information The following products and more are available Accessories Accessories 6PDOO URLOHU 3DQ DUJH URLOHU 3DQ URLOHU 3DQ Parts Oven racks Oven elements LJKW EXOEV Probe Cleani...

Page 28: ...rn about special discounts that are available while your warranty is still in effect You can purchase it on line anytime GE Appliances Services will still be there after your ZDUUDQW H SLUHV Q WKH 86...

Page 29: ...rno de Pared Simple de 30 PTS9000 Horno de Pared Doble de 30 PTD9000 INFORMACI N DE SEGURIDAD 3 USO DEL HORNO Controles del Horno 6 Horno Doble 7 Settings Configuraciones 7 C mara de la Puerta del Hor...

Page 30: ...y creemos que usted tambi n Entre otras cosas el registro de su electrodom stico asegura que podamos entregarle informaci n importante del producto y detalles de la garant a cuando los necesite Regis...

Page 31: ...tico se podr n calentar lo suficiente como para ocasionar lesiones Las superficies potencialmente calientes incluyen la abertura de la ventilaci n del horno superficies cercanas a la abertura y grieta...

Page 32: ...empujar el estante extensible hasta la posici n completamente abierta para levantar comidas pesadas Esto tambi n es una precauci n contra quemaduras por tocar superficies calientes de la puerta o las...

Page 33: ...LEA TODAS LAS INSTRUCCIONES ANTES DE USAR ESTE ELECTRODOM STICO El equipo de acceso remoto instalado en este horno fue probado y cumple con los l mites establecidos para un GLVSRVLWLYR GLJLWDO GH FODV...

Page 34: ...n le permite al usuario guardar sus ciclos favoritos para un f cil acceso en el futuro Luego de seleccionar un modo de cocci n y de configurar una temperatura y un temporizador presione para guardar...

Page 35: ...o 4 Siga las instrucciones en pantalla de la aplicaci n para FRQHFWDU VX KRUQR GH SSOLDQFHV 8QD YH FRQHFWDGR su horno debe mostrar que se encuentra conectado a la red de Wi Fi de su hogar 5 Si se prod...

Page 36: ...cci n puede ser cambiada a Celsius La funci n Auto Recipe Conversion Conversi n de Receta Autom tica puede ser activada a fin de reducir autom ticamente la temperatura de cocci n programada para Conve...

Page 37: ...sione Start Iniciar La siguiente pantalla exhibir las configuraciones que program para Sabbath Bake Horneado Sab tico Ajuste de Temperatura Durante un Horneado Sab tico Si es necesario ajustar la temp...

Page 38: ...r posibles quemaduras coloque los estantes en la posici n deseada antes de encender el horno Estantes Planos Al colocar y retirar utensilios de cocina empuje el estante hacia afuera del tope posici n...

Page 39: ...vidad 2 Deslice la parrilla hacia usted hasta que llegue al tope posici n detenida del soporte de la parrilla 3 Tome de manera firme ambos lados de la estructura del estante y deslizando este ltimo in...

Page 40: ...del tiempo m nimo de cocci n Si se obtienen resultados no deseados con este tipo de utensilios considere la posibilidad de reducir la temperatura del horno en 25 F la pr xima vez Las ollas brillantes...

Page 41: ...tom tica de modo que no es necesario convertir la temperatura al usar este modo Es posible que el tiempo de horneado sea un poco m s prolongado con estantes m ltiples en comparaci n con lo que se espe...

Page 42: ...n para lograr la textura crujiente deseada Podr acceder a pautas adicionales para el uso de este modo en la Gu a de Cocci n Leudar El modo Proof Leudar est dise ado para elevar fermentar y leudar masa...

Page 43: ...GH OD agalla en la zona m s carnosa paralela a columna Uso de la Sonda Para usar la sonda sin precalentamiento QVHUWH OD VRQGD HQ OD FRPLGD FRQVXOWH VREUH OD 8ELFDFLyQ Correcta de la Sonda 2 Coloque...

Page 44: ...al asar Para un mejor rendimiento centre la comida debajo del elemento calentador para asar Pavo entero Horneado Tradicional Dorado por Convecci n 1 o 2 8VD XQD ROOD FKDWD WDO FRPR XQD ROOD SDUD DVDU...

Page 45: ...debajo del elemento calentador para asar Pavo entero Horneado Tradicional Dorado por Convecci n 1 o 2 8VD XQD ROOD FKDWD WDO FRPR XQD ROOD SDUD DVDU 1R VH UHTXLHUH SUHFDOHQWDUOD Pechuga de Pavo Horne...

Page 46: ...arrollen microorganismos produciendo como resultado desechos o enfermedades provenientes de la comida 1R FRQItH VyOR HQ HO DVSHFWR H WHULRU R OD WH WXUD FRQWUROH el interior de la comida para asegurar...

Page 47: ...as de tomate y l quidos para humedecer que contengan cidos pueden ocasionar descoloraci n y se deber n limpiar de inmediato Deje que las superficies calientes se enfr en y luego limpie y enjuague Supe...

Page 48: ...erre la puerta Si usar un horno doble seleccione qu horno desea limpiar Seleccione la opci n More M s y luego Self Clean Limpieza Autom tica Elija un ciclo de 3 4 o 5 horas y seleccione la tecla Start...

Page 49: ...ado Ranura de la bisagra bien colocada en la parte inferior de la ranura de la bisagra La bisagra sale de la ranura Ranura de la bisagra Brazo de la bisagra Posici n destrabada de la bisagra ADVERTENC...

Page 50: ...a rejilla para asar no se ajust ni cort de forma apropiada seg n lo recomendado Si usar papel de aluminio deber usarse conforme con las aberturas de la olla En algunas reas es posible que el nivel de...

Page 51: ...o cualquier funci n de cocci n Olor a quemado o aceite desde la ventilaci n Esto es normal en un horno nuevo y desaparecer con el tiempo Para acelerar el proceso configure un ciclo de limpieza autom t...

Page 52: ...R UHTXHULGR 6ROLFLWH HO VHUYLFLR WpFQLFR SDUD UHSDUDU R UHHPSOD DU ODV l mparas excepto las l mparas LED EXCLUSI N DE GARANT AS IMPL CITAS Su nica y exclusiva alternativa es la reparaci n del producto...

Page 53: ...t n disponibles Accesorios Accesorios Olla para Asar Peque a 8 x 1 x 13 Olla para Asar Grande 12 x 1 x 16 Olla para Asar Extra Grande 17 x 1 x 19 Piezas Estantes del horno Elementos del horno L mparas...

Page 54: ...ntras su garant a a n est vigente La puede adquirir en cualquier momento a trav s de Internet Los servicios de GE Appliances a n estar n all cuando su garant a caduque Q 88 GEAppliances com extended w...

Reviews: