background image

– 48 –

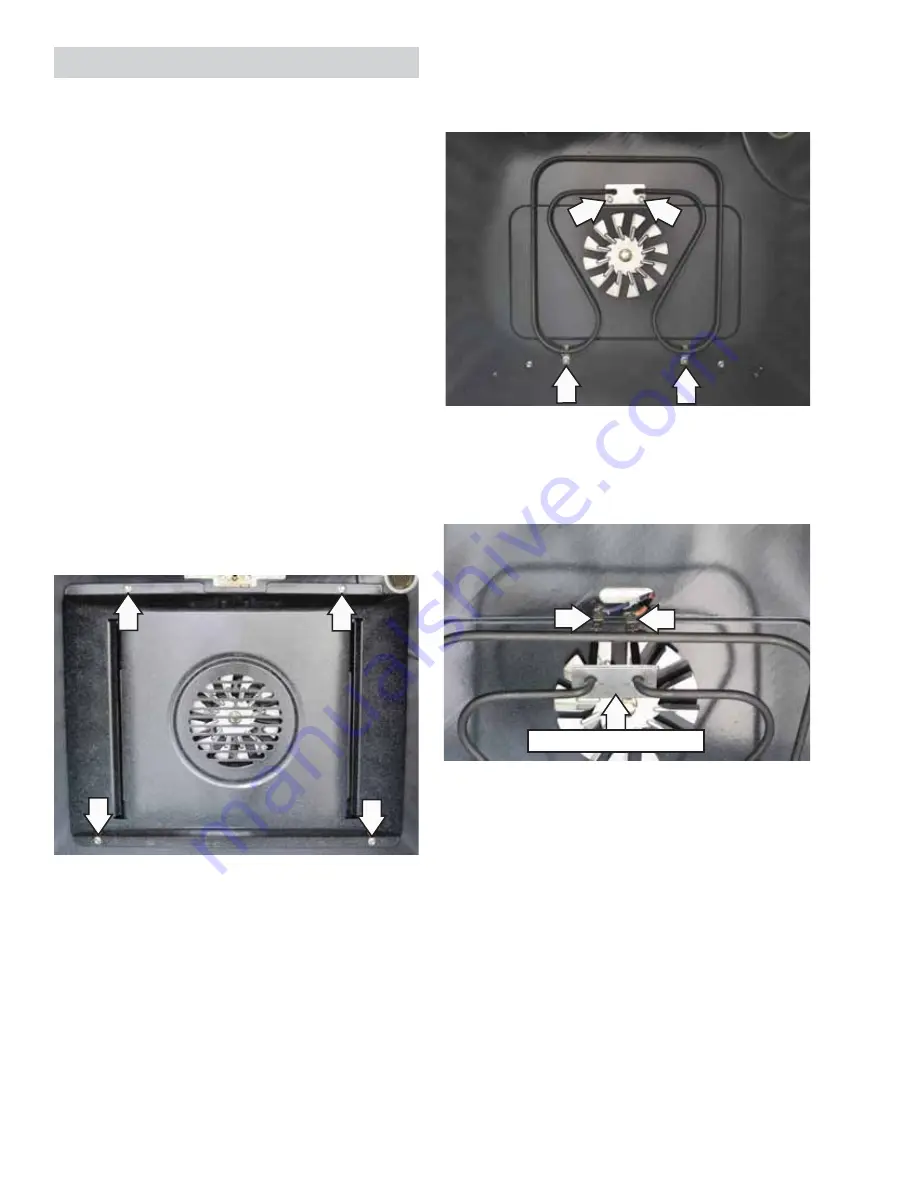
Convection Element

•  The element is rated at 2500 watts, has an 

approximate resistance value of 23 

Ω

, and 

draws approximately 10 amps.

•  The convection bake element is located on the 

back wall of the lower oven and can be removed 
from inside the oven cavity.

The convection element operates during the 
following modes:

Preheat

• 

Convection Bake

• 

Convection Roast

• 

Clean

• 

To remove the convection bake element:

Remove oven racks. 

1. 

Remove the four ¼-in. hex-head screws that 

2. 

hold the convection cover to the back wall of the 
oven cavity.

3.  Remove the four ¼-in. hex-head screws that 

hold the convection element to the back wall of 
the oven cavity.

4.  Carefully pull the convection element towards 

the front of the oven until the element terminals 
are accessible.

Disconnect the wires from the convection 

5. 

element. 

Note:

 There is a gasket placed between the element 

bracket and the oven cavity. Be sure to install the 
gasket to its original location.

Convection Bake Element

Summary of Contents for Profile PB975

Page 1: ...GE Appliances General Electric Company Louisville Kentucky 40225 31 9157 Profile 30 in Free Standing Double Oven Range PB975 PB970 Technical Service Guide October 2007 GE Consumer Industrial ...

Page 2: ... avoid personal injury disconnect power before servicing this product If electrical power is required for diagnosis or test purposes disconnect the power immediately after performing the necessary checks RECONNECT ALL GROUNDING DEVICES If grounding wires screws straps clips nuts or washers used to complete a path to ground are removed for service they must be returned to their original position an...

Page 3: ...tion 4 Lock Assembly 61 Lower Oven Bake Element 50 Lower Oven Door Assembly 36 Lower Oven Door Hinge Receiver 44 Meat Probe and Outlet PB975 51 Nomenclature 5 Operational Notes 25 Oven Components 46 Oven Light Assemblies 42 Oven Sensor and Door Switch Test 70 Oven Temperature Sensor 46 Radiant Heating Elements 59 Range Component Access Chart 33 Range Components 34 Range Top Components 59 Rear Cove...

Page 4: ...tional fan that works with a dedicated third heating element to promote even heat circulation Performance compensation for 208 volt installation boosts power as needed in multifamily dwellings 6 5 cu ft total capacity Cooktop locked out during self clean New motorized self clean door latch Recessed convection low profile broil elements and hidden lower oven bake element Dual Halogen lights located...

Page 5: ...1986 T 1998 Serial Number The first two numbers of the serial number identify the month and year of manufacture Example AM123456S January 2007 A JAN 2007 M D FEB 2006 L F MAR 2005 H G APR 2004 G H MAY 2003 F L JUN 2002 D M JUL 2001 A R AUG 2000 Z S SEP 1999 V T OCT 1998 T V NOV 1997 S Z DEC 1996 R Feature Pack Designates features the higher the number the more features Product Color WW White Indic...

Page 6: ...en touch the number pads to set the amount of time you want your food to cook The oven will shut off when the cooking time has run out Display Shows the time of day oven temperature whether the oven is in the bake broil or self cleaning mode and the times set for the timer or automatic oven operations Number Pads Use to set any function requiring numbers such as the time of day on the clock the ti...

Page 7: ...t COOK TIME Pad Touch and then touch the number pads to set the amount of time you want your food to cook The oven will shut off when the cooking time has run out Display Shows the time of day oven temperature whether the oven is in the bake broil or self cleaning mode and the times set for the timer or automatic oven operations If your oven was set for a timed oven operation and a power outage oc...

Page 8: ...he CLEAR OFF pad when cooking is complete How to Set the Upper and Lower Ovens for Broiling Leave the door open to the broil stop position The door stays open by itself yet the proper temperature is maintained in the oven Place the meat or fish on a broiler grid in a broiler pan Follow suggested rack positions in the Broiling Guide Touch the BROIL HI LO pad once for HI Broil To change to LO Broil ...

Page 9: ...desired oven temperature Touch the COOK TIME pad NOTE If your recipe requires preheating you may need to add additional time to the length of the cooking time Touch the number pads to set the desired length of cooking time The minimum cooking time you can set is 1 minute The oven temperature that you set and the cooking time that you entered will be in the display Touch the DELAY START pad Touch t...

Page 10: ...00 F the changing internal temperature will be shown in the display When the internal temperature of the food reaches the number you have set the probe and the oven turn off and the oven control signals To stop the signal touch the CLEAR OFF pad Use hot pads to remove the probe from the food Do not use tongs to pull on it they might damage it If the probe is removed from the oven while probe cooki...

Page 11: ...you the time is counting down although the display does not change until one minute has passed Seconds will not be shown in the display until the last minute is counting down When the Kitchen Timer reaches 00 the control will beep 3 times followed by one beep every 6 seconds until the TIMER CLOCK or TIMER pad depending on model is touched The 6 second tone can be canceled by following the steps in...

Page 12: ...o cold you can adjust the thermostat yourself Do not use thermometers such as those found in grocery stores to check the temperature setting of your oven These thermometers may vary 20 40 degrees NOTE This adjustment will only affect baking and roasting temperatures it will not affect broiling convection or self cleaning temperatures The adjustment will be retained in memory after a power failure ...

Page 13: ...ck Convection Baking The convection oven comes with two convection baking modes Convection Bake Multi and Convection Bake 1 Rack MULTI for convection cooking on more than one rack Touch the CONVECTION BAKE MULTI 1 RACK pad and then the 2 pad See the Multi Rack Convection Baking section below 1 RACK for convection cooking on one rack only Touch the CONVECTION BAKE MULTI 1 RACK and then the 1 pad Se...

Page 14: ... oven starts to heat the changing temperature starting at 100 F will be displayed When oven reaches the temperature you set 3 beeps will sound Touch CLEAR OFF pad when finished You will hear a fan while cooking with convection The fan will stop when the door is opened but the heat will not turn off You may hear the oven clicking during baking This is normal In convection bake modes for maximum coo...

Page 15: ... cooking time countdown and the changing temperature starting at 100 F The temperature display will start to change once the oven temprature reaches 100 F When the oven reaches the temperature you set 3 beeps will sound NOTE If the Auto Recipe Conversion Feature is on it will automatically reduce the set regular baking temperature by 25 F to the appropriate convection temperature in convection bak...

Page 16: ...o turn on and start cooking Touch the START pad NOTE An attention tone will sound if you are using timed baking or roasting and do not touch the START pad NOTE If you would like to check the times you have set touch the DELAY START pad to check the start time you have set or touch the COOK TIME pad to check the length of cooking time you have set When the oven turns ON at the time of day you set t...

Page 17: ...emperature of the meat reaches the number you have set the probe and the oven turn off and the oven control signals To stop the signal touch the CLEAR OFF pad Use hot pads to remove the probe from the food Do not use tongs to pull on it they might damage it NOTE If the probe is removed from the oven while probe cooking the oven will not automatically turn off CAUTION To prevent possible burns do n...

Page 18: ...desired length of cooking time For the HI setting the cooking time must be between 3 and 8 hours For the LO setting the cooking time must be between 3 and 12 hours Touch the START pad When the Slow Cook function has completed the oven will go into the Warm mode Display will say Cooking Complete Keeping Warm The total time the oven will be on Slow Cook time plus Warm time is 12 hours This is becaus...

Page 19: ...h For moist foods cover them with an oven safe lid or aluminum foil Fried or crisp foods do not need to be covered but can become too dry if warmed for too long Repeated opening of the door allows the hot air to escape and the food to cool Allow extra time for the temperature inside the oven to stabilize after adding items With large loads it may be necessary to cover some of the cooked food items...

Page 20: ... at the same time The last oven set will automatically delay its start until the end of the first oven s clean cycle When an oven is set to self clean both oven doors will lock and the cooktop controls will lock out The ovens and cooktop cannot be used when an oven is set to self clean Wipe up heavy soil on the oven bottom Before a Clean Cycle We recommend venting your kitchen with an open window ...

Page 21: ...Start of Cleaning Touch the SELF CLEAN HI LO pad once for a 5 hour clean time or twice for a 3 hour clean time A 3 hour self clean time is recommended for use when cleaning small contained spills A self clean time of 5 hours is recommended for a dirtier oven If a time other than 5 hours or 3 hours is needed use the number pads and enter the desired clean time You can change the clean time to any t...

Page 22: ...e canceled To cancel the 6 second beep Touch the upper oven BROIL HI LO and BAKE pads at the same time until the display shows SF Touch the BROIL pad The display shows CONTI BEEP continuous beep Touch the BROIL pad again The display shows SINGLE BEEP This cancels the one beep every 6 seconds Touch the START pad Special features of your oven control Your new touch pad control has additional feature...

Page 23: ...splay shows SF Touch the TIMER CLOCK or CLOCK pad depending on model once The display will show 12 hr If this is the choice you want touch the START pad Touch the TIMER CLOCK or CLOCK pad depending on model again to change to the 24 hour military time clock The display will show 24 hr If this is the choice you want touch the START pad Touch the TIMER CLOCK or CLOCK pad depending on model again to ...

Page 24: ...0 seconds to 1 minute will appear in the display indicatingthat the oven is baking roasting If doesn t appear in the display start again at Step 4 To adjust the oven temperature touch the BAKE pad enter the new temperature using the number pads and touch the START pad NOTE The CLEAR OFF and COOK TIME pads are active during the Sabbath feature How to Set for Timed Baking Roasting Immediate Start an...

Page 25: ...he bake operation with one element on at a time On non convection models when bake or timed baking is used the bake and broil elements cycle during both the preheat and the baking operation with one element on at a time In Convection Bake or Convection Roast the convection element and the fan operate whenever the oven is heating Timed baking can be used in both ovens at the same time Broil will no...

Page 26: ...ti Tip Bracket WARNING The range must be secured by the anti tip bracket supplied WARNING Unless properly installed the range could be tipped by stepping or sitting on the doors Injury may result from spilled hot liquids or from the range itself An anti tip bracket is supplied with instructions for installation in a variety of locations The instructions include all necessary information to complet...

Page 27: ... 27 Component Locator Views Continued next page Front View PB975 shown Control Panel ...

Page 28: ...own Hidden Bake Element Convection Fan and Element Broil Element Broil Element Light Light Meat Probe Outlet Light Light Bake Element Oven Temperature Sensor Oven Temperature Sensor Shown with oven doors removed Continued next page ...

Page 29: ...75 shown Shown in service position Surface Unit Switch Surface Unit Switch Bridge Element Tri Ring Element Right Rear Element Warming Zone Element Hot Surface Indicator Light Assembly Electronic Range Control ERC Control Panel PB975 shown ...

Page 30: ...or Upper Oven Bake Element Upper Oven Broil Element Lower Oven Broil Element Upper Oven Door Lock Assembly Lower Oven Door Lock Assembly Cooktop Lockout Relay The electronic range control ERC consists of the lower oven control board and the display board Note The lower oven bake element terminals are located behind the left side panel Convection Fan Motor Capacitor Convection Element ...

Page 31: ...rness Display Board Lower Oven Control Board Lower Oven Control Board and Display Board J2 Glass Touch Panel J3 Glass Touch Panel J5 Upper and Lower Oven Sensors J6 Meat Probe J7 Lower Oven Lock Motor Cooktop Lockout Relay Coil Lower Broil Outer Element Convection Fan Motor Lower Oven Lights J10 Ground J11 Neutral J14 L1 supply to Lower Oven Lock Motor Cooktop Lockout Relay Coil Lower Broil Outer ...

Page 32: ...J11 J7 Lock Motor Outer Broil Element Oven Lights J11 Neutral J14 L1 supply to K3 and J7 J16 Oven Lock Switch Oven Unlock Switch J17 Communication Cable K1 Oven Lights K3 Broil Relay K7 Bake Relay K8 Broil Boost Relay K13 Door Lock Relay K14 Double Line Break Relay ...

Page 33: ...mbly Upper Oven Door Assemblies Oven Light Assembly upper oven right side Hinge Receiver Lower Oven Door Hinge Upper Oven Meat Probe and Outlet PB975 Oven Light Assemblies excluding upper oven right side C o m p o n e n t s R e q u i r i n g R e a r C o v e r R e m o v a l C o m p o n e n t s R e q u i r i n g C o o k t o p S u p p o r t o r R e m o v a l Oven Temperature Sensors Radiant Heating E...

Page 34: ...e door fully 1 Lift each hinge lock towards the oven frame 2 until it stops Range Components Continued next page 3 Close the door to the stop position The hinge locks will contact the oven frame 4 Simultaneously press down on each release button located on the top of both hinges 5 Lift the door up until it is clear of the door hinges 6 Pull on the hinge arms lightly to relieve pressure on the lock...

Page 35: ...uter door assembly Remove the door See 1 Upper Oven Door Assembly Place the door assembly gasket side down on a 2 protective surface Remove the 4 Phillips head screws that attach 3 the bottom of the outer door assembly to the outer door Remove the six In hex head screws that 7 attach the handle to the outer door assembly Remove the Phillips head screw from each side 4 of the outer door panel Remov...

Page 36: ...ies Caution The door is very heavy Use the correct lifting procedure Do not lift the door by the handle To remove the lower oven door assembly Open the door fully 1 Insert a flat blade screwdriver into the cut out 2 in each of the hinge door locks Push the hinge locks from the locked position down toward the door frame to the unlocked position Hinge Door Lock Cut out Remove the insulation and the ...

Page 37: ...the door assembly gasket side up on a 2 protective surface Remove the 4 Phillips head screws from the 3 bottom of the outer door assembly Remove the 4 Phillips head screws 2 on each 4 side from the outer door assembly Note The inner door assembly is heavier than the outer door assembly Separate the inner door assembly from the 5 outer door assembly Remove the four in hex head screws 6 that hold th...

Page 38: ...e the hinges are parallel to each other and perpendicular to the door liner If not the hinge may bind on the receiving channel of the door If the new hinge is not in the cocked and locked position after installing place the bottom of the door against a firm protected surface and push the hinge arm down to the cocked position Pull the hinge lock back against the door liner surface to lock the hinge...

Page 39: ...he gasket into the slots The overlap is required to ensure a proper door seal Cross Tuck Cooktop Assembly The ceramic glass cooktop is sealed into the cooktop frame and is not replaceable as a separate part The glass cooktop and frame come as a complete assembly To remove the cooktop assembly Disconnect power to the range 1 Open the upper oven door and remove the two 2 in hex head screws that hold...

Page 40: ...ed for clearer view Hinge Pin Hinge Slot Rear Cover Removal To remove the rear cover Disconnect power to the range 1 Pull the range out from its installation 2 Remove and capture the hidden in hex head 3 screw from the bottom of the cover Remove the in ground screw and ground 4 wire from the top of the cover Remove eight in hex head screws that attach 5 the panel to the range Pull the top of the c...

Page 41: ...e four screws from the rear of the 5 side panel Remove the three top screws and maintop strike 6 from the top of the side panel Maintop Strike Note The front of the panel is held to the range frame by 3 plastic grommets that engage 3 keyhole slots placed along the inside front flange of the panel Grasp the front and rear portion of the side 7 panel Lift the side panel up and pull towards you then ...

Page 42: ...ess To access the oven light assemblies in the lower oven and the left side light assembly in the upper oven follow method 1 It will be necessary to follow method 2 to replace the right side light assembly in the upper oven Method 1 Open the oven door and remove the two in hex head screws that attach the light assembly to the oven liner Lower Oven Light The light assembly and wiring can then be pu...

Page 43: ...iginal position There is a gasket placed between the light assembly and the oven cavity Be sure to install the gasket to its original location Oven Light Bulbs Caution Before replacing your oven light bulb disconnect the electrical power to the range at the main fuse or circuit breaker panel Note The glass cover should be removed only when cold Wearing latex gloves may offer a better grip To remov...

Page 44: ... Note Higher wattage bulbs will damage your oven Using gloves or a dry cloth remove the bulb from its packaging Do not touch the bulb with bare fingers Oil from bare fingers may cause hot spots on the glass surface and lead to premature failure of the bulb If you do touch the glass clean it with alcohol prior to installation Push the bulb straight into the receptacle all the 1 way Place the tabs o...

Page 45: ...ving the side panel See Side Panel Removal Cooktop Lockout Relay When an oven is set to Self Clean the cooktop controls will lock out The cooktop cannot be used when an oven is set to Self Clean The cooktop lockout relay is attached to the back of the range with two in hex head screws To replace it requires removing the rear cover See Rear Cover Removal Mark and disconnect wires from the relay ...

Page 46: ...control 4 board wire harness to the replacement board Disconnect Wire Harness Jumper Wire Disconnect Oven Temperature Sensor The oven temperature sensor has a resistance of 1091 Ω at room temperature 1654 Ω at 350 F 2634 Ω at 865 F Clean temperature The oven temperature sensor has a resistance change rate of 2 Ω per F To remove the oven temperature sensor Disconnect power 1 Remove rear cover See 2...

Page 47: ...ent 4 towards the front of the oven Note There is a gasket placed between the element bracket and the oven cavity Be sure to install the gasket to its original location Remove the seven in hex head screws upper 3 oven or the five in hex head screws lower oven that hold the broiler to the top of the oven cavity IMPORTANT The lower wattage outer element utilizes 3 16 16 in terminal connections The h...

Page 48: ... convection bake element Remove oven racks 1 Remove the four in hex head screws that 2 hold the convection cover to the back wall of the oven cavity 3 Remove the four in hex head screws that hold the convection element to the back wall of the oven cavity 4 Carefully pull the convection element towards the front of the oven until the element terminals are accessible Disconnect the wires from the co...

Page 49: ...opened The convection fan motor has approximate resistance values between the following wires Red and Blue 174 Ω Red and Gray 78 Ω Blue and Gray 96 Ω To remove the convection fan and motor assembly Remove oven racks 1 Remove the four in hex head screws that 2 hold the convection cover to the back wall of the oven cavity Note The fan blade is attached to the D shaped motor shaft with a left hand th...

Page 50: ...er gloves to protect your hands 4 carefully grasp the insulation which covers the side of the range and roll it upwards to the top of the range Upper Oven Bake Element The element is rated at 2500 watts has an approximate resistance value of 23 Ω and draws approximately 10 amps The bake element is located on the oven floor and can be removed from inside the oven cavity The upper oven bake element ...

Page 51: ...let is held in place with two in hex head screws After removing the two in hex head screws the outlet and wiring can then be pulled down from the oven wall approximately 3 inches Note When replacing the meat probe outlet cut the probe wires and splice the new probe using approved heat resistant connectors Meat Probe and Outlet PB975 The lower oven is equipped with a meat probe outlet The meat prob...

Page 52: ...tom of the control panel To remove the upper oven vent tube and smoke eliminator Remove the upper oven broil element See 1 Broil Element Remove the cooktop See 2 Cooktop Assembly Carefully cut then remove the insulation that 3 covers the upper oven vent tube Remove the 2 hex head screws that attach the 4 vent tube to the top of the oven liner Vent Tube Remove the in hex head screw that holds the 5...

Page 53: ...e the range from its installation 2 Remove the cooktop See 3 Cooktop Assembly Remove the rear and side panels See 4 Rear Cover Removal and Side Panel Removal Disconnect the wire harness from the door 5 switch Remove the upper oven lock assembly See 6 Lock Assembly Disconnect the 2 wire harnesses to the upper 7 lights Disconnect the sensor wire harness 8 Remove wires from the upper oven bake and 9 ...

Page 54: ...fully lift and remove the insulation covering 13 the liner Remove the two in hex head screws that 14 hold the vent to top of liner See Vent Tube Smoke Eliminator Remove the 5 screws and the clamp that hold 15 the front of the liner to the oven frame Carefully slide oven liner from frame 16 Clamp ...

Page 55: ...damage electronic controls ground yourself to the range frame or use an ESD wristband Place a protective cover on the main top 1 Remove all control panel knobs 2 Control Panel The control panel contains the ERC infinite heat switches tri ring burner size switch PB975 and the warmer element switch To remove the control panel Pull the range out approximately 6 inches from 1 the wall Loosen do not re...

Page 56: ...ange Grasp the control panel and pull the bottom out 5 then lift the panel off the top 2 screws Place the control panel in the service position 6 Remove and capture the 2 Phillips head screws 2 that hold the threaded retainer nut mount and the infinite switch to the control panel Slide the crystal mount off the shaft Place the control panel in the service position 3 See Control Panel Mark and remo...

Page 57: ...d that plugs into the lower oven control board Both boards are installed in a frame attached to the control panel To remove the ERC assembly Place the control panel in the service position 1 See Control Panel Note In the following step do not remove the relay jumper wires attached to the lower oven control board or the model selector harness attached to the display board See Control Boards Connect...

Page 58: ...emove the 7 Phillips head screws that attach 5 the display board to the ERC assembly frame Note The display board is connected to the control board utilizing an 8 pin plug located between the boards Pull the display board straight out from the 6 control board Turn the frame over and remove the 5 Phillips 7 head screws that attach the control board to the ERC frame Note If replacing the ERC transfe...

Page 59: ...limit of approximately 1031 F and disconnects power to that unit When the glass temperature cools below 1031 F the unit will turn back on The temperature limit hot light switch cannot be calibrated Note A surface unit pilot element on indicator light located over the top of each surface unit selector knob will turn on immediately when the surface unit is turned on The light will remain on until th...

Page 60: ... lifting the right side of the assembly out of the cooktop Tab Tab Flat Blade Screwdriver White Yellow White Orange White Gray White Blue White White Brown Wire to Terminal Location To remove a radiant heating element Remove the cooktop assembly See 1 Cooktop Assembly Place the cooktop upsidedown on a protective surface Caution Routing of the wires is extremely critical Care must be taken to ensur...

Page 61: ...the motor performs two functions Positions the lock hook in the door to prevent 1 opening during clean operation Operates the lock switches which tell the control 2 if the door is unlocked or locked and ready for clean operation Note When the door is either being locked or unlocked both lock switches will be in the open position The upper oven latch is controlled by the upper oven relay board loca...

Page 62: ...cooktop 3 Caution To prevent damage to the cooktop or the control panel do not raise the cooktop more than 45 degrees Remove the in hex head ground screw 4 ground wire and the wire retainer from the mounting plate Wire Retainer Remove the two T 15 Torx screws 6 first 300 units produced used in hex head screws that attach the front of the mounting plate to the frame Caution It is possible to reconn...

Page 63: ...ay not be necessary to remove the door lock assembly from the range It is possible to transfer these parts from a new door lock assembly Verify proper operation of the lock assembly after transferring these parts The lower oven door lock assembly is located between the insulation blankets of each oven liner It may be necessary to remove the upper oven liner to replace the lower oven door lock asse...

Page 64: ...y Supervisor jumper there are 2 Open wire or terminal within keypad harness Bad solder on crystal mounted keypad board F2 Over temperature Inside oven cavity as measured by sensor over 650 F unlatched or 915 F latched Welded relay contacts High resistance in oven sensor leads connectors especially at sensor in rear F3 Open oven sensor over 2950 ohms Disconnect power Disconnect sensor harness from ...

Page 65: ...XeT D__Ta eT fTa eT PaT c _ U TXcWTa eT PaVT aT Phb aT Phb bW d S h Qa X P S FWX T FWX T _aTWTPcX V QT T TaVXiTS 3 1 aT Ph _aTWTPcX V 1a X m bTR X bcP SQh PRcXePcT 1a X m bTR cWT 2 e m cWT 1PZT m bTR cWT 1a X bTR cWT m bTR cWT 1PZT m bTR cWT 9 _X c _X E XU c WPa Tbb Ph QT QPS 9 c 9 E XU c WPa Tbb Ph QT QPS 9 c 9 aTS fXaT E XU c WPa Tbb Ph QT QPS 9 c 1a X m E02 1a X m E02 1a X eX Tc fXaT m E02 m E0...

Page 66: ... 9 _X c _X E XU c WPa Tbb Ph QT QPS 9 c 9 E XU c WPa Tbb Ph QT QPS 9 c 9 aTS fXaT E XU c WPa Tbb Ph QT QPS 9 c 1a X m E02 1a X m E02 1a X eX Tc fXaT m E02 m E02 1a X UU m E02 1a X UU 9 c 1PZT m E02 1PZT UU m E02 1PZT UU hT f fXaT m E02 m E02 1PZT m E02 1PZT 9 c 3 1 aP VT fXaT m E02 m E02 m E02 FXaTb _X R TRc a QT f b P aT Phb 1a f c FWXcT W b fWT E4 867C Xb EX Tc c 9 E fWT 2 CA 2 Xb 1 PRZ c 9 E fW...

Page 67: ...the bake and broil elements cycle for the balance of the bake operation with one element on at a time CLEAN Broil unit only on during first 30 minutes or until sensor reaches 750 F During balance of clean oven will cycle between bake and broil units 2 E 50 2 E42C8 10 4 25 1A 8 2 E 50 2 E42C8 A 0BC 2 E 3 1 1A 2 3 A BF 2 1A 8 10 4 2 E 3 1 2 E 10 4 22F 2F 3 A BF 10 4 10 4 3 1 3 1 1 02 1 02 1A 8 1A 8 ...

Page 68: ...ven Broil Inner Element L1 J14 K3 L2 K14 NC NO C NO NC C K7 NC NO C R O B Y B O L1 J14 K3 L2 K14 C NO NC NC C NO R O B V Lower Oven Broil Inner Element L1 J14 K3 L2 K14 C NO NC NC C NO R O V Y B Lower and Upper Broil Outer Element L1 J14 K8 L2 K14 C NO NC J7 3 R O V W B Convection Element L1 J14 K3 L2 K14 NC NO C NC NO C NO NC C NO NC C K7 K10 O R Y O O B ...

Page 69: ...W b TPRW 5P dS bT bWPUc dc CXVWcT bWPUc dc 3 c QT S Q PST 5P dS 2 eTRc R eTa bRaTfb CXVWcT DbT PaVTa bRaTf bT a RPeXch bRaTfb XU bcaX__TS UP _TaPcX 2WTRZ e cPVT 22F c fWT UP Xb R d cTa R RZfXbT bW d S aTPS E02 X 2 eTRcX 1PZT 0 b 2F c fWT R RZfXbT Pb X SXRPcTS 1h 4A2 SXb_ Ph UP _TaPcX BWPUc a Q PST adQQX V bT bRaTfb aTPSYdbc eT X Ta _ bXcX cXVWcT UP _TaPcX 9P Q bfXcRW 2 c 2 Xb AT_ PRT YP Q bfXcRW a...

Page 70: ...ntrol Panel Test at connector J5 for the sensors and J16 for the lock switches If abnormal reading is observed wiggle leads at disconnect block If any variation replace Component Test Circuit Terminals Ohms Upper Oven Sensor 3 to 4 1100 W Rm Temp 1654 W 350 F 2650 W Clean Temp Lower Oven Sensor 1 to 2 Door Latched 1 to 3 1 to 4 0 W Open Door Unlatched 1 to 4 1 to 3 0 W Open Door Locked Lock Assemb...

Page 71: ...abel all wires prior to disconnection Wiring errors can cause improper and dangerous operation Verify operation after servicing Continued Next Page Model PB 970 Schematic WIRE COLORS BARE U BLACK B or BK BLUE N or BU BROWN C or BR GRAY S or GY GREEN G or GN ORANGE O RED R VIOLET V WHITE W YELLOW Y ...

Page 72: ... 72 Continued Next Page Model PB 975 Schematic WIRE COLORS BARE U BLACK B or BK BLUE N or BU BROWN C or BR GRAY S or GY GREEN G or GN ORANGE O RED R VIOLET V WHITE W YELLOW Y ...

Page 73: ... 73 Model PB 970 Wiring Diagram Continued next page WIRE COLORS BARE U BLACK B or BK BLUE N or BU BROWN C or BR GRAY S or GY GREEN G or GN ORANGE O RED R VIOLET V WHITE W YELLOW Y ...

Page 74: ... 74 Model PB 975 Wiring Diagram WIRE COLORS BARE U BLACK B or BK BLUE N or BU BROWN C or BR GRAY S or GY GREEN G or GN ORANGE O RED R VIOLET V WHITE W YELLOW Y ...

Page 75: ...y or maintenance Failure of the product if it is abused misused or used for other than the intended purpose or used commercially Damage to the glass cooktop caused by use of cleaners other than the recommended cleaning creams and pads Damage to the glass cooktop caused by hardened spills of sugary materials or melted plastic that are not cleaned according to the directions in the Owner s Manual Re...

Reviews: