


Consumer Support
Tr
oubleshooting T
ips
Care and Cleaning
Operating Instructions
Safety Instructions
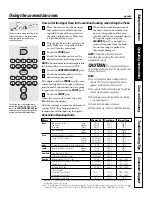
Touch the
CONVECTION BAKE MULTI/
1 RACK
pad once for multi-rack
convection baking. This mode is used
for cooking food items on more than
one rack (i.e., 2, 3 or more racks) at
the same time in convection bake.
See the
Multi-Rack Convection Baking
section for more information.
Touch the
CONVECTION BAKE MULTI/
1 RACK
pad twice for one rack
convection baking. This mode is used
for cooking food items on only one
rack in convection bake.
Touch the
CONVECTION ROAST
pad
for convection roasting.
Touch the number pads to set the
oven temperature.
Touch the
START
pad.
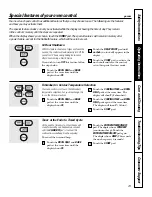
NOTE:
If the Auto Recipe
™
Conversion Feature
is on, it will automatically reduce the set regular
baking temperature by 25°F to the appropriate
convection temperature in convection bake mode.
See Auto Recipe
™
Conversion in the Special
Features section.
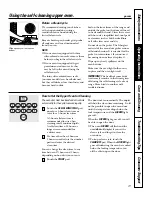
To change the oven temperature, touch
the
CONVECTION BAKE MULTI/1 RACK
or
CONVECTION ROAST
pad and then the
number pads to set the new temperature.
When the oven starts to heat, the
changing temperature, starting at 100°F,
will be displayed. When oven reaches the
temperature you set, 3 beeps will sound.
Touch
CLEAR/OFF
pad when finished.
■
You will hear a fan while cooking with
convection. The fan will stop when the door
is opened, but the heat will not turn off.
■
You may hear the oven clicking during
baking. This is normal.
■
In convection bake modes, for maximum cooking
evenness, the fan is designed to rotate in
both directions, with a pause in between.
This is normal.
Cookware for Convection Cooking
Before using your convection oven, check
to see if your cookware leaves room for air
circulation in the oven. If you are baking
with several pans, leave space between
them. Also, be sure the pans do not touch
each other or the walls of the oven.
Paper and Plastic
Heat-resistant paper and plastic
containers that are recommended for
use in regular baking can also be used
for convection baking, but should not
be used at temperatures higher than
the temperature recommended by the
cookware manufacturer. Plastic cookware
that is heat-resistant to temperatures of
400°F can also be used.
Metal and Glass
Any type of cookware will work in your
convection oven. However, metal pans
heat the fastest and are recommended
for convection baking.
■
Darkened or matte-finished pans will bake
faster than shiny pans.
■
Glass or ceramic pans cook more slowly.
For recipes like oven-baked chicken,
use a pan with low sides. Hot air
cannot circulate well around food
in a pan with high sides.
How to Set the Upper Oven for Convection Baking or Roasting
When baking cookies, you will get
the best results if you use a flat
cookie sheet instead of a pan with
low sides.
22
Using the convection oven.
(on some models)
Convection Roast
■
Good for large tender cuts of meat, uncovered.
The convection fan circulates the heated
air evenly over and around the food.
Meat and poultry are browned on all
sides as if they were cooked on a
rotisserie. The heated air seals in juices
quickly for a moist and tender product
while, at the same time, creating a rich
golden brown exterior.
When you are convection roasting, it is
important that you use a broiler pan and
grid designed for broiling for best
convection roasting results. The pan is
used to catch grease spills and the grid
is used to prevent grease spatters.