background image

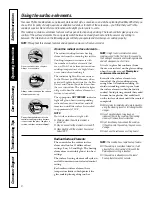
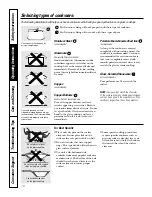
To turn on the warmer surface element:

Touch the 

ON/OFF

pad, then touch

the 

WARMER 

pad. The surface

element will turn on to warmer
power setting W1 (low). 

Use the 

(+)

/

(-)

pad to choose

additional settings of W2(medium)
and W3 (high).

To turn off the warmer power settings,
touch the 

ON/OFF

pad. To change from

the warmer settings to regular cooking
settings, press the 

WARMER

pad. The

surface element will be on power setting 
L (low). The surface element may then
be set to the desired setting using the

(+)

/

(-)

pads. To turn off the surface

element, touch the 

ON/OFF

pad again.

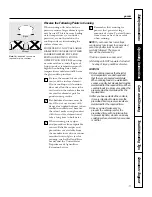
Food Type

Control Setting

Breads/Pastries

W1

(LOW)

Sauces

W2

(Medium)

Soups (cream)

W2

(Medium)

Stews

W2

(Medium)

Vegetables

W2 (Medium)

Hot Beverages

W3

(HIGH)

Soups (liquid)

W3

(HIGH)

The chart above shows initial suggested settings
only. The temperature, type and amount of food,
and the time held will affect the quality of the
food. 

CAUTION:

Do not warm food on the 

WARMER

for more than two hours.

Do not use plastic wrap to cover food. Plastic
may melt onto the surface and be very difficult 
to remove.

Use only cookware recommended for top-of-range
cooking.

The 

WARMER

will keep hot, cooked food

at serving temperature. Always start with
hot food. Do not use to heat cold food.

Placing uncooked or cold food on surface
warmer could result in foodborne illness.

For best results, all food on the 

WARMER

should be covered with a lid or

aluminum foil. When warming pastries
or breads, the cover should be vented to
allow moisture to escape.

Always use potholders or oven mitts when
removing food from the 

WARMER

as

cookware and plates will be hot.

A hot surface indicator light will glow
when the glass surface is hot and will
remain on until the surface has cooled
below 150°F.

ON

OFF

OR

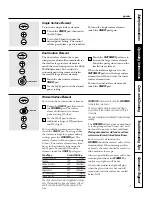
To turn on a single surface element: 

Touch the 

ON/OFF

pad, then touch

the 

(+)

/

(-)

pad.

Use the 

(+)

/

(-)

pad to choose the

desired power setting. The control
will beep each time a pad is touched. 

To turn off a single surface element,
touch the 

ON/OFF

pad again.

Single Surface Element

ge.com

7

Safety Instructions

Operating Instructions

Care and Cleaning

Tr

oubleshooting T

ips

Consumer Support

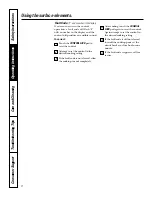
Dual Surface Element

The dual surface element has a pan
sizing sensor which will automatically set
the small or large surface element to
match the size of your pan (see the 

Using

Pan Sizing 

section). To override the

automatic pan sizing sensor and select
the small or large surface element:

Touch the dual surface element

ON/OFF

pad. 

Use the 

(+)

/

(-)

pad to set the desired

power setting.

Touch the 

SIZE SELECT

pad once to

turn on the large surface element.
Touch the pad again to turn on the
small surface element.

When the indicator light next to the 

SIZE SELECT

pad is on, the large surface

element is on. When it is off, the small
surface element is on.

To turn the dual surface element off,
touch the 

ON/OFF

pad.

ON

OFF

OR

SIZE SELECT

Warmer Surface Element

ON

OFF

OR

WARMER

Summary of Contents for PP950BMBB - 30" Smoothtop Electric Cooktop

Page 1: ...Locking the Cooktop 9 Pan Detection Feature 9 Pan Sizing Feature 9 Surface Elements 6 9 Warmer Surface Element 7 Care and Cleaning Control Lock Pad 13 Glass Cooktop 13 14 Packaging Tape 12 Troubleshooting Tips 15 16 Consumer Support Consumer Support 20 Product Registration 17 18 Warranty 19 Write the model and serial numbers here Model ______________ Serial ______________ You can find them on a la...

Page 2: ...tems of interest to children should not be stored in cabinets above a cooktop children climbing on the cooktop to reach items could be seriously injured Always keep combustible wall coverings curtains or drapes a safe distance from your cooktop Always keep dish towels dishcloths pot holders and other linens a safe distance away from your cooktop Always keep wooden and plastic utensils and canned f...

Page 3: ... eye on foods being fried at high or medium high heat settings Foods for frying should be as dry as possible Frost on frozen foods or moisture on fresh foods can cause hot fat to bubble up and over the sides of the pan Avoid placing any objects on or near the keypads in order to prevent accidental activation of the cooktop controls Use little fat for effective shallow or deep fat frying Filling th...

Page 4: ...d thoroughly and controls will resume normal operation To prevent accidental activation of the cooktop do not place any objects on or near the keypad Clean the cooktop with caution Always lock the control panel using the control lock feature and wait until the entire glass surface is cool before attempting to clean the cooktop See the Locking the Cooktop section for details If a wet sponge or clot...

Page 5: ...r model Feature Index Features and appearances may vary Explained on page Single Surface Element 6 Warmer Surface Element 8 Dual Surface Element 7 Single Surface Element Control Pad 6 Dual Surface Element Control Pad 7 Warmer Surface Element Control Pad 8 Kitchen Timer Control Pad 9 Pan Sensor Control Pad 9 Control Lock Pad 9 Hot Surface Indicator Lights one for each surface element 9 PP980 PP950 ...

Page 6: ... is normal when a new cooktop is used for the first time It is caused by the heating of new parts and insulating materials and will disappear in a short time It is safe to place hot cookware from the oven or surface on the glass cooktop when the surface is cool Never place cookware on the control area Even after the surface elements are turned off the glass cooktop retains enough heat to continue ...

Page 7: ...e WARMER should be covered with a lid or aluminum foil When warming pastries or breads the cover should be vented to allow moisture to escape Always use potholders or oven mitts when removing food from the WARMER as cookware and plates will be hot A hot surface indicator light will glow when the glass surface is hot and will remain on until the surface has cooled below 150 F ON OFF OR To turn on a...

Page 8: ...NTROL LOCK pad to reset the control Attempt to set the control to the desired cooking setting If the fault code is not cleared allow the cooktop to cool completely After cooling touch the CONTROL LOCK pad again to reset the control Again attempt to set the control to the desired cooking setting If the fault code is still not cleared turn off the cooktop power at the circuit breaker or fuse box for...

Page 9: ...ms see the Types of Cookware section This feature will not work with glass ceramic stoneware cookware see the Types of Cookware section 9 Safety Instructions Operating Instructions Care and Cleaning Troubleshooting Tips Consumer Support How to Lock the Cooktop IMPORTANT As a convenience you can lock the entire cooktop at any time when it is not in use or before cleaning Locking the cooktop will pr...

Page 10: ...are not recommended Poor performance May scratch the surface NOTE Use pans that match the diameter of the surface element Cooking performance will not be as good if the cookware is either smaller or larger than the surface element Check pans for flat bottoms by using a straight edge Pans with rounded curved ridged or warped bottoms are not recommended Pan Detection Sizing may not work properly wit...

Page 11: ...nufacturers of glass jars for canning such as Ball and Kerr brand and the United States Department of Agriculture Extension Service Remember that canning is a process that generates large amounts of steam To avoid burns from steam or heat be careful when canning NOTE If your house has low voltage canning may take longer than expected even though directions have been carefully followed The process ...

Page 12: ...pping film with your fingers and slowly peel it from the appliance surface Do not use any sharp items to remove the film Remove all of the film before using the appliance for the first time To assure no damage is done to the finish of the product the safest way to remove the adhesive from packaging tape on new appliances is an application of a household liquid dishwashing detergent Apply with a so...

Page 13: ...p cleaner on the entire burned residue area Using the included cleaning pad for ceramic cooktops rub the residue area applying pressure as needed If any residue remains repeat the steps listed above as needed For additional protection after all residue has been removed polish the entire surface with ceramic cooktop cleaner and a paper towel The ceramic cooktop scraper and all recommended supplies ...

Page 14: ...n in the glass surface has already occurred the cooktop glass will have to be replaced In this case service will be necessary Damage from Sugary Spills and Melted Plastic Our testing shows that if you are cooking high sugar mixtures such as jelly or fudge and have a spillover it can cause permanent damage to the glass surface unless the spillover is immediately removed Be careful not to slide pots...

Page 15: ...as been slid across the cooktop surface Areas of discoloration Food spillovers not cleaned See the Cleaning the glass cooktop section on the cooktop before next use Hot surface on a model This is normal The surface may appear discolored with a light colored glass when it is hot This is temporary and will disappear cooktop as the glass cools Plastic melted to Hot cooktop came into See the Glass sur...

Page 16: ...n the display time out feature activated 1 hour before using again Surface element is The rapid heat up feature The cooktop has a rapid heat up feature and is glowing red when it activated designed to do this See the Radiant surface elements should be on a low section power setting F and a number You have a fault code Write down the F and the number and touch appear in the display the CONTROL LOCK...

Page 17: ...otection or you may request your money back on the remaining value of your contract No questions asked It s that simple Protect your refrigerator dishwasher washer and dryer range TV VCR and much more any brand Plus there s no extra charge for emergency service and low monthly financing is available Even icemaker coverage and food spoilage protection is offered You can rest easy knowing that all y...

Page 18: ...here Complete and mail your Consumer Product Ownership Registration today Have the peace of mind of knowing we can contact you in the unlikely event of a safety modification After mailing the registration below store this document in a safe place It contains information you will need should you require service Our service number is 800 GE CARES 800 432 2737 Read your Owner s Manual carefully It wi...

Page 19: ...e or used commercially Damage to the glass cooktop caused by use of cleaners other than the recommended cleaning creams and pads Damage to the glass cooktop caused by hardened spills of sugary materials or melted plastic that are not cleaned according to the directions in the Owner s Manual Replacement of house fuses or resetting of circuit breakers Damage to the product caused by accident fire fl...

Page 20: ...bilities and impairments For details of GE s Universal Design applications including kitchen design ideas for people with disabilities check out our Website today For the hearing impaired please call 800 TDD GEAC 800 833 4322 Extended Warranties ge com Purchase a GE extended warranty and learn about special discounts that are available while your warranty is still in effect You can purchase it on ...

Page 21: ...ie doble 7 Elementos de superficie 6 9 Función de detección de cacerola 9 Función de tamaño de cacerola 9 Temporizador de cocina 9 Cuidado y limpieza Cinta adhesiva de empaque 12 Superficie de vidrio 13 14 Tecla de bloqueo de control 13 Consejos para la solución de problemas 15 16 Soporte al consumidor Garantía 19 Soporte al consumidor 20 Escriba los números de modelo y de serie aquí No de modelo ...

Page 22: ...inetes encima de la estufa artículos de interés para los niños ya que si se suben en la estufa para alcanzar dichos artículos pueden sufrir serias lesiones Siempre mantenga el papel de colgadura o las cortinas de material combustible a una distancia prudente de la estufa Siempre mantenga las toallas y paños para platos guantes para ollas y otros artículos de tela a una distancia prudente de la est...

Page 23: ... de temperatura altos o medios Los alimentos a freír deben estar lo más secos posible La escarcha de los alimentos congelados o la humedad en los alimentos frescos puede hacer que la grasa caliente salpique por fuera de los lados de la olla No coloque objetos encima o cerca del teclado para evitar activar accidentalmente los controles de la estufa Use poca grasa para freír incluso al sumergir los ...

Page 24: ...ntalmente la estufa no coloque objetos encima o cerca del teclado Limpie la estufa con cuidado Siempre bloquee el panel de control con la función de bloqueo de control y espere hasta que la superficie de vidrio se enfríe antes de limpiar la estufa Consulte la sección Cómo bloquear la estufa para más información Si usa una esponja o paño para limpiar los derrames en algún elemento de superficie cal...

Page 25: ...ntador 8 Elemento de superficie doble 7 Tecla de control del elemento de superficie simple 6 Tecla de control del elemento de superficie doble 7 Tecla de control del elemento de superficie calentador 8 Tecla de control del temporizador de cocina 9 Tecla de control del sensor de cacerola 9 Tecla de bloque de control 9 Luces indicadoras de superficie caliente una por cada elemento de superficie 9 PP...

Page 26: ... que el elemento se enfríe a aproximadamente 150 F NOTA Un olor ligero es normal cuando una estufa nueva es usada por primera vez Esto es causado por el calentamiento de las partes nuevas y los materiales de aislamiento y desaparecerá en corto tiempo Es seguro colocar una pieza de cocina caliente del horno o de la superficie sobre la superficie de vidrio cuando la superficie está fría Nunca coloqu...

Page 27: ...ón Tamaño de cacerola Para anular el sensor automático de tamaño de cacerola y seleccionar el elemento de superficie pequeño o grande Presione la tecla ON OFF del elemento de superficie doble Utilice la tecla para establecer el ajuste de potencia deseado Presione la tecla SIZE SELECT seleccionar tamaño para encender el elemento de superficie grande Presione la tecla nuevamente para encender el ele...

Page 28: ...el elemento de superficie vuelva a presionar la tecla ON OFF Tipo de alimento Ajuste de control Pan Pastelería L LOW BAJO Salsa L LOW BAJO Sopa crema L LOW BAJO Guiso L LOW BAJO Vegetales L LOW BAJO Bebidas calientes H HIGH ALTO Sopa líquida H HIGH ALTO El cuadro anterior muestra los ajustes iniciales recomendados únicamente La temperatura el tipo y la cantidad de alimentos y el tiempo de cocción ...

Page 29: ...osible que esta función no funcione con cacerolas con fondos redondeados curveados o combados consulte la sección Tipos de utensilios Esta función no es adecuada para utensilios de vidrio cerámica cerámica de gres consulte la sección Tipos de utensilios 9 Cómo bloquear la estufa IMPORTANTE Para su comodidad puede bloquear la estufa en cualquier momento cuando no está en uso o antes de limpiarla Bl...

Page 30: ...s utensilios son más pequeños o más grandes que el elemento de superficie Verifique que los fondos de las cacerolas estén planos usando una tablilla derecha No se recomienda el uso de cacerolas con fondos redondeados curveados con protuberancias o pandeados La detección de cacerolas identificación del tamaño puede no funcionar adecuadamente con este tipo de cacerolas Las funciones Detección Tamaño...

Page 31: ...de fuentes confiables Las recetas y procedimientos de fuentes confiables están disponibles a través del fabricante de su enlatadora fabricantes de frascos de vidrio para enlatar tales como la marca Ball and Kerr y el Servicio de Extensión del Departamento de Agricultura de EE UU Recuerde que el enlatado es un proceso que genera gran cantidad de vapor Para evitar quemaduras debidas al vapor o calor...

Page 32: ... use ningún objeto puntiagudo para retirar la película Retire toda la película antes de usar el aparato por primera vez Para asegurarse de no dañar el acabado del producto la manera más segura de retirar el adhesivo de la cinta de empaque sobre aparatos nuevos es la aplicación de un detergente doméstico líquido para lavar platos Aplique con un paño suave y moje NOTA Antes de usar la estufa debe re...

Page 33: ... repita los pasos arriba mencionados tantas veces como sea necesario Para protección adicional una vez que haya removido todos los residuos pula toda la superficie con limpiador para estufas de cerámica y una toalla de papel El raspador para estufas de cerámica y todos los artículos recomendados están disponibles a través de nuestro Centro de piezas Consulte las instrucciones en la sección Para or...

Page 34: ...a presenta hendiduras o agujeros deberá reemplazar el vidrio de la estufa En este caso será necesario un servicio de reparación Daños causados por derrames con azúcar y plástico fundido Nuestras pruebas demuestran que si está cocinando mezclas con un alto contenido de azúcar tales como gelatina o caramelo fundido y éstas se derraman sobre la estufa podrían causar daños permanentes a la superficie ...

Page 35: ...limentos antes del de la estufa siguiente uso Superficie caliente en un Esto es normal La superficie podría parecer modelo con cubierta de vidrio decolorada cuando está caliente Esto es temporal de color claro y desaparecerán conforme el vidrio se enfría Plástico fundido sobre La estufa caliente entró Consulte la sección Superficie de vidrio potencial la superficie en contacto con plástico de daño...

Page 36: ... usarlo s nuevamente activado la función de tiempo espera agotado time out El elemento de La función de calentamiento La estufa tiene una función de calentamiento rápido superficie está al rojo rápido está activada y está diseñada para hacer esto Consulte la sección vivo cuando debe estar Elementos de superficie radiante en una configuración de potencia baja La letra F y un Tiene un código de fall...

Page 37: ...17 Seguridad Operación Cuidado y limpieza Solucionar problemas Soporte al consumidor Notas ...

Page 38: ...18 Seguridad Operación Cuidado y limpieza Solucionar problemas Soporte al consumidor Notas ...

Page 39: ...está cubierto por GE Todos los servicios de garantía los proporcionan nuestros Centros de Reparación de Fábrica o nuestros técnicos Customer Care autorizados Para concertar una cita de reparación en línea 24 horas al día visítenos en ge com o llame al 800 GE CARES 800 432 2737 Cuando llame para solicitar servicio por favor tenga a mano el número de serie y el número de modelo Pegue aquí su recibo ...

Page 40: ...ctiva Puede comprarla en línea en cualquier momento o llamar al 800 626 2224 durante horas normales de oficina GE Consumer Home Services estará aún ahí cuando su garantía termine Piezas y accesorios ge com Aquellos individuos con la calificación necesaria para reparar sus propios electrodomésticos pueden pedir que se les manden las piezas o accesorios directamente a sus hogares aceptamos las tarje...

Reviews: