background image

49-85222   07-15   GE

Safety Information 

  . . . . . . . . . . . . 2

Warranty

  . . . . . . . . . . . . . . . . . . . . . . . . 8

Assistance / Accessories

  . . . . . . 9

Using The Cooktop

In Case of a Power Failure . . . . . . . . .10
Surface Burners . . . . . . . . . . . . . . . . . . .10
Griddle . . . . . . . . . . . . . . . . . . . . . . . . . . . .12

Using The Oven

Oven  Controls . . . . . . . . . . . . . . . . . . . . .14
Special  Features   . . . . . . . . . . . . . . . . . .16
Sabbath Mode . . . . . . . . . . . . . . . . . . . .17
Cookware Guidelines . . . . . . . . . . . . . .18
Cooking Modes  . . . . . . . . . . . . . . . . . . .18
Oven Racks . . . . . . . . . . . . . . . . . . . . . . .19
Oven  Air  Vents  . . . . . . . . . . . . . . . . . . . .19
Probe  . . . . . . . . . . . . . . . . . . . . . . . . . . . . .20
Cooking Guide . . . . . . . . . . . . . . . . . . . .21
Warming  Drawer  Guide  . . . . . . . . . . .22
Aluminum Foil and Oven Liners . . . .22
WiFi  Connect . . . . . . . . . . . . . . . . . . . . . .23

Care and Cleaning

Cleaning  the  Oven   . . . . . . . . . . . . . . . .24
Cleaning  The  Cooktop  . . . . . . . . . . . . .25
Cleaning The Door and Drawer . . . .29
Maintenance . . . . . . . . . . . . . . . . . . . . . .30

Troubleshooting Tips

  . . . . . . . . .34

Ranges

Gas Dual Fuel

Write the model and serial  
numbers here:

Model #  __________________

Serial # ___________________

You can find the rating label on the 

front behind the range drawer. 

In Canada contact us at:

www.GEAppliances.ca

For a Spanish version of this 
manual, visit our Website at 
GEAppliances.com.

Para consultar una version  
en español de este manual 
de instrucciones, visite 
nuestro sitio de internet 
GEAppliances.com.

Owner’s Manual

Summary of Contents for PC2B940SEJSS

Page 1: ...i Connect 23 Care and Cleaning Cleaning the Oven 24 Cleaning The Cooktop 25 Cleaning The Door and Drawer 29 Maintenance 30 Troubleshooting Tips 34 Ranges Gas Dual Fuel Write the model and serial numbers here Model __________________ Serial ___________________ You can find the rating label on the front behind the range drawer In Canada contact us at www GEAppliances ca For a Spanish version of this...

Page 2: ...he rear leveling leg is engaged in the bracket On some models the storage drawer or kick panel can be removed for easy inspection If visual inspection is not possible slide the range forward confirm the anti tip bracket is securely attached to the floor or wall and slide the range back so the rear leveling leg is under the anti tip bracket If your range is removed for cleaning servicing or any rea...

Page 3: ...tallation instructions and local codes The agency performing this work assumes responsibility for the conversion Ŷ Have the installer show you the location of the range gas shut off valve and how to turn it off if necessary Ŷ Plug your range into a 240 volt grounded outlet only Do not remove the round grounding prong from the plug If in doubt about the grounding of the home electrical system it is...

Page 4: ...appliance may become hot enough to cause burns Potentially hot surfaces include the burners grates oven vent opening surfaces near the opening and crevices around the oven door Ŷ Do not heat unopened food containers Pressure could build up and the container could burst causing an injury Ŷ Cook food thoroughly to help protect against foodborne illness Minimum safe food temperature recommendations c...

Page 5: ...amage the gas tubing to the surface burners resulting in a gas leak and risk of fire Ŷ KHQ GLVDEOLQJ RFN RQWURO RQ VRPH PRGHOV make sure the surface controls are set to the OFF position This will prevent unintended gas flow from the burners Ŷ R QRW XVH DOXPLQXP IRLO WR FRYHU WKH JUDWHV RU line any part of the cooktop Doing so may result in carbon monoxide poisoning overheating of the cooktop surfa...

Page 6: ...ount of grease may ignite leading to smoke damage to your home Ŷ If the self cleaning mode malfunctions turn the oven off and disconnect the power supply Have it serviced by a qualified technician Ŷ Do not use oven cleaners No commercial oven cleaner or oven liner protective coating of any kind should be used in or around any part of the oven Ŷ Do not clean the door gasket The door gasket is essen...

Page 7: ...n this range has been tested and found to comply with the limits for a Class B digital device pursuant to part 15 of the FCC Rules These limits are designed to a provide reasonable protection against harmful interference in a residential installation This equipment generates uses and can radiate radio frequency energy and if not installed and used in accordance with the instructions may cause harm...

Page 8: ...s appliance Ŷ Damage caused after delivery Ŷ Product not accessible to provide required service Ŷ 6HUYLFH WR UHSDLU RU UHSODFH OLJKW EXOEV H FHSW IRU lamps EXCLUSION OF IMPLIED WARRANTIES RXU VROH DQG H FOXVLYH UHPHG LV SURGXFW UHSDLU DV SURYLGHG LQ WKLV LPLWHG DUUDQW Q LPSOLHG ZDUUDQWLHV including the implied warranties of merchantability or fitness for a particular purpose are limited to one yea...

Page 9: ...t Us Contact us on our website with all the details including your phone number or write to General Manager Customer Relations GE Appliances Appliance Park Louisville KY 40225 Try the GE Appliances website www geappliances com service_and_support 24 hours a day any day of the year For greater convenience and faster service you can now download Owner s Manuals order parts or even schedule service o...

Page 10: ...QG WXUQ LW WR WKH 7 SRVLWLRQ You will hear a clicking noise the sound of the electric spark igniting the burner When one EXUQHU LV WXUQHG WR 7 DOO burners will spark Sparking will continue as long as the knob UHPDLQV DW 7 2QFH JDV LV ignited turn the knob to adjust the flame size Using the Surface Burners NOTES Ŷ R QRW RSHUDWH WKH EXUQHU IRU DQ H WHQGHG SHULRG RI time without cookware on the grate...

Page 11: ...noxide levels above allowable standards This could be hazardous to your health Use a flat bottomed wok Do not use stove top grills Top of Range Cookware Aluminum Medium weight cookware is recommended because it heats quickly and evenly Most foods brown evenly in an aluminum skillet Use saucepans with tight fitting lids when cooking with minimum amounts of water Stainless Steel This metal alone has...

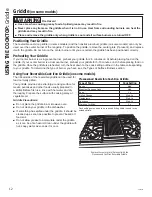
Page 12: ... the griddle has been positioned correctly Preheating Your Griddle If your center burner is a single oval burner preheat your griddle for 2 5 minutes on Hi before placing food on the griddle If your center burner is a dual oval burner preheat your griddle for 5 10 minutes on Hi before placing food on the griddle Once the griddle is preheated turn the heat down to the cook setting outlined in the t...

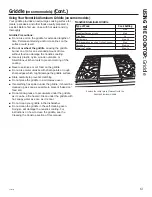
Page 13: ...DO XWHQVLOV ZLWK VKDUS SRLQWV RU URXJK sharp edges which might damage the griddle surface Ŷ 6WRUH FDUHIXOO WR SUHYHQW VFUDWFKLQJ Ŷ R QRW SODFH WKH JULGGOH LQ D PLFURZDYH RYHQ Ŷ I VRPHWKLQJ KDV VSLOOHG XQGHU WKH JULGGOH LW VKRXOG EH FOHDQHG XS DV VRRQ DV SRVVLEOH WR SUHYHQW EDNHG RQ food soil Ŷ R QRW DOORZ JUHDVH WR DFFXPXODWH XQGHU WKH JULGGOH as it can be a fire hazard Clean under the griddle wit...

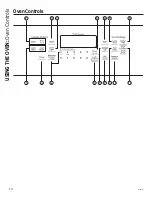
Page 14: ...14 49 85222 Oven Controls USING THE OVEN Oven Controls 6 2 4 8 9 5 1 7 3 10 15 16 14 12 11 13 ...

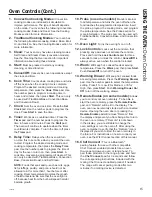
Page 15: ...t the oven light is off because heat from the bulb will speed harmful bacteria growth 10 Probe on some models Monitors internal food temperature and turns the oven off when the food reaches the programmed temperature Insert the probe program the cooking mode and program the probe temperature See the Probe section for more information The probe can only be used with Traditional Bake Convection Bake...

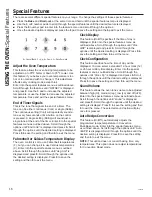
Page 16: ...mperatures C Enter into the special features menu as outlined DERYH 6FUROO WKURXJK WKH RSWLRQV XQWLO GHJ 8QLW LV displayed and press 0 Scroll through the options until the desired setting is displayed Press 0 to save the setting and then 6 to exit the menu Clock Display 7KLV IHDWXUH 2Q 2II VSHFLILHV LI WKH WLPH RI GD LV displayed Enter into the special features menu as RXWOLQHG DERYH 6FUROO WKURXJ...

Page 17: ...eset cooking temperature and press Start 2 Since no feedback is given during temperature change an oven thermometer can be used to confirm temperature changes Starting a Timed Bake 1 Press the Bake pad I WKH GHVLUHG WHPSHUDWXUH LV XVH WKH 6 through 0 number pads or the Lock Control pad to select a cooking time If a cooking temperature other WKDQ LV GHVLUHG XVH WKH 1 through 5 number pads or the Ti...

Page 18: ...s not necessary to preheat when using this mode Broil Lo 7KH URLO R PRGH XVHV OHVV LQWHQVH KHDW IURP WKH XSSHU burner to cook food thoroughly while also browning the VXUIDFH 8VH URLO R IRU WKLFNHU FXWV RI PHDW DQG RU IRRGV that you would like cooked all the way through To use this mode press the Broil pad twice and then press Start It is not necessary to preheat when using this mode Convection Bak...

Page 19: ...y after a self clean cycle To improve sliding conditions use a soft cloth or paper towel to rub vegetable oil on the left and ULJKW HGJHV RI WKH UDFNV DQG RU UDFN VXSSRUWV NOTE Remove unused racks when using the oven for faster preheat improved efficiency and optimal cooking performance Extension Racks on some models Extension racks have a frame that locks into the rack supports on both sides Once...

Page 20: ...the lowest large muscle or joint Ŷ RU FDVVHUROHV RU GLVKHV VXFK DV PHDWORDI LQVHUW WKH probe into the center of the dish Ŷ RU ILVK LQVHUW WKH SUREH IURP MXVW DERYH WKH JLOO LQWR the meatiest area parallel to the backbone Probe Usage To use the probe with preheating 1 Press the desired cook mode Bake Convection Bake or Convection Roast pad and enter the desired cooking temperature with the number p...

Page 21: ...HG SDQ such as a broil pan Bone in chicken breasts legs thighs URLO R Bake RU If breaded or coated in sauce avoid Broil Hi modes Broil skin side down first Watch food closely when broiling Boneless chicken breasts URLO R Bake 4 0RYH IRRG GRZQ IRU PRUH GRQHQHVV OHVV VHDULQJ DQG XS IRU JUHDWHU VHDULQJ EURZQLQJ when broiling Whole turkey Convection Roast Bake 1 or 2 HDYH XQFRYHUHG XVH D ORZ VLGHG SDQ...

Page 22: ...a CAUTION Dishes will be hot Use pot holders or mitts when removing hot dishes Warming Drawer Guide on some models USING THE OVEN Warming Drawer Guide Aluminum Foil and Oven Liners CAUTION Do not use any type of foil or oven liner to cover the oven bottom These items can block airflow or melt resulting in damage to the product and risk of carbon monoxide poisoning smoke or fire Damage from imprope...

Page 23: ... ability to access the internet and download apps RX ZLOO QHHG WR NQRZ WKH SDVVZRUG RI RXU KRPH WiFi router Have this password ready while you are setting up your GE oven Connect your GE oven 1 On your smart phone or tablet visit ZZZ SSOLDQFHV FRP FRQQHFW WR OHDUQ PRUH DERXW connected appliance features and to download the appropriate app 2 Follow the app onscreen instructions to connect your GE o...

Page 24: ...lean cycle the rack may become difficult to slide See the Oven Racks section for instructions on how to improve IMPORTANT The health of some birds is extremely sensitive to the fumes given off during the self cleaning cycle of any range Move birds to another well ventilated room To use the Self Clean feature 1 Start with the oven at room temperature 2 Wipe excess grease and soils from the oven and...

Page 25: ...ZLWK FOHDQ water Polish dry with a soft cloth Do not use abrasive cleansers strong liquid cleansers plastic scouring pads or oven cleaners on the control panel they will damage the finish Stainless Steel Surfaces on some models Do not use a steel wool pad it will scratch the surface To clean the stainless steel surface use warm sudsy water or a stainless steel cleaner or polish Always wipe the sur...

Page 26: ...UTION Do not attempt to remove oval dual oval or tri ring burner caps from the burner heads Inner Burner Cap Removable Outer Burner Cap Non Removable Burner Head Electrode Round Burner Oval Burner on some models Tri Ring Burner on some models Dual Oval Burner on some models Round Burner Cap Removable Electrode Oval Burner Cap Non Removable Oval Burner Head Electrode Dual Oval Burner Caps Non Remov...

Page 27: ...rts in the burner heads must be kept clean at all times for an even unhampered flame Clogged or dirty burner ports or electrodes will not allow the burner to operate properly For proper ignition make sure the small hole in the notch that fits over the electrode is kept open A sewing needle or wire twist tie works well to unclog it Replacing Surface Burners Before replacing WKH EXUQHU FDSV KHDGV DQ...

Page 28: ...tic scouring pad soaked in hot soapy water Rinse well and dry Self Clean Mode on some models If your grates do not have rubber bumpers on their bottom surface they may be cleaned in the oven using the self clean cycle Do not attempt to clean your grates in the oven if your grates have rubber bumpers Doing so will destroy the rubber bumpers and may affect the function of your surface burners Porcel...

Page 29: ... model s configuration Removing the Storage Drawer 1 Pull drawer straight out until it stops 2 Continue to pull the drawer until it is detached from the oven Replacing the Storage Drawer 1 Rest the left drawer rail around the inner left rail guide and slide it in slightly 2 Place the right drawer rail around the inner right rail guide and slide it in slightly 2 Slide the drawer all the way in Clea...

Page 30: ...improved lighting inside the oven clean the glass cover frequently using a wet cloth This should be done when the oven is completely cool Bulb Socket Tab 31ø2 Max length Glass cover Lift Off Oven Door The door is very heavy Be careful when removing and lifting the door Do not lift door by the handle To Remove the Door 1 Fully open the door 2 Pull the hinge locks up and away from the range frame to...

Page 31: ...49 85222 31 Notes ...

Page 32: ...32 49 85222 Notes ...

Page 33: ...49 85222 33 Notes ...

Page 34: ...cifically designed for broiling Aluminum foil on the broil pan has not been fitted properly or slit to drain grease If using aluminum foil on broil pan wrap tightly and add slits conforming to those in the pan to allow grease to drain Oven temperature too hot or too cold Oven temperature needs adjustment See the Special Features section Oven and or display appears not to work A fuse in your home m...

Page 35: ...display The self clean cycle has been selected but the door is not closed Close the oven door F and a number or letter flash in the display You have a function error code Press the Cancel Off pad Allow the oven to cool for one hour Put the oven back into operation If the function code UHSHDWV GLVFRQQHFW DOO SRZHU WR WKH RYHQ IRU DW OHDVW seconds and then reconnect power If the function error code ...

Page 36: ... broil burners do not Gas to the oven burners may have been shut off The oven gas shut off is located on the gas regulator near the JDV OLQH DWWDFKPHQW WR RXU UDQJH RFDWH LW DQG IOLS WKH OHYHU My oven door glass appears to be tinted or have a rainbow color The inner oven glass is coated with a heat barrier to reflect the heat back into the oven to prevent heat loss and keep the outer door cool whi...

Page 37: ...cuisson 21 Guide d utilisation du tiroir réchaud 22 Papier d aluminium et protections pour four 22 Connexion WiFi 23 Entretien et nettoyage Nettoyage du four 24 Nettoyage de la surface de cuisson 25 Nettoyage de la porte et du tiroir 29 Entretien 30 Enregistrement du produit 31 Conseils de dépannage 34 Cuisinières à gaz bi énergie Inscrivez ici les numéros de modèle et de série Nº de modèle_______...

Page 38: ...que de protection peuvent être retirés afin de faciliter l inspection Si une vérification visuelle ne peut être effectuée glissez la cuisinière vers l avant vérifiez que le support antibasculement est solidement fixé au plancher ou au mur et replacez la cuisinière pour que le pied de mise à niveau arrière repose sous le support antibasculement Si votre cuisinière doit être déplacée pour être netto...

Page 39: ...ctue ce travail assume la responsabilité de la conversion Demandez à l installateur de vous montrer l emplacement du robinet de gaz de la cuisinière pour pouvoir le fermer si nécessaire Ne branchez votre cuisinière que sur une prise mise à la terre de 240 V Ne coupez ou ne retirez pas la broche de mise à la terre de la fiche Si vous avez un doute concernant la mise à la terre du système électrique...

Page 40: ...ment Ne laissez personne grimper se tenir ou s accrocher à la porte du four au tiroir ou à la surface de cuisson Cela pourrait endommager la cuisinière ou la faire basculer ce qui pourrait causer des blessures graves voire la mort CONSIGNES DE SÉCURITÉ IMPORTANTES LISEZ TOUTES LES INSTRUCTIONS AVANT D UTILISER VOTRE APPAREIL LISEZ ET CONSERVEZ CES INSTRUCTIONS AVERTISSEMENT N entreposez pas et n u...

Page 41: ...ie Lorsque vous désactivez le dispositif de verrouillage des commandes certains modèles assurez vous que les commandes de la surface de cuisson sont à la position d arrêt OFF Cela empêchera les fuites de gaz accidentelles des brûleurs N utilisez pas de papier d aluminium pour couvrir les grilles ou recouvrir une quelconque partie de la surface de cuisson Cela peut entraîner une intoxication par mo...

Page 42: ...sse pourrait prendre feu et la fumée pourrait endommager votre domicile Si la fonction d autonettoyage fonctionne mal éteignez le four et coupez l alimentation Contactez un technicien qualifié pour faire réparer l appareil N utilisez pas de produits de nettoyage pour four N utilisez pas de produit commercial de nettoyage pour four ou de revêtement protecteur pour four sur aucune des parties intern...

Page 43: ... d interférences nuisibles et 2 il doit accepter toute interférence reçue y compris les interférences risquant d engendrer un fonctionnement indésirable Cet appareil a été testé et il a été démontré qu il respectait les limites imposées aux appareils numériques de classe B en vertu de la partie 15 des règlements de la FCC Ces limites ont été mises en place pour a assurer une protection raisonnable...

Page 44: ...s défaillances possibles de l appareil Tout dommage causé après la livraison Tout produit auquel il n est pas possible d accéder pour effectuer les réparations nécessaires La réparation ou le remplacement d ampoules à l exception de DEL EXCLUSIONS DES GARANTIES IMPLICITES Votre seul et unique recours est de faire réparer le produit dans le cadre de cette garantie limitée Toute garantie implicite i...

Page 45: ... pratique et rapide vous pouvez maintenant télécharger des manuels commander des pièces ou même faire une demande de réparation en ligne Accessoires Vous manquez de quelque chose GE propose une panoplie d accessoires qui permettent d améliorer votre expérience de cuisson et de nettoyage Pour passer une commande visitez notre site Web à www GEAppliancesParts com É U ou www electromenagersge ca Cana...

Page 46: ...ntendrez un petit clic produit par l étincelle électrique lorsqu elle allume le brûleur Lorsque vous mettez un brûleur sur LITE allumage tous les brûleurs produisent des étincelles Des étincelles sont produites tant que le bouton demeure positionné sur LITE allumage Lorsque le gaz est allumé tournez le bouton pour ajuster la dimension des flammes Utilisation des brûleurs de surface REMARQUES Ne fa...

Page 47: ...e monoxyde de carbone supérieurs aux normes Ceci pourrait présenter des risques pour votre santé N utilisez pas de grilles pour dessus de cuisinière Ustensiles pour surface de cuisson Aluminium Les ustensiles de poids moyen sont recommandés car ils chauffent plus rapidement et de manière plus uniforme La plupart des aliments dorent uniformément dans une poêle en aluminium Utilisez des casseroles a...

Page 48: ...é que la plaque chauffante a été placée correctement Préchauffage de votre plaque chauffante Si le brûleur central de votre cuisinière est un brûleur ovale simple préchauffez la plaque de 2 à 5 minutes au réglage de température élevé Hi avant d y déposer les aliments Si le brûleur central de votre cuisinière est un brûleur ovale double préchauffez la plaque de 2 à 5 minutes au réglage de températu...

Page 49: ...ensiles à bout pointu ou tranchants qui pourraient endommager la surface de la plaque chauffante Prenez garde de ne pas la rayer lorsque vous la rangez Ne mettez pas la plaque chauffante au four à micro ondes Si quelque chose s est renversé sous la plaque chauffante nettoyez la aussi vite que possible pour éviter que le produit renversé ne brûle Ne laissez pas la graisse s accumuler sous la plaque...

Page 50: ...14 29 5981 Commandes du four UTILISATION DU FOUR Commandes du four 6 2 4 8 9 5 1 7 3 10 15 16 14 12 11 13 ...

Page 51: ...téries nocives prolifèrent rapidement à la température ambiante Assurez vous que la lampe du four est éteinte la chaleur provenant de l ampoule accélère la prolifération de ces bactéries 10 Probe sonde thermique certains modèles Cette fonction permet de contrôler la température interne des aliments et d arrêter le four lorsque la température programmée est atteinte Insérez la sonde dans l aliment ...

Page 52: ...ué ci dessus Faites défiler les fonctions jusqu à afficher deg Unit puis appuyez sur 0 Appuyez sur la touche jusqu à ce que le réglage désiré s affiche Appuyez sur la touche 0 pour enregistrer le réglage puis sur 6 pour sortir du menu Affichage de l horloge Cette fonction permet de préciser si vous désirez faire afficher On ou ne pas faire afficher Off l heure sur l horloge Affichez le menu des fo...

Page 53: ...nnée lors du changement de température un thermomètre de four peut être utilisé pour confirmer les changements de température Démarrer une cuisson minutée 1 Appuyez sur la touche Bake cuisson au four 2 Si vous désirez utiliser une température de cuisson de 350 F 176 7 C appuyez sur les touches numériques de 6 à 0 ou sur la touche Lock Control verrouillage des commandes pour sélectionner une durée ...

Page 54: ... puis sur la touche Start mise en marche Ce mode de cuisson n exige pas de préchauffer le four Gril à basse température Le mode de cuisson au gril à basse température Broil Lo utilise une chaleur moins intense générée par le brûleur supérieur pour cuire à point les aliments tout en brunissant leur surface Utilisez ce mode pour les coupes de viande épaisses ou les aliments qui doivent être cuits à ...

Page 55: ...ue des deux côtés des supports de grille Une fois le cadre bloqué en position tirez toujours sur la grille en la saisissant par le rail avant supérieur jusqu à la position d arrêt pour déposer ou retirer des ustensiles de cuisson Si les grilles coulissantes sont difficiles à tirer lubrifiez les avec le lubrifiant à base de graphite livré avec votre four Retirez la grille du four voir la section Re...

Page 56: ...ns le centre de l aliment Pour le poisson insérez la sonde juste au dessus de la branchie et dans la partie la plus charnue parallèlement à la colonne vertébrale Utilisation de la sonde thermique Utilisation de la sonde avec le préchauffage 1 Appuyez sur la touche de cuisson désirée Bake cuisson au four Conv Bake cuisson à convection ou Conv Roast rôtissage à convection puis entrez la température ...

Page 57: ...rofond comme une lèchefrite Poitrines cuisses hauts de cuisse de poulet Gril à basse température Cuisson au four 3 ou 4 Pour les aliments panés ou couverts de sauce évitez le mode Gril à température élevée Grillez l aliment avec la peau vers le bas en premier Vérifiez fréquemment les aliments lorsque vous utilisez le gril Poitrines de poulet désossées Gril à basse température Cuisson au four 4 Aba...

Page 58: ...ertains modèles UTILISATION DU FOUR Guide du tiroir réchaud Papier d aluminium et protections pour four ATTENTION Ne recouvrez pas la sole du four de papier d aluminium ni de protection pour four d aucune sorte Ils sont susceptibles de bloquer la circulation d air ou de fondre ce qui pourrait endommager la cuisinière ou provoquer une intoxication par monoxyde de carbone de la fumée ou un incendie ...

Page 59: ...ous aurez besoin de connaître le mot de passe de votre routeur WiFi domestique Ayez ce mot de passe sous la main lorsque vous serez prêt à configurer votre four GE Connecter votre four GE 1 Sur votre téléphone ou tablette intelligente visitez le site au www GEAppliances ca connect pour en savoir plus sur les fonctionnalités des électroménagers connectés et pour télécharger l application appropriée...

Page 60: ... vous à la section Grilles de four pour savoir comment améliorer leur glissement IMPORTANT Certains oiseaux sont extrêmement sensibles aux fumées dégagées pendant l autonettoyage d une cuisinière Déplacez les dans une autre pièce bien aérée Utilisation de la fonction d autonettoyage 1 Allumez le four à la température ambiante 2 Enlevez tout excédent de saleté et d huile qui se trouvent à l intérie...

Page 61: ...chez en polissant à l aide d un chiffon doux N utilisez pas de nettoyant abrasif de nettoyant liquide fort de tampon à récurer en plastique ou de nettoyant pour four sur le tableau de commande Ils endommageraient son revêtement Surfaces en acier inoxydable certains modèles N utilisez pas de tampon en laine d acier il raierait la surface Pour nettoyer la surface en acier inoxydable utilisez de l ea...

Page 62: ...de retirer les chapeaux de brûleur ovale de brûleur ovale double ou de brûleur à trois anneaux des têtes de brûleur ENTRETIEN ET NETTOYAGE Nettoyage de la surface de cuisson Chapeau intérieur de brûleur amovible Chapeau extérieur de brûleur non amovible Tête de brûleur Électrode Brûleur rond Brûleur ovale certains modèles Brûleur à trois anneaux certains modèles Brûleur ovale double certains modèl...

Page 63: ...tes de brûleur doivent être propres en tout temps pour que les flammes soient uniformes Des orifices ou électrodes obstrués ou sales empêchent les brûleurs de fonctionner correctement Pour un bon allumage veillez à ce que le petit orifice de la section qui se pose sur l électrode ne soit pas obstrué Pour le désobstruer une aiguille à coudre ou un lien torsadé suffisent Remise en place des brûleurs...

Page 64: ...on abrasif en plastique dans une eau chaude savonneuse Rincez et essuyez Autonettoyage certains modèles Si vos grilles de brûleur ne sont pas dotées de butées en caoutchouc sur le dessous elles peuvent être nettoyées dans le four au moyen de la fonction d autonettoyage Si les grilles sont dotées de butées en caoutchouc ne tentez pas de les nettoyer avec la fonction d autonettoyage Cela pourrait en...

Page 65: ...èle Retrait du tiroir de rangement 1 Tirez le tiroir vers vous jusqu à sa butée d arrêt 2 Continuer à tirer le tiroir jusqu à ce qu il se détache du four Remise en place du tiroir de rangement 1 Placez le rail gauche du tiroir sur le guide intérieur du rail gauche et faites le glisser doucement à l intérieur 2 Placez le rail droit du tiroir sur le guide intérieur du rail droit et faites le glisser...

Page 66: ... l intérieur du four nettoyez le couvre ampoule fréquemment à l aide d un chiffon humide Cela doit être fait lorsque le four est complètement froid Ampoule Réceptacle Languette Longueur maximale de 31 2 po 8 9 cm Couvre ampoule en verre Retrait de la porte du four La porte est très lourde Faites attention lorsque vous la soulevez pour la retirer Ne soulevez pas la porte par sa poignée Pour enlever...

Page 67: ... OWNERSHIP REGISTRATION P O BOX 1780 MISSISSAUGA ONTARIO L4Y 4G1 FOR CANADIAN CONSUMERS ONLY POUR RÉSIDENTS CANADIENS SEULEMENT Please place in envelope and mail to Veuillez mettre dans une enveloppe et envoyez à ...

Page 68: ... OWNERSHIP REGISTRATION P O BOX 1780 MISSISSAUGA ONTARIO L4Y 4G1 FOR CANADIAN CONSUMERS ONLY POUR RÉSIDENTS CANADIENS SEULEMENT Please place in envelope and mail to Veuillez mettre dans une enveloppe et envoyez à ...

Page 69: ...29 5981 33 Notes ...
Page 70: ...d aluminium sur la lèchefrite n a pas été installé correctement ou percez des ouvertures pour laisser s écouler la graisse Si vous utilisez une feuille d aluminium sur la lèchefrite enveloppez cette dernière hermétiquement et percez des fentes correspondant à celles de la poêle pour permettre à la graisse de se drainer Température du four trop chaude ou trop froide La température du four doit être...

Page 71: ... porte du four La lettre F suivie d un chiffre ou d une lettre clignotent sur l afficheur Il s agit d un code d erreur de fonction Appuyez sur la touche Cancel Off annuler arrêt Laissez le four refroidir pendant une heure Rallumez le four Si le code d erreur s affiche de nouveau coupez l alimentation du four pendant au moins 30 secondes puis rétablissez la Si le code d erreur réapparaît contactez ...

Page 72: ...s brûleurs du four a peut être été fermée Le robinet d alimentation en gaz du four est situé sur le régulateur de gaz à proximité du raccord de la conduite de gaz de la cuisinière Localisez le et abaissez le levier La vitre de ma porte de four semble teintée ou présente un arc en ciel Le verre intérieur de la porte du four est revêtu d une barrière thermique qui réfléchit la chaleur dans le four p...

Reviews: