background image

3

Model Number

Serial Number

Use these numbers in any
correspondence or service calls
concerning your oven.

Before using your oven, read this guide carefully.

It is intended to help you operate and maintain your new oven properly.

Keep it handy for answers to your questions.

If you don’t understand something or need more help, call:

GE Answer Center

®

800.626.2000
24 hours a day, 7 days a week

Write down the model and serial numbers.

You’ll find them on a label on the front of the lower oven behind the oven door.

These numbers are also on the Consumer Product Ownership Registration
Card that came with your oven. Before sending in this card, please write
these numbers here:

If you received a damaged oven…

Immediately contact the dealer (or builder) that sold you the oven.

Save time and money. Before you request service…

Check the Problem Solver in the back of this guide. It lists causes of minor
operating problems that you can correct yourself.

If you need service…

To obtain service, see the
Consumer Services page in the
back of this guide. 

We’re proud of our service and
want you to be pleased. If for some
reason you are not happy with the
service you receive, here are three
steps to follow for further help.

FIRST, contact the people who
serviced your appliance. Explain
why you are not pleased. In most
cases, this will solve the problem. 

NEXT, if you are still not pleased,
write all the details—including
your phone number—to:

Manager, Consumer Relations
GE Appliances
Appliance Park
Louisville, KY 40225

FINALLY, if your problem is still
not resolved, write:

Major Appliance Consumer

Action Program

20 North Wacker Drive
Chicago, IL 60606

Summary of Contents for MONOGRAM ZEK755

Page 1: ...Monogram UseandCareGuide for ZEK755 Built In DoubleWallOven Monogram TM 27 Self CleaningOven 164D3333P016 ...

Page 2: ...en Door 30 Oven Light Replacement 29 Oven Shelves 30 Probe 31 Clock and Timer 8 10 Consumer Services 34 Important Phone Numbers 34 Control Panel 7 11 Features 6 Model and Serial Numbers 3 Preheating 14 22 24 Probe 20 21 Problem Solver 32 33 Thermostat Adjustment Do It Yourself 18 Roasting 19 22 Roasting Guide 22 Roasting with Probe 20 21 Safety Instructions 4 5 Self Cleaning Instructions 25 28 She...

Page 3: ...y contact the dealer or builder that sold you the oven Save time and money Before you request service Check the Problem Solver in the back of this guide It lists causes of minor operating problems that you can correct yourself If you need service To obtain service see the Consumer Services page in the back of this guide We re proud of our service and want you to be pleased If for some reason you a...

Page 4: ...in use They should never be allowed to sit or stand on any part of the appliance Teach children not to play with the controls or any other part of the oven For your safety never use your appliance for warming or heating the room Do not allow anyone to climb stand or hang on the door They could damage the oven or cause severe personal injury CAUTION ITEMS OF INTEREST TO CHILDREN SHOULD NOT BE STORE...

Page 5: ...ution against burns from touching hot surfaces of the door or oven walls When using cooking or roasting bags in the oven follow the manufacturer s directions Do not use your oven to dry newspapers If overheated they can catch fire Do not use the oven for a storage area Items stored in an oven can ignite Do not leave paper products cooking utensils or food in the oven when not in use Do not use alu...

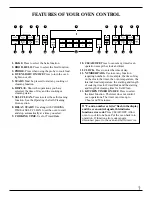
Page 6: ...Shelf Supports 5 12 14 Shelf positions are suggested 19 23 25 in the Baking Roasting 28 30 and Broiling sections 12 Oven Shelves with Stop Locks 5 12 14 Two additional shelves may be 19 23 25 ordered Pub No 3 A014 28 30 13 Bake Element 5 29 May be lifted gently for cleaning the oven floor 14 Lift Off Oven Door with Window 30 15 Probe 20 21 16 Broiler Pan and Grid 5 19 20 23 25 29 6 KITCHEN TIMER O...

Page 7: ...PADS Use to set any function requiring numbers for example the time of day on the clock the timer the oven temperature the internal food temperature the starting and length of cooking time for Timed Bake and the starting and length of cleaning time for Self Clean 13 KITCHEN TIMER ON OFF Press to select the timer function The timer does not control oven operations The timer can time up to 9 hours a...

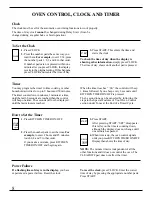
Page 8: ...To reset the clock press CLOCK Enter the correct time of day by pressing the appropriate number pads Press START 8 To Set the Clock 1 Press CLOCK 2 Press the number pads the same way you read them For example to set 12 34 press the number pads 1 2 3 and 4 in that order If number pads are not pressed within one minute after you press CLOCK the display reverts to the original setting If this happens...

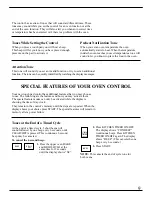
Page 9: ...ond beep may be canceled To cancel the 6 second beep 1 Press the upper oven BAKE and BROIL HI LO at the same time for 2 seconds until the display shows SF 2 Press KITCHEN TIMER ON OFF The display shows CON BEEP continuous beep Press KITCHEN TIMER ON OFF again The display shows BEEP This cancels the one beep every 6 seconds 3 Press START NOTE This cancels the end of cycle tone for both ovens BAKE K...

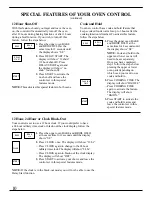
Page 10: ... and lower ovens will need to be set separately Once you have completed step 1 follow the steps below pressing the upper or lower oven pads depending on which oven you want to use cook and hold in 2 Press COOKING TIME The display will show Hld OFF Press COOKING TIME again to activate the feature The display will show Hld ON 3 Press START to activate the cook and hold feature and leave the control ...

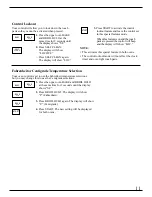
Page 11: ...d the display will show LOC NOTE This activates this special feature in both ovens The control lockout mode will not affect the clock timer and oven light touch pads START SELF CLEAN BROIL HI LO BAKE 11 Fahrenheit or Centigrade Temperature Selection Your oven control is set to use the Fahrenheit temperature selections but you may change this to use the Centigrade selections 1 Press the upper oven ...

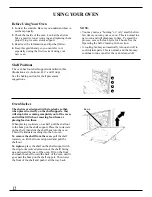
Page 12: ... curved extension of the shelf facing up and toward the rear of the oven Tilt up the front and push the shelf toward the back of the oven until it goes past the bump on the shelf support Then lower the front of the shelf and push it all the way back 12 1 Look at the controls Be sure you understand how to set them properly 2 Check the inside of the oven Look at the shelves Take a practice run at re...

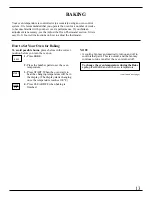
Page 13: ... place shelves in the correct position before you turn the oven on 1 Press BAKE 2 Press the number pads to set the oven temperature 3 Press START When the oven starts to heat the changing temperature will be in the display The display starts changing once the temperature reaches 100 F 4 Press CLEAR OFF when baking is finished NOTE A cooling fan may automatically turn on and off to cool internal pa...

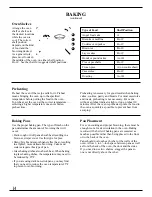
Page 14: ...ndicator light or tone preheat 10 minutes After the oven is preheated place the food in the oven as quickly as possible to prevent heat from escaping Baking Pans Pan Placement Use the proper baking pan The type of finish on the pan determines the amount of browning that will occur Dark rough or dull pans absorb heat resulting in a browner crisper crust Use this type for pies Shiny bright and smoot...

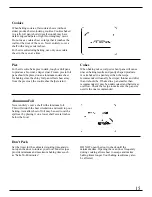
Page 15: ...cause uneven baking results and poorly shaped products A cake baked in a pan larger than the recipe recommends will usually be crisper thinner and drier than it should be If baked in a pan smaller than recommended it may be undercooked and batter may overflow Check the recipe to make sure the pan size used is the one recommended Aluminum Foil Never entirely cover a shelf with aluminum foil This wi...

Page 16: ...gth of time At the end of cooking time the oven will turn off automatically 1 Press BAKE 2 Press the number pads to set the oven temperature 3 Press COOKING TIME NOTE If your recipe requires preheating you may need to add additional time to the length of the cooking time 4 Press the number pads to set the baking time The oven temperature and the cooking time that you entered will be displayed 5 Pr...

Page 17: ...e set the display will show the changing temperature starting at 100 F and the cooking time countdown At the end of cooking time the oven will turn off and the end of cycle tone will sound 8 Press CLEAR OFF to clear the end of cycle tone if necessary NOTE The low temperature zone of this oven between 170 F and 200 F is available to keep hot cooked foods warm Food kept in the oven longer than two h...

Page 18: ...he upper oven BAKE and BROIL HI LO at the same time for 2 seconds until the display shows SF NOTE The thermostats in the upper and lower ovens need to be adjusted separately Once you have completed step 1 follow the steps below pressing the upper or lower oven pads depending on which oven thermostat you want to adjust 2 Press BAKE A two digit number shows in the display Press BAKE once to increase...

Page 19: ...Guide Remember that food will continue to cook in the hot oven and therefore should be removed when the desired internal temperature has been reached 19 How to Set Your Oven for Roasting 1 Place the shelf in A or B position No preheating is necessary 2 Check the weight of the meat Place the meat fat side up or poultry breast side up on roasting grid in a shallow pan The melting fat will baste the ...

Page 20: ... probe they might damage it TO AVOID BREAKING THE PROBE MAKE SURE FOOD IS COMPLETELY DEFROSTED BEFORE INSERTING appearance may vary ROASTING WITH THE PROBE See the Roasting Guide Plug Cable Probe Handles After preparing the meat and placing it on a trivet or on the broiler pan grid follow these steps for proper probe placement 1 Lay the probe on the outside of the meat along the top or side and ma...

Page 21: ...ternal temperature of the meat reaches 100 F the changing internal temperature will be shown in the display 8 When the internal temperature of the meat reaches the temperature you have set the probe and the oven turn off and the oven control signals To stop the signal press CLEAR OFF Use hot pads to remove the probe from the food Do not use tongs to pull on it they might damage it CAUTION To preve...

Page 22: ...lity 325 Rare 24 33 18 22 140 150 sirloin tip rump or top round Medium 35 39 22 29 150 160 Well Done 40 45 30 35 170 185 Lamb leg or bone in shoulder 325 Rare 21 25 20 23 140 150 Medium 25 30 24 28 150 160 Well Done 30 35 28 33 170 185 Veal shoulder leg or loin 325 Well Done 35 45 30 40 170 180 Pork loin rib or shoulder 325 Well Done 35 45 30 40 170 180 Ham precooked 325 To Warm 17 20 minutes per ...

Page 23: ... Broil and HI Broil 3 Press START 4 Press CLEAR OFF when broiling is finished CLEAR OFF START BROIL HI LO Use of Aluminum Foil You can use aluminum foil to line your broiler pan and broiler grid However you must mold the foil tightly to the grid and cut slits in it just like the grid Without the slits the foil will prevent fat and meat juices from draining into the broiler pan The juices could bec...

Page 24: ...ef 1 lb 4 patties Space evenly Well Done 1 2 to 3 4 inch thick C 10 7 Up to 8 patties take about same time Beef Steaks Rare 1 inch thick C 6 5 Steaks less than 1 inch thick cook Medium 1 to 11 2 lbs C 8 6 through before browning Pan frying Well Done C 12 11 is recommended Rare 11 2 inches thick C 10 7 8 Slash fat Medium 2 to 21 2 lbs C 15 14 16 Well Done C 25 20 25 Chicken 1 whole A 35 10 15 Reduc...

Page 25: ...as an extremely low resistance to abrasion An intact and well fitting oven door gasket is essential for energy efficient oven operation and good baking results If you notice the gasket becoming worn frayed or damaged in any way or if it has become displaced on the door you should have it replaced Do not let water run down through openings in the top of the door To help prevent water from getting i...

Page 26: ...maining It will not be possible to open the oven door until the temperature drops below the lock temperature and the LOCKED DOOR light goes off 5 When the LOCKED DOOR light is off open the door NOTE You can find out when the clean cycle will start by pressing DELAY START The display will flash and the control will beep if you set the clean cycle and forget to close the oven door DELAY START START ...

Page 27: ...u can set a delay clean in both ovens at the same time The second oven set will automatically delay the start of cleaning until the end of the first oven s clean cycle START DELAY START SELF CLEAN Easy Steps 1 Press SELF CLEAN 2 Press the number pads to set the clean time 3 Press DELAY START 4 Press the number pads to set the start time 5 Press START After Self Cleaning You may notice some white a...

Page 28: ...re off in the display Wipe up the excess soil and reset the clean cycle Q Is the crackling or popping sound I hear during cleaning normal A Yes This is the sound of the metal heating and cooling during both the cooking and cleaning functions Q Should there be any odor during the cleaning A Yes there will be an odor during the first few cleanings Failure to wipe out excessive soil might also cause ...

Page 29: ...e element can be lifted gently to clean the oven floor If spillovers residue or ash accumulate around the bake element gently wipe around the element with warm water continued next page Broil element Bake element Oven Light Replacement CAUTION Before replacing your oven light bulb disconnect the electrical power for your oven at the main fuse or circuit breaker panel Be sure to let the light cover...

Page 30: ...r slowly and evenly over both hinges at the same time If hinges snap back against the oven frame pull them back out TO CLEAN THE DOOR Inside of the door Because the area inside the gasket is cleaned during the self clean cycle you do not need to clean this by hand Any soap left on the liner causes additional stains when the oven is heated The area outside the gasket can be cleaned with a soap fill...

Page 31: ...e with clean water and polish dry with a soft cloth Do not use abrasive cleansers strong liquid cleaners plastic scouring pads or oven cleansers on the control panel they will damage the finish A 50 50 solution of vinegar and hot water works well Metal Parts Do not use steel wool abrasives ammonia or commercial oven cleaners To safely clean surfaces wash rinse and then dry with a soft cloth Glass ...

Page 32: ...properly into the oven receptacle or food THE DISPLAY This is reminding you to enter a probe temperature after plugging in the probe LOCK DOOR FLASHES Oven door not closed after self clean cycle is selected LOCKED DOOR FLASHES Door is still locked and you are trying to enter an oven cooking operation OVEN LIGHT DOES The light bulb is loose or defective Tighten or replace NOT WORK The pad operating...

Page 33: ...nt See the Adjust the Oven Thermostat Do It Yourself section STEAM FROM THE VENT When using Convection Bake or Convection Roast it is normal to see steam coming out of the oven vent As the number of shelves or amount of food being cooked increases the amount of visible steam will increase OVEN TEMPERATURE Oven thermostat needs adjustment See the Adjust the Oven Thermostat TOO HOT OR TOO COLD Do It...

Page 34: ...to help Your call and your question will be answered promptly and courteously And you can call any time GE Answer Center service is open 24 hours a day 7 days a week Service Contracts 800 626 2224 You can have the secure feeling that GE Consumer Service will still be there after your warranty expires Purchase a GE contract while your warranty is still in effect and you ll receive a substantial dis...

Page 35: ...free GE Answer Center 800 626 2000 consumer information service Improper installation If you have an installation problem contact your dealer or installer You are responsible for providing adequate electrical gas exhausting and other connecting facilities as described in the Installation Instructions provided with the product Replacement of house fuses or resetting of circuit breakers Failure of t...

Page 36: ...General Electric Company Louisville KY 40225 Monogram TM Pub No 49 8757 Part No 164D3333P016 5 96 CG Printed in LaFayette GA ...

Reviews: