background image

23

How to set
companion
oven
control for
proofing

(48

ranges only)

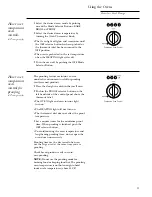
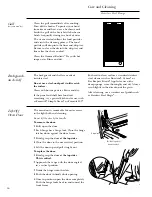
The proofing feature maintains a warm, 
non-drafty environment useful for proofing
yeast-leavened products.

1

Place the dough in a dish in the small oven.

2

Push in the PROOF selector button on the 
left hand side of the control panel above the
thermostat dial.

• The OVEN light and oven interior light 

turn on.

• The HEATING light will not turn on.

• The thermostat dial does not affect the proof

temperature.

3

Set a minute timer for the minimum proof
time. When proofing is finished, push the
OFF selector button.

• To avoid lowering the oven temperature and

lengthening proofing time, do not open the
oven door unnecessarily.

Proofing time may be decreased when you 
use the large oven at the same time you are
proofing.

Check bread products early to avoid 
over-proofing. 

NOTE:

Do not use the proofing mode for

warming food or keeping food hot. The proofing
oven temperature is not hot enough to hold
foods at safe temperatures (above 140°F).

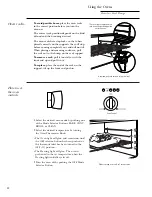
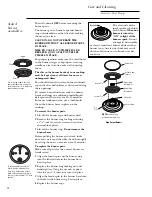
Companion Oven Control

How to set
companion
oven
controls

(48

ranges only)

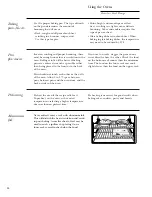
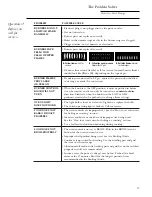
1

Select the desired oven mode by pushing
one of the Mode Selector Buttons: BAKE,
BROIL or PROOF.

2

Select the desired oven temperature by
turning the Oven Thermostat Knob.

• The Oven light will glow and remain on until

the OFF selector button has been pushed or
the thermostat dial has been turned to the
OFF position.

• The oven is preheated to the set temperature

when the HEATING light cycles off.

3

Turn the oven off by pushing the OFF Mode
Selector Button.

Companion Oven Control

Using the Ovens

Stainless Steel Range

Summary of Contents for Monogram ZDP48N4G

Page 1: ...ss Steel Professional 30 36 and 48 Dual Fuel Ranges Natural Gas Models ZDP48N4G ZDP48N6R ZDP48N6D ZDP36N6 ZDP36N4R ZDP36N4D ZDP30N4 Liquid Propane Models ZDP48L4G ZDP48L6R ZDP48L6D ZDP36L6 ZDP36L4R ZD...

Page 2: ...rranty 42 Do not store or use gasoline or other flammable vapors and liquids in the vicinity of this or any other appliance WHAT TO DO IF YOU SMELL GAS Do not try to light any appliance Do not touch a...

Page 3: ...vice check the Problem Solver in the back of this manual It lists causes of minor operating problems that you can correct yourself If you need service To obtain service see the Consumer Services page...

Page 4: ...gas shut off valve and how to turn it off if necessary Be sure all packing materials are removed from the range before operating it to prevent fire or smoke damage should the packing material ignite A...

Page 5: ...ien enlever tous les mat riaux d emballage de votre cuisini re avant de commencer l utiliser pour viter tout risque d incendie ou de dommage d la fum e si les mat riaux d emballage prennent feu Apr s...

Page 6: ...and may cause severe burns Use only dry pot holders moist or damp pot holders on hot surfaces may result in burns from steam Do not let pot holders touch surface burners burner grates or oven heating...

Page 7: ...role s ches Des poign es de casseroles humides ou mouill es sur des surfaces chaudes peuvent occasionner des br lures dues la vapeur Ne laissez jamais de poign e de casserole s approcher des br leurs...

Page 8: ...minum foil to line any part of the oven or cooktop Using a foil liner could result in a fire hazard or the obstruction of the flow of combustion and ventilation air Foil is an excellent heat insulator...

Page 9: ...N utilisez jamais de papier d aluminium pour recouvrir un l ment du four ou de la table de cuisson L utilisation de papier d aluminium peut occasionner un incendie ou un arr t de la circulation d air...

Page 10: ...ot leave plastic items on the cooktop they may melt if left too close to the vent To avoid the possibility of a burn always be certain that the controls for all burners are at the OFF position and all...

Page 11: ...nt saisies et restent froides loignez toujours les articles en mati re plastique des br leurs de surface Ne laissez jamais d article en mati re plastique sur la table de cuisson Il peut fondre s il se...

Page 12: ...Slide the oven rack out to the stop position This will provide additional clearance to hot oven walls and make it easier to lift out heavy or large dishes When using cooking or roasting bags in the o...

Page 13: ...r en position d arr t Cela fournira un espace suppl mentaire aux parois chaudes du four et facilitera le d placement de plats lourds ou de grande taille Quand vous utilisez des sacs de cuisson ou de r...

Page 14: ...s 22 26 28 14 Griddle Control Knob 21 30 15 Oven Light Switch 16 Main Oven Control Knob 22 26 28 17 Pull Out Drip Trays 18 34 18 Broil Elements 30 19 Convection Fan 25 20 Bake Elements 30 21 Oven Back...

Page 15: ...ing sounds when only one burner is being turned on Do not touch any of the burners when igniters are clicking The burners on this range will automatically relight if the flame goes out All burners wil...

Page 16: ...hold delicate sauces or for other foods requiring low simmer heat Primary Cooking Settings from LO to X HI will use both the main and simmer flames Use LO to HI for all purpose cooking Use HI or X HI...

Page 17: ...peuvent occasionner un balancement impr vu du wok dans le trou de la grille Cookware Aluminum Medium weight cookware is recommended because it heats quickly and evenly Most foods brown evenly in an al...

Page 18: ...rill into a drain hole and down to a drip tray below The other side of the grate side B is designed for delicate foods that need more support while cooking such as fish Food cooked on this side achiev...

Page 19: ...rning the outside Marinades and barbecue sauce should be added toward the end of cooking time The heat should be turned to low when sauces are added Do not leave the grill unattended while it is on Wh...

Page 20: ...r before turning the griddle on The griddle is made from Type 304 stainless steel and highly polished to provide a smooth cooking surface It is normal for it to darken with use as oils cook onto the s...

Page 21: ...p 3 Be sure to cover the entire surface with the oil 6 Repeat step 4 Allow the griddle to cool Wipe the entire surface of the griddle using a heavy cloth Apply a very thin layer of vegetable oil The g...

Page 22: ...or C rack position To remove pull rack out and lift up the front Oven racks To avoid possible burns place the oven racks in the correct position before you turn the oven on The correct rack position d...

Page 23: ...me may be decreased when you use the large oven at the same time you are proofing Check bread products early to avoid over proofing NOTE Do not use the proofing mode for warming food or keeping food h...

Page 24: ...e oven Pans should not touch each other or the walls of the oven Allow 1 to 11 2 space between pans between pans and the oven door and the back or sides of the oven If you use two racks stagger the pa...

Page 25: ...od cake and bread Ideal for baked foods cooked on two or three shelves Because heated air is circulated evenly throughout the oven foods can be baked with excellent results on two or three racks at th...

Page 26: ...through both about 2 apart If desired the fat may be trimmed leaving a layer about 1 8 thick 2 Place the meat or fish on the broiler grid in the broiler pan Always use the grid so that any fat will d...

Page 27: ...desired Lobster Tails 2 4 C 14 18 Do not Cut through back of 6 to 8 oz each turn over shell Spread open Brush with melted butter before broiling and after half of broiling time Fish 1 lb fillets 1 4 C...

Page 28: ...y Do not clean the gasket The fiberglass material of the oven door gasket cannot withstand abrasion It is essential for the gasket to remain intact If you notice it becoming worn or frayed replace it...

Page 29: ...t using spray on oven cleaners Do not spray on the electrical controls and switches because it could cause a short circuit and result in sparking or fire Do not allow a film from the cleaner to build...

Page 30: ...ed gently to clean the oven floor If spillovers residue or ash accumulate around the bake elements gently wipe around the element with warm water Stainless steel Do not use a steel wool pad it will sc...

Page 31: ...remove the bulb from its packaging Do not touch the bulb with bare fingers 3 Push the bulb straight into the receptacle all the way 4 Place the tabs of the glass cover into the grooves of the socket T...

Page 32: ...s in place on the cooktop To remove the burner parts 1 Lift off the burner cap and burner head 2 Remove the burner ring locking nut using a 11 16 socket wrench crescent wrench or channel lock pliers 3...

Page 33: ...ace the grates in a covered container or plastic bag Add 1 4 cup ammonia and let them soak for 30 minutes Wash rinse well and dry The grates may also be cleaned in a dishwasher Although they are durab...

Page 34: ...into the tray and into the liner below Do not allow the grease to accumulate in the drip tray or liner as it can be a fire hazard Clean the drip tray and liner as soon as they are cool Clean with hot...

Page 35: ...articles If desired wash with hot soapy water rinse and dry Once the griddle has cooled rub the surface lightly with vegetable oil Do not use corn oil or cooking sprays as they get sticky If the gridd...

Page 36: ...rd stainless steel cleaner such as Bon Ami Cameo or Bar Keepers Friend Apply cleaner with a damp sponge rinse thoroughly and dry Always scrub lightly in the direction of the grain After cleaning use a...

Page 37: ...N LIGHT The light bulb is loose or defective Tighten or replace the bulb DOES NOT WORK The switch operating light is broken Call for service FOOD DOES NOT The oven controls are improperly set See the...

Page 38: ...EANING CRACKING OR This is normal This is the sound of the metal heating and cooling POPPING SOUND during both the cooking and cleaning functions DURING CLEANING EXCESSIVE SMOKING Excessive soil Press...

Page 39: ...ce Contracts In the USA 800 626 2224 In Canada 1 888 880 3030 You can have the secure feeling that GE Consumer Service will still be there after your warranty expires Purchase a GE contract while your...

Page 40: ...40 Notes Stainless Steel Range...

Page 41: ...41 Notes Stainless Steel Range...

Page 42: ...exclusion may not apply to you This warranty gives you specific legal rights and you may also have other rights which vary from state to state To know what your legal rights are in your state consult...

Page 43: ...eneral Electric Company Warranty Registration Department P O Box 32150 Louisville KY 40232 2150 Place 1st Class Letter Stamp Here GE Appliances Consumer Product Ownership Registration Important Mail T...

Page 44: ...ard If the separate product registration card is missing fold and mail the form below No envelope is needed Consumer Product Ownership Registration Product Model Serial Range Important Mail Today Firs...

Page 45: ...Playas 39390 Acapulco Guerrero 01 744 482 9044 45 y 46 AGUASCALIENTES Av Aguascalientes 1119 Col Jardines de Bugambilias 20200 Aguascalientes Ags 01 449 978 8870 y 8871 CANCUN Calle 12 Ote Manzana 31...

Page 46: ...rtir de la recepci n de la llamada en nuestros Centros de Servicio SERVIPLUS 5 La garant a no podr hacerse efectiva en los siguientes casos Si el producto ha sido usado en condiciones distintas de las...

Reviews: