background image

Using the cooktop burners.

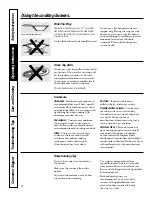
Cookware

Aluminum:

Medium-weight cookware is

recommended because it heats quickly
and evenly. Most foods brown evenly in
an aluminum skillet. Use saucepans with
tight-fitting lids when cooking with
minimum amounts of water.

Enamelware:

Under some conditions, 

the enamel of some cookware may 
melt. Follow cookware manufacturer’s
recommendations for cooking methods.

Glass:

There are two types of glass

cookware: those for oven use only 
and those for cooktop cooking
(saucepans, coffee and tea pots). 
Glass conducts heat very slowly.

Cast Iron:

If heated slowly, most 

skillets will give satisfactory results.

Heatproof Glass Ceramic:

Can be used 

for either surface or oven cooking. 
It conducts heat very slowly and cools 
very slowly. Check cookware
manufacturer’s directions to be sure it
can be used on a gas cooktop.

Stainless Steel:

This metal alone has 

poor heating properties and is usually
combined with copper, aluminum 
or other metals for improved heat
distribution. Combination metal skillets
usually work satisfactorily if they are used
with medium heat as the manufacturer
recommends.

Safety Instructions

Operating Instructions

Care and Cleaning

Tr

oubleshooting T

ips

Consumer Support

Home Canning Tips

Be sure the canner is centered over 
the burner.

Make sure the canner is flat on the
bottom.

To prevent burns from steam or heat, 
use caution when canning.

Use recipes and procedures from
reputable sources. These are available
from manufacturers such as Ball

®

and

Kerr

®

and the Department of Agriculture

Extension Service.

Flat-bottomed canners are
recommended. Use of water bath
canners with rippled bottoms may 
extend the time required to bring 
the water to a boil.

Use a flat-bottomed wok.

Wok This Way

We recommend that you use a 14

or smaller 

flat-bottomed wok. Make sure the wok bottom 
sits flat on the grate. They are available at your 
local retail store.

Only a flat-bottomed wok should be used.

Do not use a flat-bottomed wok on a
support ring. Placing the ring over the
burner or grate may cause the burner 
to work improperly, resulting in carbon
monoxide levels above allowable
standards. This could be dangerous 
to your health. 

Stove Top Grills

Do not use stove top grills on your sealed
gas burners. If you use the stove top grill 
on the sealed gas burner, it will cause
incomplete combustion and can result 
in exposure to carbon monoxide levels
above allowable current standards. 

This can be hazardous to your health.

8

Summary of Contents for JGP337

Page 1: ...nd Heads 10 Burner Grates 11 Control Knobs 9 Glass Cooktop 12 13 Stainless Steel Surfaces 11 Installation Instructions 14 26 Troubleshooting Tips 27 Consumer Support Canada Warranty 33 Consumer Support 34 Product Registration 29 30 U S Warranty 32 Write the model and serial numbers here Model ________________ Serial ________________ You can find them on a label under the cooktop Owner s Manual and...

Page 2: ...er WARNING If the information in this manual is not followed exactly a fire or explosion may result causing property damage personal injury or death IMPORTANT SAFETY NOTICE The California Safe Drinking Water and Toxic Enforcement Act requires the Governor of California to publish a list of substances known to the state to cause cancer birth defects or other reproductive harm and requires businesse...

Page 3: ...emove the round grounding prong from the plug If in doubt about the grounding of the home electrical system it is your personal responsibility and obligation to have an ungrounded outlet replaced with a properly grounded three prong outlet in accordance with the National Electrical Code Do not use an extension cord with this appliance Let the burner grates and other surfaces cool before touching t...

Page 4: ...ow do not hang long curtains that could blow over the top burners and create a fire hazard Do not store or use combustible materials gasoline or other flammable vapors and liquids in the vicinity of this or any other appliance Do not let cooking grease or other flammable materials accumulate near the cooktop Do not operate the burner without all burner parts in place Do not place hot cookware on t...

Page 5: ...pillage turn cookware handles toward the side or back of the cooktop without extending over adjacent burners Always turn the surface burner controls off before removing cookware Carefully watch foods being fried at a high flame setting Always heat fat slowly and watch as it heats Do not leave any items on the cooktop If a combination of oils or fats will be used in frying stir together before heat...

Page 6: ...to line burner bowls Misuse could result in a fire hazard or damage to the cooktop Do not cover or block the area around the cooktop knobs This area must be kept clear for proper ventilation and burner performance Clean only parts listed in this Owner s Manual Do not lift the cooktop Lifting the cooktop can lead to damage and improper operation of the cooktop LP CONVERSION KIT IMPORTANT SAFETY INF...

Page 7: ...ntinue to operate normally Do not operate the burner for an extended period of time without cookware on the grate The finish on the grate may chip without cookware to absorb the heat Check to be sure the burner you turn on is the one you want to use Be sure the burners and grates are cool before you place your hand a pot holder cleaning cloths or other materials on them Be sure you turn the contro...

Page 8: ...ions Operating Instructions Care and Cleaning Troubleshooting Tips Consumer Support Home Canning Tips Be sure the canner is centered over the burner Make sure the canner is flat on the bottom To prevent burns from steam or heat use caution when canning Use recipes and procedures from reputable sources These are available from manufacturers such as Ball and Kerr and the Department of Agriculture Ex...

Page 9: ...on the control panel The control knobs may be removed for easier cleaning To remove a knob pull it straight off the stem Wash the knobs in soap and water but do not soak Pull the knob straight off the stem Sealed Burner Assemblies Turn all controls OFF before removing the burner parts The burner grates caps and burner heads can be lifted off making them easy to clean CAUTION Do not operate the bur...

Page 10: ... heads Lift off when cool To remove burned on food soak the burner heads in a solution of mild liquid detergent and hot water for 20 30 minutes For more stubborn stains use a toothbrush After cleaning Before putting the burner caps and heads back shake out excess water and then dry them thoroughly by setting in a warm oven for 30 minutes NOTE Do not use steel wool or scouring powders to clean the ...

Page 11: ...ructions Operating Instructions Care and Cleaning Troubleshooting Tips Consumer Support Stainless Steel Surfaces on some models Do not use a steel wool pad it will scratch the surface Shake bottle well Place a small amount of CERAMA BRYTE Stainless Steel Appliance Cleaner on a damp cloth or damp paper towel Clean a small area rubbing with the grain of the stainless steel if applicable Dry and buff...

Page 12: ...as been removed polish the entire surface with CERAMA BRYTE Ceramic Cooktop Cleaner and a paper towel The CERAMA BRYTE Ceramic Cooktop Scraper and all recommended supplies are available through our Parts Center See instructions under To Order Parts section on next page NOTE Do not use a dull or nicked blade Heavy Burned On Residue Use a CERAMA BRYTE Cleaning Pad for Ceramic Cooktops Normal Daily U...

Page 13: ...a cool area on the cooktop b Remove the spill with paper towels Any remaining spillover should be left until the surface of the cooktop has cooled Don t use the surface units again until all of the residue has been completely removed NOTE If pitting or indentation in the glass surface has already occurred the cooktop glass will have to be replaced In this case service will be necessary Damage from...

Page 14: ...t is shipped from the factory set for natural gas The convertible pressure regulator supplied with the unit must be connected in series with the manifold of the cooktop and must remain in series with the supply line regardless of whether natural or L P gas is being used FOR PROPER OPERATION THE MAXIMUM INLET PRESSURE TO THE REGULATOR MUST BE NO MORE THAN 14 OF WATER COLUMN PRESSURE For checking th...

Page 15: ...s phone Follow the gas supplier s instructions If you cannot reach your gas supplier call the fire department Installation and service must be performed by a qualified installer service agency or the gas supplier 15 WHAT TO DO IF YOU SMELL GAS Installation of this cooktop must conform with local codes or in the absence of local codes with the National Fuel Gas Code ANSI Z223 1 NFPA 54 latest editi...

Page 16: ...ove a cooktop children climbing on the cooktop to reach items could be seriously injured Installation Instructions IMPORTANT SAFETY INSTRUCTIONS WARNING INSTALLATION SAFETY INSTRUCTIONS cont 16 This Appliance must be electrically grounded Check with your local codes which apply in your area If no local codes apply the National Electrical Code ANSI NFPA No 70 Latest Edition must be followed Write t...

Page 17: ...ling your cooktop in your home make sure all local codes and ordinances are followed exactly as stated Pre Installation Checklist 17 Installation Instructions Remove packaging tape To assure no damage is done to the finish of the product the safest way to remove the adhesive left from packaging tape on new appliances is an application of a household liquid dishwashing detergent mineral oil or cook...

Page 18: ...ountertop must withstand heat up to 200 F COOKTOP 30 21 19 1 2 28 3 8 3 2 1 4 Min Between cutout and the wall behind the cooktop 19 5 8 width of cut 28 1 2 length of cut 2 1 2 Min from front edge of cutout and front edge of countertop 14 1 4 3 3 4 MIN clearance from cutout to side wall on the left of the unit 30 MIN clearance from countertop to unprotected overhead surface 6 MIN clearance from cut...

Page 19: ...e countertop is parallel to the cooktop The unit must rest on the metal flange around the burner box Make final check that all required clearances are met Mounting Slot Burner Box Sides COOKTOP B6 Secure Cooktop to Cabinet Once the unit is in place screw the hold down bracket into the cabinet sides to secure the unit into place Mounting Slot Burner Box Sides Use suitable fasteners for anchoring in...

Page 20: ...d flexible connectors can cause gas leaks and personal injury Always use new flexible connectors when installing a gas appliance Screw a section of pipe onto each end of the pressure regulator C4 Install the regulator onto the burner box bottom Pressure Regulator Shut Off Valve Electrical Outlet 12 Below Countertop Screw the regulator and pipe connection into the burner box bottom Make sure the to...

Page 21: ...connect this cooktop and its individual shutoff valve from the gas supply piping system during any pressure testing of that system at test pressures greater than 1 2 psig Isolate the cooktop from the gas supply piping system by closing its individual shutoff valve during any pressure testing of the gas supply system at test pressures equal to or less than 1 2 psig INSTALLATION OVER BUILT IN OVEN S...

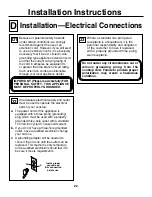
Page 22: ...irm connection before use L N D3 Where a standard two prong wall receptacle is encountered it is the personal responsibility and obligation of the customer to have it replaced with a properly grounded three prong wall receptacle Do not under any circumstances cut or remove grounding prong from the cooktop cord Failure to provide proper polarization may create a hazardous condition a The power cord...

Page 23: ...nless the screw is metal and not insulated and the wall receptacle is grounded through the house wiring The customer should have the circuit checked by a qualified electrician to make sure the receptacle is properly grounded When disconnecting the power cord from the adaptor always hold the adaptor with one hand If this is not done the adaptor ground terminal is very likely to break with repeated ...

Page 24: ...the location of the spark igniter matches up with the opening in the burner head b Position the burner cap on the burner head Make sure all burner heads and burner caps are placed onto the correct base locations See the Care and cleaning of the cooktop section for correct locations of the burner parts c Place the burner grate over the burner assembly and into the burner bowl The bottoms of the bur...

Page 25: ...top burner may be lit with a match by following the steps below WARNING Lighting gas burners with a match is dangerous You should match light the cooktop burners only in an emergency Burner Ignition a Light a match and hold the flame near the burner you want to light Wooden matches work best b Push in and turn the control knob slowly Be sure you are turning the correct knob for the burner you are ...

Page 26: ...in this manual has been completed Rechecking steps will ensure safe use of the cooktop When ordering parts always include the serial number model number and a code letter to ensure proper replacement parts Keep the conversion instructions and the orifices in case you want to convert to LP gas CONVERTING TO LP GAS or converting back to natural gas from LP This cooktop leaves the factory set for use...

Page 27: ...tlet Gas supply not connected See the Installation Instructions section or turned on A fuse in your home may be Replace the fuse or reset the circuit breaker blown or the circuit breaker tripped Igniter orifice in burner body Remove the obstruction See the Care and cleaning of may be clogged the cooktop section Burner parts not replaced See the Care and cleaning of the cooktop section correctly Ho...

Page 28: ...Safety Instructions Operating Instructions Care and Cleaning Troubleshooting Tips Consumer Support Notes 28 ...

Page 29: ... protection or you may request your money back on the remaining value of your contract No questions asked It s that simple Protect your refrigerator dishwasher washer and dryer range TV VCR and much more any brand Plus there s no extra charge for emergency service and low monthly financing is available Even icemaker coverage and food spoilage protection is offered You can rest easy knowing that al...

Page 30: ... peace of mind of knowing we can contact you in the unlikely event of a safety modification After mailing the registration below store this document in a safe place It contains information you will need should you require service Our service number is 800 GE CARES 800 432 2737 Read your Owner s Manual carefully It will help you operate your new appliance properly Model Number Serial Number E mail ...

Page 31: ...31 Notes Safety Instructions Operating Instructions Care and Cleaning Troubleshooting Tips Consumer Support ...

Page 32: ...ing of circuit breakers Damage to the product caused by accident fire floods or acts of God Incidental or consequential damage caused by possible defects with this appliance Damage caused after delivery What GE Will Not Cover This warranty is extended to the original purchaser and any succeeding owner for products purchased for home use within the USA In Alaska the warranty excludes the cost of sh...

Page 33: ...l also provide free of charge all labor original purchase and related service costs to replace the defective part Service trips to your home to teach you how to use the product Improper installation delivery or maintenance Failure of the product if it is abused misused or used for other than the intended purpose or used commercially Replacement of house fuses or resetting of circuit breakers Damag...

Page 34: ...eople with disabilities check out our Website today For the hearing impaired please call 800 TDD GEAC 800 833 4322 In Canada contact Manager Consumer Relations Camco Inc Suite 310 1 Factory Lane Moncton N B E1C 9M3 Extended Warranties In the U S GEAppliances com Purchase a GE extended warranty and learn about special discounts that are available while your warranty is still in effect You can purch...

Page 35: ...erficie de cocción de vidrio 12 13 Superficies de acero inoxidable 11 Tapas y cabezas de los quemadores 10 Instrucciones de instalación 14 26 Solucionar problemas 27 Apoyo al consumidor Apoyo al consumidor 34 Garantía 33 Escriba aquí el número de modelo y los números de serie No de modelo ______________ No de serie ________________ Estos números se encuentran en una etiqueta debajo de la estufa de...

Page 36: ...ación de este manual puede ocurrir un incendio o una explosión que cause daños a la propiedad lesiones personales o la muerte AVISO IMPORTANTE DE SEGURIDAD La ley de Tóxicos y Agua Potable Segura de California exige al gobernador de California publicar una lista de las sustancias conocidas en el estado que causen cáncer defectos de nacimiento u otros daños y exige a las empresas que alerten a los ...

Page 37: ... clavija Si tiene alguna duda sobre el sistema eléctrico redondeada de conexión a tierra de su casa es su responsabilidad y obligación personal cambiar la toma de corriente que no esté conectada a tierra por una toma de corriente adecuada para tres pates que esté conectada a tierra de acuerdo con los requerimientos del Código Eléctrico Nacional No utilice un cable de extensión para este aparato Pe...

Page 38: ... de la estufa Si la estufa está ubicada cerca de una ventana no coloque cortinas largas que podrían rozar los quemadores y provocar un incendio No guarde o utilice gasolina u otros vapores o líquidos inflamables cerca de éste u otro aparato No permita que se acumulen otros materiales inflamables o grasa en o cerca de la estufa No opere el quemador sin todas las partes en su lugar No deposite recip...

Page 39: ...os hacia la parte de atrás sin extenderlos sobre los quemadores al lado Siempre apague los quemadores antes de quitar una cacerola Vigile con atención los alimentos que se fríen en llama alta Siempre caliente la grasa lentamente y obsérvela cuando se calienta No deje elementos en la estufa Si una combinación de aceites o grasa se usara al freír revuelva antes de calentar o mientras la grasa se der...

Page 40: ...ra ni obstruya el área alrededor de las perillas de la estufa Esta área debe mantenerse libre para que haya un funcionamiento adecuado de los quemadores y una ventilación apropiada Limpie únicamente las partes que aparecen señaladas en este manual del propietario No levante la estufa Levantar la estufa podría causar daños y operación impropia KIT DE CONVERSIÓN A GAS LP INFORMACIÓN DE SEGURIDAD IMP...

Page 41: ...l No opere un quemador durante períodos de tiempo prolongados sin que haya un recipiente para cocinar sobre la parrilla del quemador El acabado de la parrilla del quemador puede desportillarse si no hay una olla o una sartén que absorba el calor Verifique para asegurarse de que el quemador que encendió sea el que quiere usar Asegúrese de que los quemadores y parrillas de los quemadores estén fríos...

Page 42: ...peración Cuidado y limpieza Solucionar problemas Apoyo al consumidor Consejos para realizar conservas caseras Asegúrese de que el recipiente para conservas se encuentre centrado sobre el quemador Cerciórese de que el recipiente para conservas tenga una base plana A fin de prevenir quemaduras de vapor o de calor tenga mucho cuidado al realizar conservas Utilice recetas y procedimientos de fuentes c...

Page 43: ... la limpieza Para retirar la perilla hálela hacia fuera del vástago Lave las perillas en agua y jabón pero no remoje Hale la perilla hacia fuera del vástago Ensambladuras de los quemadores sellados Apague todos los controles en la posición OFF antes de remover las partes de los quemadores Las parrillas de los quemadores las tapas y las cabezas de los quemadores pueden ser extraídas levantándolas h...

Page 44: ...pielas cuando estén fría Para remover comida que se haya quemado y que se encuentre encima sumerja las cabezas de los quemadores en una solución de agua con un detergente suave y agua caliente por 20 ó 30 minutos Para manchas más difíciles de retirar use un cepillo dental Después de limpiar Antes de poner las tapas y las cabezas de los quemadores de regreso en su lugar sacuda el agua que haya qued...

Page 45: ...guridad Operación Cuidado y limpieza Solucionar problemas Apoyo al consumidor Superficies de acero inoxidable en algunos modelos No use esponjillas de fibra metálica que pueden rayar la superficie Agite bien la botella Coloque una pequeña cantidad de CERAMA BRYTE Stainless Steel Appliance Cleaner en un paño húmedo o una toalla de papel húmeda Limpie un área pequeña frotando con el grano del acero ...

Page 46: ...ficie con CERAMA BRYTE Ceramic Cooktop Cleaner y una toalla de papel El CERAMA BRYTE Ceramic Cooktop Scraper y todos los elementos recomendados se encuentran disponibles a través de nuestro Centro de Repuestos Ver instrucciones en la sección Para solicitar componentes en la página siguiente NOTA No utilice una cuchilla desafilada o rota Suciedad quemada muy rebelde Utilice un CERAMA BRYTE Cleaning...

Page 47: ...cie b Quite el derrame con una toalla de papel Los derrames que queden deben dejarse hasta que la superficie cerámica se haya enfriado No vuelva a utilizar los quemadores hasta que se haya removido por completo toda la suciedad NOTA Si se ha saltado una parte de la superficie o ha recibido una marca profunda se la debe reemplazar En este caso será necesario la ayuda de un servicio técnico Daños ca...

Page 48: ...For All GE Gas CooktopsFor All GE Gas CooktopsFor All GE Gas CooktopsFor All GE Gas LP to Natural Gas ConversionLP to Natural Gas ConversionLP to Natural Gas ConversionLP to Natural Gas Conversion C1 C3 20 This cooktop is designed to operate on natural gas at 4 of water column pressure It is shipped from the factory set for natural gas The convertible pressure regulator supplied with the unit must...

Page 49: ... teléfono de su vecino Siga las instrucciones del abastecedor del gas Si no logra ponerse en contacto con su abastecedor de gas llama al cuerpo de bomberos La instalación y el servicio deben ser llevados a cabo por un instalador calificado una agencia de servicios o por un proveedor de gas 15 QUÉ HACER SI PERCIBE OLOR A GAS La instalación de esta estufa debe cumplir con los códigos locales o en au...

Page 50: ...a la estufa para alcanzar objetos pueden resultar gravemente heridos Instrucciones de instalación INSTRUCCIONES IMPORTANTES DE SEGURIDAD ADVERTENCIA INSTRUCCIONES DE SEGURIDAD PARA LA INSTALACIÓN cont 16 Este electrodoméstico debe estar eléctricamente conectado a tierra Investigue los códigos aplicables en su área en este respecto Si los códigos locales no son aplicables siga el Código Eléctrico N...

Page 51: ...ndo la estufa en su casa cerciórese de que todos los códigos y ordenamientos locales se cumplan con precisión Lista de control antes de la instalación 17 Instrucciones de instalación Retire la cinta de embalaje Para asegurarse de no dañar el acabado del producto la mejor forma de quitar el pegamento de la cinta de embalaje de los electrodomésticos nuevos consiste en aplicar detergente líquido comú...

Page 52: ...a estufa 19 5 8 ancho del corte 28 1 2 largo del corte 2 1 2 mín del extremo frontal del corte y del extremo frontal de la encimera 14 1 4 13 1 4 a partir de la línea central del corte 1 mín a partir de la pared posterior Localización recomendada del suministro de gas PREPARACIÓN DE LA ABERTURA A A1 Se deben conservar las siguientes dimensiones de tolerancia MÍNIMAS Tolerancia MÍNIMA de 3 3 4 a pa...

Page 53: ...be descansar sobre un reborde de metal ubicado alrededor de la estufa Finalmente cerciórese de que todas las tolerancias requeridas se hayan cumplido Ranura de montaje Costado de la estufa ESTUFA B6 Asegure la estufa al gabinete Una vez la unidad esté en su lugar atornille la abrazadera de sujeción en los costados del gabinete para asegurar la unidad en su lugar Ranura de montaje Costado de la est...

Page 54: ... gas y lesiones personales Siempre use conectores flexibles nuevos cuando se disponga a instalar un electrodoméstico de gas Atornille una sección de la tubería en cada uno de los extremos del regulador de presión C4 Instale el regulador en el fondo de la caja del quemador Regulador de presión Válvula de desconexión Tomacorriente eléctrico a 12 por debajo del acoplador Atornille el regulador y la c...

Page 55: ...S Desconecte esta estufa y su válvula de desconexión individual del sistema de tubería de suministro de gas durante cualquier prueba de presión del sistema a presiones de prueba superiores a los 1 2 psig Aíla estufa del suministro de las tuberías de gas natural cerrando la válvula de desconexión individual durante cualquier prueba de presión del sistema de suministro de gas a presiones de prueba i...

Page 56: ...nsabilidad personal y obligación del cliente hacer los arreglos para que el mismo sea cambiado por uno de tres puntas y apropiadamente conectado a tierra Bajo ninguna circunstancia corte o remueva la punta de conexión a tierra del cable eléctrico de la estufa No proporcionar polarización apropiada podría causar condiciones peligrosas a El cable eléctrico de este electrodoméstico está equipado con ...

Page 57: ... el electrodoméstico a tierra a no ser que el tornillo sea metálico y no esté aislado y el tomacorriente de pared esté conectado a tierra a través del cableado de la casa El cliente debe solicitar que el circuito sea inspeccionado por un electricista calificado para cerciorarse de que el tomacorriente está conectado a tierra apropiadamente Cuando usted desconecte el cable eléctrico del adaptador s...

Page 58: ...ncendedor a chispa quede en línea con la abertura en la cabeza del quemador b Coloque la tapa del quemador en la cabeza del quemador Asegúrese de que todas las cabezas y tapas de los quemadores estén colocadas en las ubicaciones correctas Ver la sección de Cuidado y limpieza de la estufa para las ubicaciones correctas de las piezas de los quemadores c Coloque la parrilla sobre la ensambladura del ...

Page 59: ... emergencia los quemadores pueden encenderse con cerillas siguiendo los pasos abajo ADVERTENCIA Encender un quemador de gas con cerillas es peligroso Solamente encienda los quemadores de esta manera en casos de emergencia Ignición de los quemadores a Encienda una cerilla y sostenga la llame cerca del quemador que desea encender Las cerillas de madera son más recomendables b Acérquelo y gire lentam...

Page 60: ...nido en esta guía se haya completado Repasar los pasos garantizará el uso seguro de la estufa Cuando se disponga a ordenar partes siempre incluya el número de serie el número del modelo y una letra código para garantizar que las partes de repuesto serán las apropiadas Guarde las instrucciones de conversión y los orificios en caso de que desee convertir la estufa a gas LP CÓMO CONVERTIR A GAS LP o ...

Page 61: ...n Instrucciones de instalación conectado o encendido Es posible que un fusible o el Reemplace el fusible o vuelva a establecer el interruptor interruptor de circuitos se de circuitos haya saltado en su casa Es posible que el orificio del Retire la obstrucción Consulte la sección ignitor en la caja del Cuidado y limpieza quemador esté obstruido Las partes del quemador no Consulte la sección Cuidado...

Page 62: ...Seguridad Operación Cuidado y limpieza Solucionar problemas Apoyo al consumidor Notas 28 ...

Page 63: ...29 Apoyo al consumidor Solucionar problemas Operación Seguridad Cuidado y limpieza Notas ...

Page 64: ...Seguridad Operación Cuidado y limpieza Solucionar problemas Apoyo al consumidor Notas 30 ...

Page 65: ...31 Apoyo al consumidor Solucionar problemas Operación Seguridad Cuidado y limpieza Notas ...

Page 66: ...Seguridad Operación Cuidado y limpieza Solucionar problemas Apoyo al consumidor Notas 32 ...

Page 67: ... estados no permiten la exclusión o las limitaciones de daños incidentales o consecuenciales Esta garantía da derechos legales específicos y usted podría tener otros derechos que variarán de estado a estado Para saber cuáles son sus derechos legales consulte a la oficina de asuntos del consumidor local o la oficina del Prucurador Attorney General en su localidad Garante General Electric Company Lo...

Page 68: ...ga detalles sobre descuentos especiales disponibles mientras su garantía está aún activa Puede comprarla en línea en cualquier momento o llamar al 800 626 2224 durante horas normales de oficina GE Consumer Home Services estará aún ahí cuando su garantía termine Piezas y accesorios www GEAppliances com Aquellos individuos con la calificación necesaria para reparar sus propios electrodomésticos pued...
Reviews: