background image

Consumer Support

Troubleshooting T

ips

Care and Cleaning

Operating Instructions

Safety Instructions

8

Selecting types of cookware.

The following information will help you choose cookware which will give good performance on glass cooktops.

Stainless Steel: 

recommended

Aluminum: 

heavy weight recommended

Good conductivity. Aluminum residues

sometimes appear as scratches on the

cooktop, but can be removed if cleaned

immediately. Because of its low melting

point, thin weight aluminum should not 

be used.

Copper Bottom:

recommended

Copper may leave residues which can

appear as scratches. The residues can be

removed, as long as the cooktop is

cleaned immediately. However, do not let

these pots boil dry. Overheated metal can

bond to glass cooktops. An overheated

copper bottom pot will leave a residue

that will permanently stain the cooktop 

if not removed immediately.

Porcelain Enamel Covered Cast Iron: 

recommended

As long as the cookware is covered

completely with porcelain enamel, this

cookware is recommended. Caution is

recommended for cast iron cookware 

that is not completely covered with

smooth porcelain enamel, as it may

scratch the glass ceramic cooktop.

Glass-ceramic: 

usable, but not recommended

Poor performance. May scratch the

surface. 

Stoneware: 

usable, but not recommended

Poor performance. May scratch the

surface.

Home Canning Tips: 

Be sure the canner is centered over the

surface unit.
Make sure the canner is flat on the

bottom.
Use recipes and procedures from

reputable sources. These are available

from manufacturers such as Ball® and

Kerr® and the Department of Agriculture

Extension Service.
To prevent burns from steam or heat, use

caution when canning.

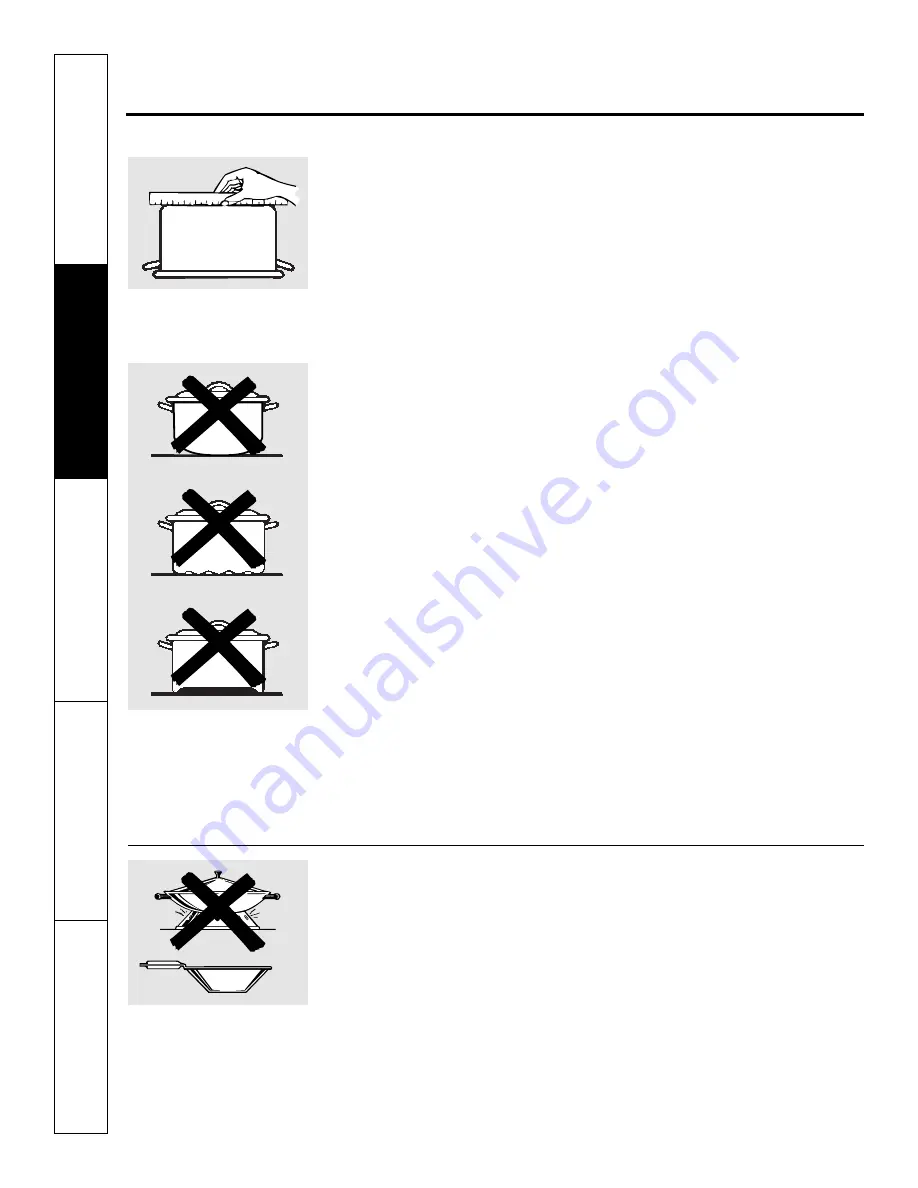
Check pans for flat bottoms by
using a straight edge.

Pans with rounded, curved, ridged
or warped bottoms are not
recommended.

Use only flat-bottomed woks.

Wok Cooking

We recommend that you use only a flat-bottomed
wok. They are available at your local retail store.

Do not use round-bottom woks. You

could be seriously burned if the wok

tipped over.

Summary of Contents for JDP46

Page 1: ...f Oven Door 22 Oven Light 24 Oven Shelves 23 Oven Vent 21 Stainless Steel Surfaces 21 Storage Drawer Removal 23 Troubleshooting Tips Before You Call For Service 27 30 Consumer Support Consumer Support Back Cover Product Registration 33 34 Warranty 35 JDP46 JSP46 Owner s Manual Ranges Self Cleaning Electric 164D4290P018 49 80052 12 00 JR Write the model and serial numbers here Model _______________...

Page 2: ... this precaution could result in tipping of the range and injury WARNING ANTI TIP DEVICE IMPORTANT SAFETY NOTICE The California Safe Drinking Water and Toxic Enforcement Act requires the Governor of California to publish a list of substances known to the state to cause cancer birth defects or other reproductive harm and requires businesses to warn customers of potential exposure to such substances...

Page 3: ... be smothered completely by closing the oven door and turning the oven off or by using a multi purpose dry chemical or foam type fire extinguisher For your safety never use your appliance for warming or heating the room Do not let cooking grease or other flammable materials accumulate in or near the range Do not touch the surface units the heating elements or the interior surface of the oven These...

Page 4: ...ating or as fats melt slowly Always heat fat slowly and watch as it heats Use a deep fat thermometer whenever possible to prevent overheating fat beyond the smoking point Avoid scratching the glass cooktop The cooktop can be scratched with items such as sharp instruments rings or other jewelry and rivets on clothing Do not operate the radiant surface units if the glass is broken Spillovers or clea...

Page 5: ...od in the oven when not in use Do not use aluminum foil to line oven bottoms except as suggested in this manual Improper installation of aluminum foil may result in a risk of electric shock or fire Stand away from the range when opening the oven door Hot air or steam which escapes can cause burns to hands face and or eyes WARNING OVEN READ AND FOLLOW THIS SAFETY INFORMATION CAREFULLY SAVE THESE IN...

Page 6: ...unit is hot to the touch stay on even after the unit is turned off glow until the unit is cooled to approximately 150 F The WARM setting on the right REAR surface unit keeps already heated food warm until ready to serve Do not use to heat cold food Be sure you turn the control knob to OFF when you finish cooking Dual Surface Unit Control Knob The right front surface unit has 2 cooking sizes to sel...

Page 7: ...lating materials and will disappear in a short time The surface unit will cycle on and off to maintain your selected control setting It is safe to place hot cookware on the glass surface even when the cooktop is cool Even after the surface units are turned off the glass cooktop retains enough heat to continue cooking To avoid over cooking remove pans from the surface units when the food is cooked ...

Page 8: ...mmended As long as the cookware is covered completely with porcelain enamel this cookware is recommended Caution is recommended for cast iron cookware that is not completely covered with smooth porcelain enamel as it may scratch the glass ceramic cooktop Glass ceramic usable but not recommended Poor performance May scratch the surface Stoneware usable but not recommended Poor performance May scrat...

Page 9: ...able from the manufacturer of your canner manufacturers of glass jars for canning such as Ball and Kerr brand and the United States Department of Agriculture Extension Service Remember that canning is a process that generates large amounts of steam To avoid burns from steam or heat be careful when canning NOTE If your house has low voltage canning may take longer than expected even though directio...

Page 10: ...ook The oven will shut off when the cooking time has run out DELAY START Pad Use along with COOKING TIME or SELF CLEAN pads to set the oven to start and stop automatically at a time you set CLOCK Pad Press this pad before setting the clock KITCHEN TIMER ON OFF Pad Press this pad to select the timer feature CLEAR OFF Pad Press this pad to cancel ALL oven operations except the clock and timer Number...

Page 11: ... position A you will need to use caution when pulling the shelf out We recommend that you pull the shelf out several inches and then using two pot holders pull the shelf out by holding the sides of it The shelf is low and you could be burned if you place your hand in the middle of the shelf and pull all the way out Be very careful not to burn your hand on the door when using the shelf in the lowes...

Page 12: ...Guide USDA Rev June 1985 Quantity and Shelf First Side Second Side Food or Thickness Position Time min Time min Comments Ground Beef 1 lb 4 patties D 13 8 Space evenly 1 2 to 3 4 thick 4 lbs 12 patties D 15 11 Beef Steaks Rare 3 4 to 1 thick F 6 4 Steaks less than 3 4 Medium 1 to 1 1 2 lbs E 8 6 thick are difficult Well Done E 10 8 to cook rare Slash fat Rare 1 1 2 thick D 10 8 Medium 2 to 2 1 2 l...

Page 13: ...in Press the START pad When the timer reaches 00 the control will beep 3 times followed by one beep every 6 seconds until the KITCHEN TIMER ON OFF pad is pressed The 6 second tone can be canceled by following the steps in the Special features of your oven control section under Tones at the End of a Timed Cycle The timer is a minute timer only The timer does not control oven operations The maximum ...

Page 14: ...baking the oven will turn off The end of cycle tone will sound Press the CLEAR OFF pad to clear the display How to Set a Delayed Start and Automatic Stop You can set the oven control to delay start the oven cook for a specific length of time and then turn off automatically Make sure the clock shows the correct time of day Press the BAKE pad Using the number pads enter the desired temperature Press...

Page 15: ...mperature or twice to increase The oven temperature can be adjusted up as much as 35 F or down as much as 35 F Press the number pads the same way you read them For example to change the oven temperature 15 F press 1 and 5 When you have made the adjustment press the START pad to go back to the time of day display Use your oven as you would normally The type of margarine will affect baking performan...

Page 16: ...some birds is extremely sensitive to the fumes given off during the self cleaning cycle of any range Move birds to another well ventilated room Wipe up heavy soil on the oven bottom How to Set the Oven for Cleaning Touch the SELF CLEAN pad Using the number pads enter the desired clean time if a time other than 4 hours is needed Clean cycle time is normally 4 hours You can change the clean time to ...

Page 17: ...en door until the temperature drops below the lock temperature and the LOCKED light goes off When the LOCKED light is off open the door www GEAppliances com After a Clean Cycle You may notice some white ash in the oven Wipe it up with a damp cloth after the oven cools If white spots remain remove them with a soap filled steel wool pad and rinse thoroughly with a vinegar and water mixture These dep...

Page 18: ...enheit or Celsius Temperature Selection Your oven control is set to use the Fahrenheit temperature selections but you may change this to use the Celsius selections Press the BAKE and BROIL HI LO pads at the same time for 3 seconds until the display shows SF Press the BROIL HI LO pad The display will show F Fahrenheit Press the BROIL HI LO pad again The display will show C Celsius Press the START p...

Page 19: ...and BROIL HI LO pads at the same time for 3 seconds until the display shows SF Press the CLOCK pad once The display will show 12 hr If this is the choice you want press the START pad Press the CLOCK pad again to change to the 24 hour military time clock The display will show 24 hr If this is the choice you want press the START pad Press the CLOCK pad again to black out the clock display The displa...

Page 20: ... until the display shows SF NOTE If bake or broil appears in the display the BAKE and BROIL HI LO pads were not touched at the same time Touch the CLEAR OFF pad and begin again Tap the DELAY START pad until SAb bAtH appears in the display Touch the START pad and will appear in the display Touch the COOKING TIME pad Touch the number pads to set the desired length of cooking time between 1 minute an...

Page 21: ...er placement Wash the knobs in soap and water or a vinegar and hot water solution but do not soak Oven Vent The oven vent is located above the left side of the door This area could become hot during oven use It is normal for steam to come out of the vent The vent is important for proper air circulation Never block this vent Stainless Steel Surfaces on some models Do not use a steel wool pad it wil...

Page 22: ... Soap filled steel wool pads may also be used Do not allow food spills with a high sugar or acid content such as milk tomatoes sauerkraut fruit juices or pie filling to remain on the surface They may cause a dull spot even after cleaning To clean the outside of the door Use soap and water to thoroughly clean the top sides and front of the oven door Rinse well You may also use a glass cleaner to cl...

Page 23: ... grid from the pan Carefully pour out the grease from the pan into a proper container Wash and rinse the broiler pan and grid in hot water with a soap filled or plastic scouring pad If food has burned on sprinkle the grid with detergent while hot and cover with wet paper towels or a dishcloth Soaking the pan will remove burned on foods Both the broiler pan and grid may be cleaned with a commercial...

Page 24: ... cover Replace bulb with a 40 watt appliance bulb or two prong halogen bulb as appropriate To replace the cover Line up tabs of lens in front of tabs on housing and rotate clockwise to engage Oven Heating Elements Do not clean the bake element or the broil element Any soil will burn off when the elements are heated To clean the oven floor gently lift the bake element Clean with warm soapy water 24...

Page 25: ...al protection after all residue has been removed polish the entire surface with Cerama Bryte and a paper towel NOTE Razor blade is packed inverted for safety reasons Prior to use the blade must be rotated and reinserted into slot Do not use a dull or nicked blade The RAZOR SCRAPER is available through our Parts Center See instructions under To Order Parts section on next page Heavy Burned On Resid...

Page 26: ...y or fudge and have a spillover it can cause permanent damage to the glass surface unless the spillover is immediately removed Be careful not to slide pots and pans across your cooktop It will leave metal markings on the cooktop surface These marks are removable using the cleaning cream with a scrub sponge and or razor scraper If pots with a thin overlay of aluminum or copper are allowed to boil d...

Page 27: ...tion Food spillovers not cleaned See the Cleaning the glass cooktop section on the cooktop before next use Hot surface on a model This is normal The surface may appear discolored with a white glass cooktop when it is hot This is temporary and will disappear as the glass cools Plastic melted to Hot cooktop came into See the Glass surface potential for permanent damage the surface contact with plast...

Page 28: ... some areas the power Preheat the broil element for 10 minutes voltage may be low Broil for the longest period of time recommended in the Broiling Guide Oven temperature too Oven thermostat See the Adjust the oven thermostat Do it yourself hot or too cold needs adjustment section Oven will not work A fuse in your home may be Replace the fuse or reset the circuit breaker blown or the circuit breake...

Page 29: ...or will not Oven too hot Allow the oven to cool below locking temperature open after a clean cycle Oven not clean after Oven controls not properly set See the Using the self cleaning oven section a clean cycle Oven was heavily soiled Clean up heavy spillovers before starting the clean cycle Heavily soiled ovens may need to self clean again or for a longer period of time LOCKED flashes The self cle...

Page 30: ... Power outage or surge Reset the clock If the oven was in use you must reset clock flashes it by pressing the CLEAR OFF pad setting the clock and resetting any cooking function Burning or oily This is normal in a new To speed the process set a self clean cycle for a odor emitting from oven and will disappear minimum of 3 hours See the Using the self the vent in time cleaning oven section Strong od...

Page 31: ...31 Safety Instructions Operating Instructions Safety Instructions Operating Instructions Care and Cleaning Troubleshooting Tips Consumer Support Notes ...

Page 32: ...32 Consumer Support Troubleshooting Tips Care and Cleaning Operating Instructions Safety Instructions Notes ...

Page 33: ...otection or you may request your money back on the remaining value of your contract No questions asked It s that simple Protect your refrigerator dishwasher washer and dryer range TV VCR and much more any brand Plus there s no extra charge for emergency service and low monthly financing is available Even icemaker coverage and food spoilage protection is offered You can rest easy knowing that all y...

Page 34: ... detach and return the form below to ensure that your product is registered or register online at www GEAppliances com 1 2 3 Model Number Serial Number Cut here Complete and mail your Consumer Product Ownership Registration today Have the peace of mind of knowing we can contact you in the unlikely event of a safety modification After mailing the registration below store this document in a safe pla...

Page 35: ...y succeeding owner for products purchased for home use within the USA In Alaska the warranty excludes the cost of shipping or service calls to your home Some states do not allow the exclusion or limitation of incidental or consequential damages This warranty gives you specific legal rights and you may also have other rights which vary from state to state To know what your legal rights are consult ...

Page 36: ...at are available while your warranty is still in effect You can purchase it on line anytime or call 800 626 2224 during normal business hours GE Consumer Home Services will still be there after your warranty expires Parts and Accessories www GEAppliances com Individuals qualified to service their own appliances can have parts or accessories sent directly to their homes VISA MasterCard and Discover...

Reviews: