background image

12

Consumer Support

Troubleshooting T

ips

Care and Cleaning

Operating Instructions

Safety Instructions

To avoid possible burns, place the shelves in the desired position before you turn the oven on.

Before you begin…

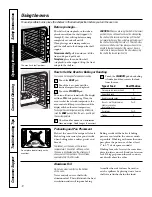
The shelves have stop-locks, so that when
placed correctly on the shelf supports (A
through F), they will stop before coming
completely out, and will not tilt.

When placing and removing cookware, 
pull the shelf out to the bump on the shelf
support.

To remove a shelf,

pull it toward you, tilt the

front end up and pull it out.

To replace,

place the end of the shelf 

(stop-locks) on the support, tilt up the front
and push the shelf in. 

CAUTION:

When you are using the shelf in the lowest

position (A), you will need to use caution when pulling
the shelf out. We recommend that you pull the shelf
out several inches and then, using two pot holders, pull
the shelf out by holding the sides of it. The shelf is low
and you could be burned if you place your hand in the
middle of the shelf and pull all the way out. Be very
careful not to burn your hand on the door when using
the shelf in the lowest position (A).

The oven has 6 shelf positions.

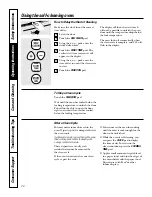
How to Set the Oven for Baking or Roasting

Your oven is not designed for open-door cooking.

Touch the 

BAKE

pad.

Touch the 

+

or 

pads until the 

desired temperature is displayed.

Touch the 

START/ON

pad.

The oven will start automatically. The display
will show 

PrE

while preheating. When the

oven reaches the selected temperature, the
oven control will beep several times and the
display will show the oven temperature.

To change the oven temperature during BAKE cycle,
touch the 

BAKE

pad and then the 

+

or 

pads to get

the new temperature.

Check food for doneness at minimum
time on recipe. Cook longer if necessary.

Touch the 

CLEAR/OFF

pad when baking

is finished and then remove the food
from the oven.

Type of Food

Shelf Position

Frozen pies (on cookie sheet)

D

Angel food cake

A

Bundt or pound cakes

C or D

Biscuits, muffins, brownies,

C or D

cookies, cupcakes, 
layer cakes, pies

Casseroles

C or D

Turkey

A

Preheating and Pan Placement

Preheat the oven if the recipe calls for it. 
Preheating is necessary for good results
when baking cakes, cookies, pastry and
breads. 

To preheat, set the oven at the correct
temperature. The control will beep when 
the oven is preheated and the display will 
show your set temperature. This will take
approximately 15–20 minutes.

Baking results will be better if baking
pans are centered in the oven as much 
as possible. If baking with more than one
pan, place the pans so each has at least 
1

″ 

to 1

1

2

″ 

of air space around it.

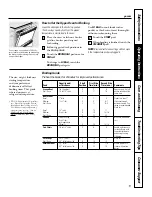
If baking four cake layers at the same time,
place two layers on rack B and two layers on
rack D. Stagger pans on the rack so one is
not directly above the other.

Using the oven.

Do not place foods directly on the
oven floor.

Aluminum Foil

Do not use aluminum foil on the bottom 
of the oven.

Never entirely cover a shelf with
aluminum foil. This will disturb the heat
circulation and result in poor baking.

A smaller sheet of foil may be used to
catch a spillover by placing it on a lower
shelf several inches below the food.

Summary of Contents for JBP81TLWW

Page 1: ...ions Clock and Timer 14 Oven 10 22 Broiling Broiling Guide 13 Controls 10 11 Sabbath Feature 17 18 Self Cleaning 21 22 Special Features 16 Thermostat 18 Timed Baking and Roasting 15 Warming Drawer 19...

Page 2: ...not there is a possible risk of the range tipping over and causing injury if you or a child stand sit or lean on an open door Please refer to the Anti Tip device information in this manual Failure to...

Page 3: ...the glass is broken Food splatter or cleaning solution may penetrate a broken control panel and create a risk of electrical shock Contact a qualified technician immediately should your glass control...

Page 4: ...and other linens a safe distance from your range Always keep wooden and plastic utensils and canned food a safe distance from your range Always keep combustible wall coverings curtains or drapes a saf...

Page 5: ...not place or store items that can melt or catch fire on the glass cooktop even when it is not being used Be careful when placing spoons or other stirring utensils on glass cooktop surface when it is i...

Page 6: ...apers If overheated they can catch on fire Do not leave paper products plastics canned food or combustible materials in the drawer Never leave jars or cans of fat drippings in or near your drawer Do n...

Page 7: ...s Operating Instructions Safety Instructions Operating Instructions Care and Cleaning Troubleshooting Tips Consumer Support Using the surface units ge com Throughout this manual features and appearanc...

Page 8: ...prevent burns from steam or heat use caution when canning Use recipes and procedures from reputable sources These are available from manufacturers such as Ball and Kerr and the Department of Agricult...

Page 9: ...t store heavy items above the cooktop If they drop onto the cooktop they can cause damage Do not use the surface as a cutting board DRAGGING SURFACE COOKING OFF CENTER Always place the pan in the cen...

Page 10: ...ched position Make sure the latch is moved to the right as far as it will go Touch the CLEAR OFF pad Allow the oven to cool for one hour Put the oven back into operation If the function error code rep...

Page 11: ...change the length of time for the self clean cycle at this point Glows when the oven is in the self clean cycle After the self clean cycle the light will turn off Unlatch the door CLEAR OFF Pad Touch...

Page 12: ...temperature the oven control will beep several times and the display will show the oven temperature To change the oven temperature during BAKE cycle touch the BAKE pad and then the or pads to get the...

Page 13: ...w that cooking it to only 140 F means some food poisoning organisms may survive Source Safe Food Book Your Kitchen Guide USDA Rev June 1985 If your range is connected to 208 volts rare steaks may be b...

Page 14: ...twice Touch the or pads If the or pads are not touched within one minute after you touch the CLOCK pad the display reverts to the original setting If this happens touch the CLOCK pad twice and reenter...

Page 15: ...with PrE if showing the oven temperature The oven will continue to cook for the programmed amount of time then turn off automatically Touch the CLEAR OFF pad to clear the display if necessary Remove t...

Page 16: ...and the Thermostat Adjustment feature are also Special Features but they are addressed separately in the following sections Special features of your oven control 12 Hour Shut Off With this feature sh...

Page 17: ...tep 7 To adjust the oven temperature touch the BAKE pad and tap the or pads to increase or decrease the temperature in 25 increments Touch the START ON pad When cooking is finished the display will ch...

Page 18: ...results with your old favorite recipes use margarine butter or stick spreads containing at least 70 vegetable oil Using the Sabbath Feature Designed for use on the Jewish Sabbath and Holidays on some...

Page 19: ...an excellent heat insulator and will trap heat beneath it This will upset the performance of the drawer and could damage the interior finish Allow approximately 25 minutes for the warming drawer to pr...

Page 20: ...CAUTION Do not keep food in the warming drawer for more than two hours Food Type Control Setting Bacon HI Breads LO Casserole MED Chicken fried HI Ham HI Muffins LO Pies LO Pizza HI Potatoes baked HI...

Page 21: ...yed replace it Wipe up any heavy spillovers on the oven bottom Make sure the oven light bulb cover is in place and the oven light is off IMPORTANT The health of some birds is extremely sensitive to th...

Page 22: ...with a damp cloth after the oven cools If white spots remain remove them with a soap filled scouring pad and rinse thoroughly with a vinegar and water mixture These deposits are usually a salt residue...

Page 23: ...moved for cleaning servicing or any reason be sure the anti tip device is reengaged properly when the range is replaced Failure to take this precaution could result in tipping of the range and cause i...

Page 24: ...e door Use soap and water to thoroughly clean the top sides and front of the oven door Rinse well You may also use a glass cleaner to clean the glass on the outside of the door Do not let water drip i...

Page 25: ...s Consumer Support Removable Warming Drawer Pan NOTE For models with an electric warming drawer before performing any adjustments cleaning or service disconnect the range electrical power supply at th...

Page 26: ...clear the guides Lower the front of the drawer and push back until it closes Stop guide Rail Oven Light Replacement CAUTION Before replacing your oven light bulb disconnect the electrical power to the...

Page 27: ...onal protection after all residue has been removed polish the entire surface with CERAMA BRYTE Ceramic Cooktop Cleaner and a paper towel The CERAMA BRYTE Ceramic Cooktop Scraper and all recommended su...

Page 28: ...rface These marks are removable using the CERAMA BRYTE Ceramic Cooktop Cleaner with the CERAMA BRYTE Cleaning Pad for Ceramic Cooktops If pots with a thin overlay of aluminum or copper are allowed to...

Page 29: ...es procedures Make sure bottoms of cookware are clean salt or sand were between before use and use cookware with smooth bottoms the cookware and the surface of the cooktop Cookware has been slid acros...

Page 30: ...gned for broiling for broiling In some areas the power Preheat the broil element for 10 minutes voltage may be low Broil for the longest period of time recommended in the Broiling Guide Oven temperatu...

Page 31: ...clean cycle to rid the room of smoke Wait until the light on the SELF CLEAN pad goes off Wipe up the excess soil and reset the clean cycle Oven door will not Oven too hot Allow the oven to cool below...

Page 32: ...d The clock is turned off See the Using the clock and timer section from showing in the display Display flashes Power failure Reset the clock Unable to get the Oven control pads were The BAKE and BROI...

Page 33: ...protection or you may request your money back on the remaining value of your contract No questions asked It s that simple Protect your refrigerator dishwasher washer and dryer range TV VCR and much mo...

Page 34: ...ere Complete and mail your Consumer Product Ownership Registration today Have the peace of mind of knowing we can contact you in the unlikely event of a safety modification After mailing the registrat...

Page 35: ...35 Notes ge com Safety Instructions Operating Instructions Care and Cleaning Troubleshooting Tips Consumer Support...

Page 36: ...36 Notes Consumer Support Troubleshooting Tips Care and Cleaning Operating Instructions Safety Instructions...

Page 37: ...37 Notes ge com Safety Instructions Operating Instructions Care and Cleaning Troubleshooting Tips Consumer Support...

Page 38: ...800 626 2002 during normal business hours Have your model number ready Tired of discolored shelves Wishing you had extra heavy duty oven shelves NOW AVAILABLE for your range GE s innovative self clean...

Page 39: ...If the product is located in an area where service by a GE Authorized Servicer is not available you may be responsible for a trip charge or you may be required to bring the product to an Authorized GE...

Page 40: ...ur warranty is still in effect You can purchase it on line anytime or call 800 626 2224 during normal business hours GE Consumer Home Services will still be there after your warranty expires Parts and...

Reviews: