background image

16

49-80764

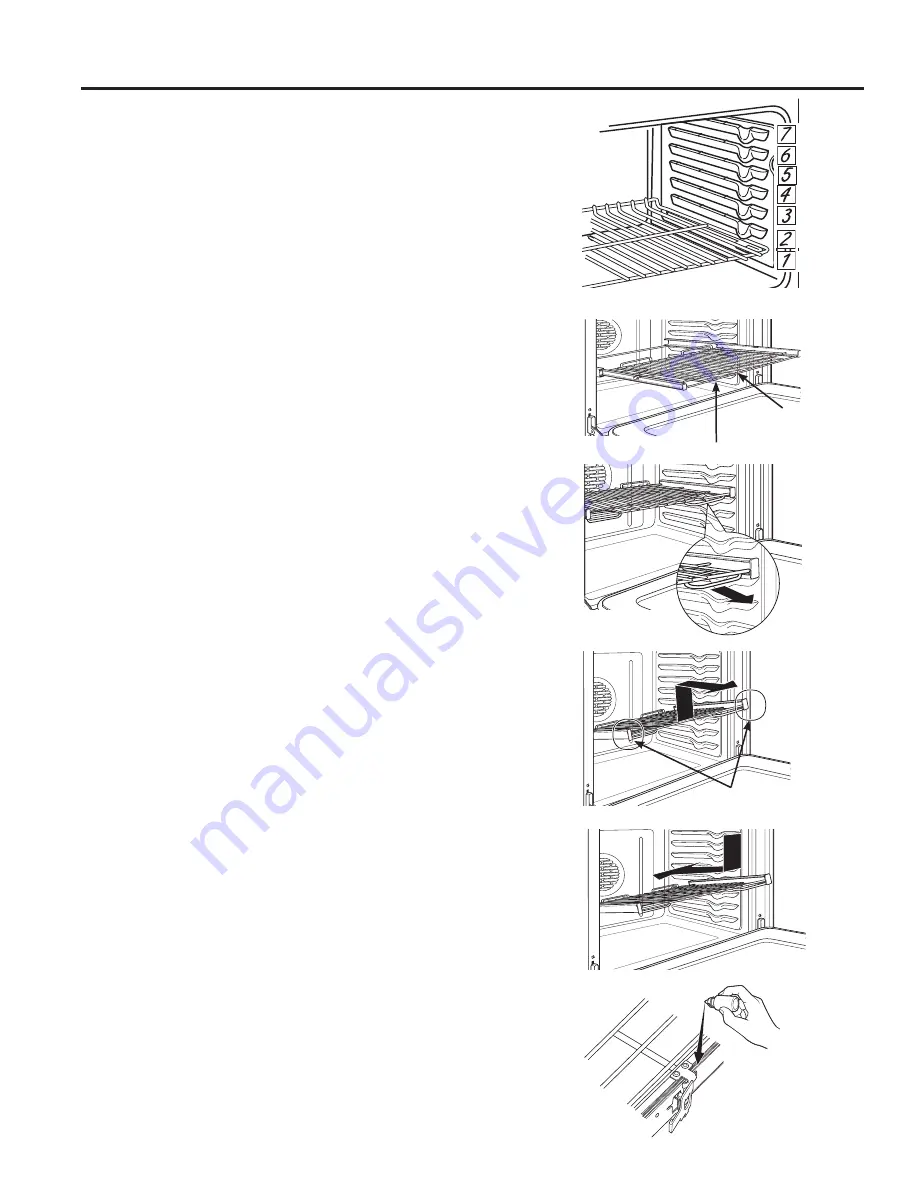
Recommended rack positions for various types of 
foods are provided in the Cooking Guide. Adjusting 
rack position is one way to impact cooking results. For 
example, if you would prefer darker tops on cakes, 
muffins, or cookies, try moving food one rack position 
higher. If you find foods are too brown on top try moving 
them down next time.

When baking with multiple pans and on multiple racks, 

HQVXUHWKHUHLVDWOHDVWòEHWZHHQSDQVWRDOORZ

sufficient space for air to flow.

<RXU2YHQPD\KDYHH[WHQVLRQUDFNVDQGRUWUDGLWLRQDO

flat racks.

To avoid possible burns, place the racks in the desired 
position before you turn the oven on.

Extension Racks

Always pull the rack out by its upper front rail to its fully 
open position, when placing or removing cookware.

If extension racks are difficult to extend, lubricate the 
racks with the graphite lubricant provided with your 
oven. Remove the rack from the oven, remove debris in 
the side tracks with a paper towel, shake the graphite 
lubricant and place 4 small drops on the two bottom 
tracks of the left and right sides. Open and close the 
rack several times to distribute the lubricant.

To order additional graphite lubricant, read the 
Assistance and Accessories section at the beginning of 
the manual.

To Remove An Extension Rack:

1.  Make sure the rack is pushed all the way into the 

oven so that side paddles on the rack disengage from 
the oven support.

2.  Slide the rack toward you to the bump (stop position) 

on the rack support.

3.  Firmly grasp both sides of the rack frame and the 

sliding rack, tilt the front end up and pull it out.

To Replace An Extension Rack:

1.  Firmly grasp both sides of the rack frame and the 

sliding rack.

2.  Place the curved end of the rack (stop-locks) onto the 

oven supports, tilt up the front of the rack and push it 
in as far as it will go.

If extension racks are difficult to replace or remove, wipe 
the oven rack supports with cooking oil. Do not wipe oil 
on the rack slides.

To Lubricate the Paddle:

Shake lubricant and apply to the moving parts of the 
paddle mechanisms as shown.

The number of rack positions may vary by model.

Upper Front 

Rail

Fully Open Position

Grasp here

USING THE RANGE:

 O

ven Racks

Oven Racks

Summary of Contents for JB860

Page 1: ...ven PB960 30 Free Standing Double Oven PB980 30 Free Standing Double Oven Owner s Manual Ranges Electric Free Standing Safety Information 2 Warranty 7 Assistance Accessories 8 Using The Range Surface Units Knob Models 9 Surface Units Knob Free Models 10 Surface Units All Models 11 Cookware for Radiant Glass Cooktop 12 Double Oven Controls 13 Special Features 14 Sabbath Mode 15 Oven Racks 16 Alumin...

Page 2: ...bracket See installation instructions shipped with the bracket for complete details before attempting to install For Free Standing and Slide In Ranges To check if the bracket is installed and engaged properly look underneath the range to see that the rear leveling leg is engaged in the bracket On some models the storage drawer or kick panel can be removed for easy inspection If visual inspection i...

Page 3: ...earby the surface units or any interior area of the oven allow sufficient time for cooling first Other surfaces of the appliance may become hot enough to cause burns Potentially hot surfaces include the cooktop areas facing the cooktop oven vent opening surfaces near the opening and crevices around the oven door Ŷ R QRW KHDW XQRSHQHG IRRG FRQWDLQHUV 3UHVVXUH could build up and the container could ...

Page 4: ...fire that may spread WR VXUURXQGLQJ FDELQHWV 8VH D GHHS IDW thermometer whenever possible to monitor oil temperature Ŷ To avoid oil spillover and fire use a minimum amount of oil when shallow pan frying and avoid cooking frozen foods with excessive amounts of ice Ŷ 8VH SURSHU SDQ VL H VHOHFW FRRNZDUH KDYLQJ flat bottoms large enough to cover the surface heating element The use of undersized cookwa...

Page 5: ...he product and risk of shock smoke or fire OVEN SAFETY INSTRUCTIONS WARNING SAVE THESE INSTRUCTIONS SAFETY INFORMATION Ŷ 8VH FDUH ZKHQ WRXFKLQJ WKH FRRNWRS 7KH JODVV surface of the cooktop will retain heat after the controls have been turned off Ŷ Do not cook on a broken cooktop If glass cooktop should break cleaning solutions and spillovers may penetrate the broken cooktop and create a risk of el...

Page 6: ...ly gray porcelain coated oven racks may be left in the oven Do not use self clean to clean other parts such as drip pans or bowls Ŷ HIRUH RSHUDWLQJ WKH VHOI FOHDQ F FOH ZLSH grease and food soils from the oven Excessive amount of grease may ignite leading to smoke damage to your home Ŷ I WKH VHOI FOHDQLQJ PRGH PDOIXQFWLRQV WXUQ WKH oven off and disconnect the power supply Have it serviced by a qua...

Page 7: ...ed after delivery Ŷ Product not accessible to provide required service Ŷ Service to repair or replace light bulbs except for LED lamps EXCLUSION OF IMPLIED WARRANTIES RXU VROH DQG H FOXVLYH UHPHG LV SURGXFW UHSDLU DV SURYLGHG LQ WKLV LPLWHG DUUDQW Q LPSOLHG ZDUUDQWLHV including the implied warranties of merchantability or fitness for a particular purpose are limited to one year or the shortest per...

Page 8: ...DQLQJ 3DGV IRU HUDPLF RRNWRSV 5 0 5 7 HUDPLF RRNWRS OHDQHU 5 0 5 7 HUDPLF RRNWRS 6FUDSHU LW LW LQFOXGHV FUHDP DQG FRRNWRS VFUDSHU 27 7KH ODUJH EURLOHU SDQ GRHV QRW ILW LQ UDQJHV 7KH EURLOHU SDQ GRHV QRW ILW LQ ZDOO RYHQV GURS LQV RU UDQJH Schedule Service Expert GE repair service is only one step away from your door Get on line and schedule your service at www geappliances com service_and_support ...

Page 9: ... temperatures below 140 F Ŷ OZD V VWDUW ZLWK KRW IRRG R QRW XVH ZDUP VHWWLQJ WR heat cold food Ŷ R QRW XVH ZDUP VHWWLQJ IRU PRUH WKDQ 2 hours The WARMING ZONE located in the back center of the glass surface will keep hot cooked food at serving temperature Always start with hot food Do not use to heat cold food Placing uncooked or cold food on the WARMING ZONE could result in foodborne illness Turn...

Page 10: ... Off pad Using the Warming Zone FOOD POISON HAZARD DFWHULD PD JURZ LQ IRRG DW WHPSHUDWXUHV EHORZ Ŷ OZD V VWDUW ZLWK KRW IRRG R QRW XVH ZDUP VHWWLQJ WR KHDW FROG IRRG Ŷ R QRW XVH ZDUP VHWWLQJ IRU PRUH WKDQ KRXUV To Use the Warming Zone 1 Touch the Warming Zone On Off pad 8VH WKH or pad to choose the desired Lo Med Hi setting To Turn Off the Warming Zone Touch the Warming Zone On Off pad WARNING Dua...

Page 11: ...in a short time NOTE On models with light colored glass cooktops it is normal for the cooking zones to change color when hot or cooling down This is temporary and will disappear as the glass cools to room temperature The surface unit will cycle on and off to maintain your selected control setting It is safe to place hot cookware on the glass surface even when the cooktop is cool Even after the sur...

Page 12: ...ermanent damage to cooktop glass The enamel can melt and bond to the ceramic cooktop Glass ceramic not recommended Poor performance Will scratch the surface Stoneware not recommended Poor performance May scratch the surface Cast Iron QRW UHFRPPHQGHG XQOHVV GHVLJQHG specifically for glass cooktops Poor conductivity and slow to absorb heat Will scratch the cooktop surface Check pans for flat bottoms...

Page 13: ... Start A Cook Time may also be programmed if desired Follow the directions under Cook Time for setting WKLV IHDWXUH 7KLV FDQ RQO EH XVHG ZLWK DNH RQYHFWLRQ DNH RQYHFWLRQ 5RDVW DQG 6HOI OHDQ NOTE When using the Delay Time feature foods WKDW VSRLO HDVLO VXFK DV PLON HJJV ILVK VWXIILQJV SRXOWU DQG SRUN VKRXOG QRW EH DOORZHG WR VLW IRU more than 1 hour before or after cooking Room temperature promotes...

Page 14: ...nd tonE This is the tone that signals the end of a timer The tone can be continuous Con bEEP or one repeating beep bEEP A continuous setting will continue to sound a tone until a button on the control is pressed Fahrenheit or Celsius Temperature Display dEg Unit The oven control is set to use Fahrenheit temperatures F but you can change it to use Celsius temperatures C Clock Configuration Cloc cFg...

Page 15: ...eset cooking temperature and press Start 2 Since no feedback is given during temperature change an oven thermometer can be used to confirm temperature changes Starting a Timed Bake 1 Press the Bake pad I WKH GHVLUHG WHPSHUDWXUH LV XVH WKH 6 through 0 number pads or the Lock Control pad to select a cooking time If a cooking temperature other WKDQ LV GHVLUHG XVH WKH 1 through 5 number pads or the Ti...

Page 16: ...t and place 4 small drops on the two bottom tracks of the left and right sides Open and close the rack several times to distribute the lubricant To order additional graphite lubricant read the Assistance and Accessories section at the beginning of the manual To Remove An Extension Rack 1 Make sure the rack is pushed all the way into the oven so that side paddles on the rack disengage from the oven...

Page 17: ...d cookies Glass and ceramic pans heat slowly but retain heat well These types of pans work well for dishes such as pies and custards Air insulated pans heat slowly and can reduce bottom browning Keep cookware clean to promote even heating CAUTION Do not use any type of foil or oven liner to cover the oven bottom These items can trap heat or melt resulting in damage to the product and risk of shock...

Page 18: ...d earlier than the recipe suggested time when using this mode or use a meat probe To use this mode press the Convection Roast pad enter a temperature and then press Start It is not necessary to preheat when using this mode Broiling Modes URLOLQJ LV DYDLODEOH LQ ERWK RYHQV RU EHWWHU EURLOLQJ the lower oven is recommended When broiling in the upper oven the door should remain CLOSED When broiling in...

Page 19: ...I EUHDGHG RU FRDWHG LQ VDXFH DYRLG URLO L PRGHV URLO VNLQ VLGH down first Watch food closely when broiling For best performance when broiling center food below the broil heating element URLO R DNH 2 or 3 RQHOHVV FKLFNHQ EUHDVWV URLO R DNH 2 or 3 Move food down for more doneness less searing and up for greater searing browning when broiling For best performance when broiling center food below the b...

Page 20: ...DNH 1 For best performance when broiling center food below the broil heating element Fish URLO R 1 Watch food closely when broiling For best performance center food below the broil heating element Frozen Convenience Foods Pizza potato products chicken nuggets appetizers on a Single Rack DNH 1 8VH VKLQ FRRNZDUH Upper Oven for Double Oven Models USING THE RANGE Cooking Guide Cooking Guide Cont NOTE ...

Page 21: ...cleaning surfaces make sure that they are at room temperature and not in direct sunlight If stain on the door vent trim is persistent use a mild abrasive cleaner and a sponge scrubber for best results Spillage of marinades fruit juices tomato sauces and basting liquids containing acids may cause discoloration and should be wiped up immediately Let hot surfaces cool then clean and rinse Painted Sur...

Page 22: ...g a ventilation fan or hood during the first self clean cycle Soil on the front frame of the range and outside the gasket on the door will need to be cleaned by hand Clean these areas with hot water soap filled steel wool pads or cleansers such as Soft Scrub Rinse well with clean water and dry Do not clean the gasket The fiberglass material of the oven door gasket cannot withstand abrasion It is e...

Page 23: ...ooktop Cleaner on the entire burned residue area 8VLQJ WKH LQFOXGHG 5 0 5 7 Cleaning Pad for Ceramic Cooktops rub the residue area applying pressure as needed 4 If any residue remains repeat the steps listed above as needed RU DGGLWLRQDO SURWHFWLRQ DIWHU DOO UHVLGXH KDV EHHQ removed polish the entire surface with CERAMA 5 7 Ceramic Cooktop Cleaner and a paper towel Heavy Burned On Residue 1 Allow ...

Page 24: ...ing of the surface of your cooktop not covered by the warranty unless the spill is removed while still hot Special care should be taken when removing hot substances H VXUH WR XVH D QHZ VKDUS UD RU VFUDSHU Do not use a dull or nicked blade 1 Turn off all surface units Remove hot pans 2 Wearing an oven mitt D 8VH D VLQJOH HGJH UD RU EODGH VFUDSHU 5 0 5 7 Ceramic Cooktop Scraper to move the spill to ...

Page 25: ... JORYHV RU D GU FORWK UHPRYH WKH EXOE IURP LWV packaging Do not touch the bulb with bare fingers Oil from skin will damage the bulb and shorten its life 3 Push the bulb straight into the receptacle all the way 4 Place the tabs of the glass cover into the grooves of the socket Turn the glass cover clockwise 1 4 turn For improved lighting inside the oven clean the glass cover frequently using a wet ...

Page 26: ...ame of the oven cavity to the locked position ORVH WKH RYHQ GRRU Lift Off Upper Oven Door To remove the door 1 Fully open the door 2 Lift up on the hinge lock toward the oven frame until they stop ORVH WKH GRRU WR GHJUHHV RX ZLOO IHHO WKH GRRU stop The hinge lock will contact the oven frame 4 On both sides of the door press down on the release buttons on each hinge LIW GRRU XS XQWLO LW LV FOHDU RI...

Page 27: ...49 80764 27 Notes ...

Page 28: ...28 49 80764 Notes ...

Page 29: ...49 80764 29 Notes ...

Page 30: ... a model with a light colored cooktop This is normal The surface may appear discolored when it is hot This is temporary and will disappear as the glass cools Plastic melted to the surface Hot cooktop came into contact with plastic placed on the hot cooktop 6HH WKH ODVV VXUIDFH SRWHQWLDO IRU SHUPDQHQW GDPDJH section in the Cleaning the glass cooktop section Pitting or indentation of the cooktop Hot...

Page 31: ...ugged into a live properly grounded outlet Oven controls improperly set 6HH WKH 8VLQJ WKH NLWFKHQ WLPHU VHFWLRQ Oven door is crooked The door is out of position HFDXVH WKH RYHQ GRRU LV UHPRYDEOH LW VRPHWLPHV JHWV out of position during installation To straighten the door re install the door See the Lift Off Oven Door instructions in the Care and Cleaning section Oven light does not work Light bulb...

Page 32: ...glass appears to be tinted or have a rainbow color Is this defective No The inner oven glass is coated with a heat barrier to reflect the heat back into the oven to prevent heat loss and keep the outer door cool while baking 7KLV LV QRUPDO 8QGHU FHUWDLQ OLJKW RU DQJOHV RX PD VHH this tint or rainbow color Sometimes the oven takes longer to preheat to the same temperature Cookware or food in oven T...

Page 33: ...cia Accesorios 8 Uso de la Cocina Unidades de superficie Modelos con Perillas 9 Unidades de superficie Modelos sin Perillas 10 Unidades de superficie Todos los Modelos 11 Utensilios para Placa de Cocción de Vidrio Radiante 12 Controles del Horno Doble 13 Funciones Especiales 14 Modo Sabático 15 Estantes del Horno 16 Papel de Aluminio y Cobertores del Horno 17 Utensilios 17 Modos de Cocción 18 Guía...

Page 34: ...tes de iniciar la instalación Para Cocinas Sin Apoyo y Deslizabless Para controlar si el soporte es instalado y ajustado de forma apropiada mire que debajo de la cocina la pata niveladora trasera esté ajustada al soporte En algunos modelos el cajón de almacenamiento o el panel de protección se pueden retirar para una fácil inspección Si no es posible realizar una inspección visual deslice la cocin...

Page 35: ... KRUQR GHMH SDVDU XQ WLHPSR SUXGHQFLDO para que se enfríen Otras superficies del aparato pueden calentarse lo suficiente como para provocar quemaduras Las superficies potencialmente calientes incluyen la estufa las áreas orientadas hacia la estufa la abertura de ventilación del horno las superficies cercanas a la abertura y las hendiduras ubicadas alrededor de la puerta del horno Ŷ 1R FDOLHQWH UHF...

Page 36: ...ea posible para controlar la temperatura del aceite Ŷ 3DUD HYLWDU HO GHUUDPH GH DFHLWH XQ LQFHQGLR XWLOLFH una cantidad mínima de aceite cuando fría en sartenes poco profundas y evite la cocción de alimentos congelados con una cantidad excesiva de hielo Ŷ 8WLOLFH HO WDPDxR GH UHFLSLHQWH DGHFXDGR OLMD recipientes con bases planas lo suficientemente grandes para cubrir el elemento calentador de supe...

Page 37: ...onando daños sobre el producto y el riesgo de descargas humo o incendios INSTRUCCIONES DE SEGURIDAD DEL HORNO INSTRUCCIONES DE SEGURIDAD DE LA ESTUFA RADIANTE SAFETY INFORMATION Ŷ Tenga cuidado al tocar la estufa La superficie de vidrio de la estufa retendrá calor después de que los controles se hayan apagado Ŷ No cocine sobre una estufa rota Si la estufa se rompe las soluciones de limpieza y los ...

Page 38: ...o ollas de goteo o recipientes Ŷ Antes de utilizar el ciclo de limpieza automática limpie la grasa y restos de comida que haya en el horno 8QD FDQWLGDG H FHVLYD GH JUDVD VH SXHGH LQFHQGLDU OR cual puede producir daños con humo en su hogar Ŷ Si el modo de limpieza automática funciona de forma incorrecta apague el horno y desconecte el suministro de corriente Solicite el servicio de un técnico calif...

Page 39: ...ntales o consecuentes causados por posibles defectos sobre este producto Ŷ Daño causado después de la entrega Ŷ Producto no accesible para brindar el servicio requerido Ŷ Solicite el servicio técnico para reparar o reemplazar las lámparas excepto las lámparas LED EXCLUSIÓN DE GARANTÍAS IMPLÍCITAS 6X QLFD H FOXVLYD DOWHUQDWLYD HV OD UHSDUDFLyQ GHO SURGXFWR FRPR VH LQGLFD HQ OD DUDQWtD LPLWDGD DV JD...

Page 40: ...Limpiador de la Placa de Cocción de Cerámica CERAMA BRYTE Espátula para Placa de Cocción Cerámica CERAMA BRYTE LW HO NLW LQFOX H FUHPD HVSiWXOD SDUD SODFD GH FRFFLyQ 27 D ROOD SDUD DVDU JUDQGH QR HQWUD HQ FRFLQDV GH D ROOD QR HQWUD HQ KRUQRV GH SDUHG GH HPSRWUDEOHV GH R FRFLQDV GH Servicio Programado El servicio de reparación de expertos de GE está a sólo un paso de su puerta Entre a Internet y pr...

Page 41: ...ría Ŷ 1R XVH OD FRQILJXUDFLyQ FDOLHQWH GXUDQWH PiV GH KRUDV WARMING ZONE Área para Calentar ubicada en la parte central trasera de la superficie de vidrio mantendrá la comida caliente y cocida a la temperatura para servir Siempre comience con comida caliente No use la función para calentar comida fría Colocar comida que no está cocinada o fría en el WARMING ZONE Área para Calentar podría producir ...

Page 42: ...O CON COMIDA Se pueden desarrollar bacterias cuando OD FRPLGD HVWp D XQD WHPSHUDWXUD LQIHULRU D ORV Ŷ 6LHPSUH FRPLHQFH FRQ FRPLGD FDOLHQWH 1R XVH OD FRQILJXUDFLyQ FDOLHQWH SDUD FDOHQWDU FRPLGD IUtD Ŷ 1R XVH OD FRQILJXUDFLyQ 50 DOHQWDU GXUDQWH PiV GH KRUDV Para usar la función Warming Zone Área para Calentar 1 Presione la tecla Warming Zone On Off Encendido Apagado del Área para Calentar 8VH OD WHF...

Page 43: ...color claro es normal que las zonas de cocción cambien de color cuando están calientes o enfriándose Esto es temporal y desaparecerá a medida que el vidrio se enfríe a temperatura ambiente La unidad superficial seguirá un ciclo de encendido y apagado para mantener su configuración de control seleccionada Es seguro colocar utensilios calientes en la superficie de vidrio incluso cuando la estufa est...

Page 44: ...provocar daños permanentes al vidrio de las estufas El esmalte puede derretirse y adherirse a la estufa cerámica Vidrio cerámico No se recomienda Desempeño pobre Raya la superficie Cerámica No se recomienda Desempeño pobre Puede rayar la superficie Hierro fundido No se recomienda a menos que se encuentre específicamente diseñado para estufas de vidrio Pobre conductividad y lentitud para absorber e...

Page 45: ...horno se encienda y presione Start Iniciar Presione el modo de cocción deseado y la temperatura y luego presione Start Iniciar Si lo desea también puede ser programado un tiempo de cocción Siga las instrucciones de Cook Time Tiempo de Cocción para configurar esta función Esto sólo puede ser usado con DNH RUQHDU RQYHFWLRQ DNH RUQHDU SRU RQYHFFLyQ Convection Roast Dorar por Convección y Self Clean L...

Page 46: ...End tonE Se trata de un tono que indica la finalización de un temporizador El tono puede ser continuo bEEP Cont o un SLWLGR UHSHWLGR E 3 8QD FRQILJXUDFLyQ FRQWLQXD VHJXLUi haciendo que un tono suene hasta que un botón del control sea presionado Selección de Temperatura Fahrenheit o Celsius dEg Unit El control del horno está configurado para su uso con temperaturas Fahrenheit F pero lo puede modifi...

Page 47: ...nte y presione Start Iniciar 2 Debido a que no hay ninguna indicación durante el cambio de temperatura se puede usar un termómetro para horno para confirmar los cambios de temperatura Inicie un Horneado por Tiempo 1 Presione la tecla Bake Hornear 6L OD WHPSHUDWXUD GHVHDGD HV GH XVH ODV WHFODV numéricas de 6 a 0 o la tecla Lock Control Control de Bloqueo para seleccionar un tiempo de cocción Si se ...

Page 48: ...agite el lubricante de grafito FRORTXH JRWLWDV HQ ORV GRV UHFRUULGRV LQIHULRUHV GH ORV ODGRV izquierdo y derecho Abra y cierre el estante varias veces para distribuir el lubricante Para ordenar más lubricante de grafito lea la sección de Asistencia y Accesorios en el comienzo de este manual Para Retirar un Estante Extensible VHJ UHVH GH LQWURGXFLU OD SDUULOOD KDVWD HO IRQGR GHO KRUQR de modo que l...

Page 49: ...erámica calientan con lentitud pero retienen bien el calor Estos tipos de ollas funcionan bien con platos tales como tartas y postres con natilla Las ollas con aislante de aire calientan lentamente y pueden producir fondos dorados Mantenga los utensilios limpios para una cocción más pareja PRECAUCIÓN No use ningún tipo de aluminio o cobertor de horno para cubrir el fondo del horno Estos ítems pued...

Page 50: ...nda controle la comida antes que el tiempo sugerido en la receta Para usar este modo presione la tecla Convection Bake Hornear por Convección ingrese una temperatura y luego presione Start Iniciar No es necesario realizar el precalentamiento al usar este modo Modo para Asar La función para asar está disponible en ambos hornos Para una mayor calidad al asar se recomienda el horno inferior Al asar e...

Page 51: ...on salsa evite los modos URLO L VDU OWR VH GHO ODGR GH OD SLHO KDFLD DEDMR primero Preste atención a la comida al asarla Para un mejor rendimiento centre la comida debajo del elemento calentador para asar Asado Bajo RUQHDU R Pechugas de pollo deshuesadas Asado Bajo RUQHDU R Mueva la comida más abajo para que quede más preparada y menos soasada y más arriba para que quede más soasada y dorada al as...

Page 52: ...e la comida debajo del elemento calentador para asar Pescado Asado Bajo 1 Preste atención a la comida al asarla Para un mejor rendimiento centre la comida debajo del elemento calentador para asar Comidas Congeladas a Conveniencia Pizza productos con papas patitas de pollo fritas aperitivos en un Solo Estante RUQHDU 1 8VH XWHQVLOLRV EULOODQWHV Horno Superior en Modelos con Horno Doble USO DE LA COC...

Page 53: ...fuera del contacto con la luz solar Si las manchas en el borde de la ventana de la puerta son persistentes use un limpiador abrasivo suave o una esponja con estropajo para obtener un mejor resultado El derrame de adobo jugos de fruta salsas de tomate y líquidos para humedecer que contengan ácidos pueden ocasionar descoloración y se deberán limpiar de inmediato Deje que las superficies calientes se...

Page 54: ...o campana durante el primer ciclo de auto limpieza La suciedad ubicada en el marco frontal de la cocina y fuera de la junta de la puerta deberá limpiarse a mano Limpie estas áreas con agua caliente esponjillas de lana de acero embebidas en jabón o limpiadores tales como Soft Scrub Enjuague bien con agua limpia y seque No limpie la junta El material de fibra de vidrio de la junta de la puerta del h...

Page 55: ...duos pegados 8WLOL DQGR HO SDxR GH OLPSLH D 5 0 5 7 para estufas cerámicas incluido frote el área sucia aplicando SUHVLyQ VHJ Q VHD QHFHVDULR 6L TXHGDQ UHVWRV UHSLWD ORV SDVRV LQGLFDGRV FRQ anterioridad 3DUD SURWHFFLyQ DGLFLRQDO GHVSXpV GH KDEHU TXLWDGR WRGRV los restos pula toda la superficie con limpiador de estufas cerámicas CERAMA BRYTE y una toalla de papel Residuos pegados rebeldes 1 Deje en...

Page 56: ...sticos derretidos pueden marcar la superficie de la estufa no cubierto por la garantía a menos que el derrame se quite mientras está caliente Debe tenerse mucho cuidado al remover sustancias calientes VHJ UHVH GH XWLOL DU XQ UDVSDGRU QXHYR DILODGR No utilice hojas desafiladas o dañadas 1 Apague todas las unidades de superficie Quite las ollas calientes 8WLOL DQGR XQ JXDQWH GH FRFLQD D 8VH XQ UDVSD...

Page 57: ...OWD Para una mejor iluminación dentro del horno limpie frecuentemente la cubierta de vidrio utilizando un paño K PHGR VWR GHEHUtD KDFHUVH FXDQGR HO KRUQR HVWi completamente frío RQHFWH QXHYDPHQWH HO VXPLQLVWUR HOpFWULFR DO KRUQR CUIDADO Y LIMPIEZA Mantenimiento Use guantes o un paño Receptáculo Bombilla de G9 Portalámpara Lengüeta Cubierta de vidrio Receptáculo en algunas modelos Reemplazo de la b...

Page 58: ...nimiento Mantenimiento Continúa Posición de retiro Bloqueo de la bisagra Ranura Empuje los bloqueos de la bisagra hacia abajo para desbloquear Extremo inferior de la ranura Bloqueo de la bisagra Brazo de la bisagra Hendidura Empuje el bloqueo de la bisagra hacia arriba hasta que quede bloqueado Brazo de la bisagra Puerta del horno superior desmontable Para quitar la puerta 1 Abra la puerta por com...

Page 59: ...49 80764 27 Notas ...

Page 60: ...28 49 80764 Notas ...

Page 61: ...49 80764 29 Notas ...

Page 62: ... a medida que se enfría el vidrio Plástico derretido sobre la superficie La estufa caliente entró en contacto con plástico colocado sobre la misma Ver la sección Superficie de vidrio posibilidades de daño permanente en la sección Cómo limpiar la estufa de vidrio Marcas o hendiduras en la estufa Se ha derramado una mezcla azucarada caliente en la estufa Llame a un técnico calificado para el reempla...

Page 63: ... el temporizador de cocina La puerta del horno alineada La puerta no está bien Dado que la puerta del horno es desmontable a veces está torcida se desequilibra durante la instalación Para alinear la puerta vuelva a instalar la misma Consulte las instrucciones sobre Cómo Retirar la Puerta del RUQR HQ OD VHFFLyQ XLGDGR LPSLH D La luz del horno no funciona La lámpara está floja o presenta defectos Aj...

Page 64: ... vidrio del horno parece estar teñida o tener un color arcoíris Es esto un defecto No El vidrio del horno interno está cubierto con una barrera de calor que refleja este último nuevamente hacia el horno a fin de evitar la pérdida de calor y de mantener fría la puerta externa mientras se hornea Esto es normal Bajo ciertas luces y ángulos es posible que visualice esta tinta o arcoíris A veces el hor...

Reviews: