Customer Ser
vice
Tr
oubleshooting T
ips
Operating Instr
uctions
Safety Instr
uctions
Installation Instr
uctions
Customer Ser
vice
Tr
oubleshooting T
ips
Installation Instr
uctions
Safety Instr
uctions
Operating Instr
uctions
Customer Ser
vice
Tr
oubleshooting T
ips
Installation Instr
uctions
Safety Instr
uctions
Operating Instr
uctions
Preparing to install the freezer.
Read these instructions completely and carefully.
Freezer Location
Your freezer should be conveniently located for
day-to-day use in a dry, well-ventilated room.
Be sure to install your freezer on a floor strong
enough to support it when it is fully loaded.
The freezer must be solidly positioned on the floor if
it is to function at its best. Shims may be used to
accomplish this wherever the floor is too uneven. If
the place selected for the freezer is damp or moist,
place 2 X 4’s (51 mm X 102 mm) under its entire
length to assure adequate support.
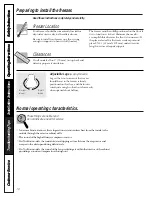
Clearances
On all models, allow 3
²
(76 mm) on top, back and
sides for proper air circulation.
Adjustable Legs
(on Upright models)
Legs at the front corners of the freezer
should be set so the freezer is firmly
positioned on the floor, and the front is
raised just enough so the door closes easily
when opened about halfway.
Turn right
to lower
Turn left
to raise
Normal operating characteristics.
These things are normal and
do not indicate a need for service.
■
A warm cabinet exterior as the refrigeration system transfers heat from the inside to the
outside through the exterior cabinet walls.
■
The sound of the high-efficiency compressor motor.
■
On No-Frost models, the sound of water dripping as it melts from the evaporator and
escapes to the drain pan during defrost cycle.
■
On No-Frost models, the sound of the fan circulating air within the interior of the cabinet
providing a consistent temperature throughout.
10


