background image

Installation Instructions

12

WARNING

• Never terminate the exhaust into a common duct

with a kitchen exhaust system. A combination of
grease and lint creates a potential fire hazard.

• Do not use duct longer that specified in the exhaust

length table. Longer ducts can accumulate lint,
creating a potential fire hazard.

• Never install a screen in or over the exhaust duct.

This will cause lint to accumulate, creating a potential
fire hazard.

• Do not assemble ductwork with any fasteners that

extend into the duct. These fasteners can accumulate
lint, creating a potential fire hazard.

• Do not obstruct incoming or exhausted air.
• Provide an access for inspection and cleaning of the

exhaust system, especially at turns and joints. Exhaust
system shall be inspected and cleaned at least once 
a year.

EXHAUST SYSTEM CHECKLIST

HOOD OR WALL CAP

• Terminate in a manner to prevent back drafts or entry

of birds or other wildlife.

• Termination should present minimal resistance to 

the exhaust airflow and should require little or no
maintenance to prevent clogging.

• Never install a screen in or over the exhaust duct.
• Wall caps must be installed at least 12

above ground

level or any other obstruction with the opening 
pointed down.

SEPARATION OF TURNS

• For best performance, separate all turns by at least 

4 ft. of straight duct, including distance between last
turn and dampened wall cap. 

SEALING OF JOINTS

• All joints should be tight to avoid leaks. The male end

of each section of duct must point away from the dryer.

• Do not assemble the ductwork with fasteners that

extend into the duct. They will serve as a collection
point for lint.

• Duct joints should be made air- and moisture-tight 

by wrapping the overlapped joints with duct tape 
or aluminum tape.

• Horizontal runs should slope down towards the

outdoors 1/4

per foot.

INSULATION

• Ductwork that runs through an unheated area or is

near air conditioning should be insulated to reduce
condensation and lint buildup.

WARNING 

To reduce the risk of fire 

or personal injury:

• This clothes dryer must be exhausted to the outdoors.
• Use only 4" rigid metal ducting for the home exhaust

duct.

• Use only 4" rigid metal or UL-listed flexible metal (semi-

rigid or foil-type) duct to connect the dryer to the home
exhaust duct. It must be installed in accordance with the
instructions found in "Connecting The Dryer To House
Vent" on this page.

• Do not terminate exhaust in a chimney, a wall, a ceiling,

gas vent, crawl space, attic, under an enclosed floor, or 
in any other concealed space of a building.

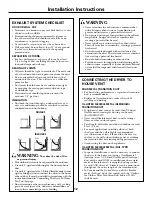
Correct

Incorrect

Do

Don’t

Don’t

Don’t

CONNECTING THE DRYER TO 
HOUSE VENT

RIGID METAL TRANSITION DUCT

• For best drying performance, a rigid metal transition

duct is recommended.

• Rigid metal transition ducts reduce the risk of 

crushing and kinking.

UL-LISTED FLEXIBLE METAL (SEMI-RIGID) 
TRANSITION DUCT

• If rigid metal duct cannot be used, then UL-listed

flexible metal (semi-rigid) ducting can be used 
(Kit WX08X10077).

• Never install flexible metal duct in walls, ceilings, 

floors or other enclosed spaces.

• Total length of flexible metal duct should not exceed 

8 feet (2.4 m).

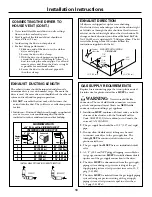
• For many applications, installing elbows at both 

the dryer and the wall is highly recommended 
(see illustrations at left). Elbows allow the dryer to 
sit close to the wall without kinking and/or crushing 
the transition duct, maximizing drying performance.

• Avoid resting the duct on sharp objects.

UL-LISTED FLEXIBLE METAL (FOIL-TYPE) 
TRANSITION DUCT

• In special installations, it may be necessary to connect

the dryer to the house vent using a flexible metal 
(foil-type) duct. A UL-listed flexible metal (foil-type)
duct may be used ONLY in installations where rigid
metal or flexible metal (semi-rigid) ducting cannot 
be used AND where a 4" diameter can be maintained
throughout the entire length of the transition duct.

• In Canada and the United States, only the flexible

metal (foil-type) ducts that comply with the “Outline
for Clothes Dryer Transition Duct Subject 2158A” 
shall be used.

Summary of Contents for DSXH43EF

Page 1: ...sting the Dryer 12 13 Gas Connection for Gas Dryer 18 Gas Supply Requirements 13 Location of Your Dryer 14 Mobile Home Installation 15 Preparing to Install Your Dryer 9 10 Reversing the Door Swing 20...

Page 2: ...tion of natural gas or LP fuels Properly adjusted dryers will minimize incomplete combustion Exposure to these substances can be minimized further by properly venting the dryer to the outdoors WARNING...

Page 3: ...outside Use only rigid metal 4 diameter ductwork inside the dryer cabinet Use only rigid metal or flexible metal 4 diameter ductwork for exhausting to the outside USE OF PLASTIC OR OTHER COMBUSTIBLE...

Page 4: ...t not be placed in or near the dryer until solvents or flammable materials have been removed There are many highly flammable items used in homes such as acetone denatured alcohol gasoline kerosene som...

Page 5: ...se any type of spray cleaner when cleaning dryer interior Hazardous fumes or electrical shock could occur If yours is a gas dryer it is equipped with an automatic electric ignition and does not have a...

Page 6: ...ome models EASY CARE For wrinkle free permanent press and delicate items and knits For most loads select the PERM PRESS Optimum Dry setting on some models DELICATES For delicates and special care fabr...

Page 7: ...located above the dryer door opening Before replacing the light bulb be sure to unplug the dryer power cord or disconnect the dryer at the household distribution panel by removing the fuse or switchi...

Page 8: ...in the screen restricts air flow which causes longer drying times The screen is located at the bottom of the door opening Remove by pulling straight up Remove the lint and replace the screen A waxy b...

Page 9: ...gid metal ducting for exhausting the clothes dryer to the outdoors DO NOT install a clothes dryer with flexible plastic ducting materials If flexible metal semi rigid or foil type duct is installed it...

Page 10: ...e the Owner s Manual and the Installation Instructions in a location where they will be noticed by the owner Installation Instructions TOOLS AND MATERIALS YOU WILL NEED Phillips head screwdriver Adjus...

Page 11: ...lectric shock or personal injury DO NOT USE AN EXTENSION CORD OR AN ADAPTER PLUG WITH THIS APPLIANCE DO NOT UNDER ANY CIRCUMSTANCES CUT OR REMOVE THE THIRD GROUNDING PRONG FROM THE POWER CORD This dry...

Page 12: ...conditioning should be insulated to reduce condensation and lint buildup WARNING To reduce the risk of fire or personal injury This clothes dryer must be exhausted to the outdoors Use only 4 rigid met...

Page 13: ...onnectors The use of old flexible connectors can cause gas leaks and personal injury Always use NEW flexible connectors when installing a gas appliance 1 Installation MUST conform with local codes or...

Page 14: ...ntilation DO NOT INSTALL YOUR DRYER IN A CLOSET WITH A SOLID DOOR 4 Closet doors must be louvered or otherwise ventilated and must contain a minimum of 60 sq in of open area equally distributed If the...

Page 15: ...me Installation Kit Pub No 14 D346 33 5 See the Exhaust System Checklist section for other important venting information 6 Installation MUST conform to current Manufactured Home Construction Safety St...

Page 16: ...esult in a risk of electric shock Check with a licensed electrician if you are in doubt as to whether the appliance is properly grounded The dryer MUST be grounded In the event of a malfunction or bre...

Page 17: ...requires that new construction non existing utilize a 4 wire connection to an electric dryer In Canada a 4 wire power supply cord is installed on the dryer 1 Remove the screws securing the terminal b...

Page 18: ...yer THE DRYER MUST BE LEVEL AND RESTING SOLIDLY ON ALL FOUR LEGS 4 Plug the power cord into a grounded outlet NOTE Check to ensure the power is off at circuit breaker fuse box before plugging the powe...

Page 19: ...HE DRYER Phillips head screwdriver Channel lock adjustable pliers MOUNTING THE DRYER TO THE WASHER The numbers in the illustration correspond to steps 1 Remove the washer top panel by first removing t...

Page 20: ...gs Be careful not to scratch the paint 2 Remove the four screws that secure the door hinges to the dryer front panel NOTE Remove 1 screw from each of the 2 hinges first Hold the door firmly before rem...

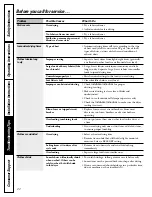
Page 21: ...when utility or there has been a utility service is restored interruption of natural gas gas models Dryer shakes or makes Some shaking noise is normal Move dryer to an even floor space or adjust noise...

Page 22: ...obstructed Check to see if outside wall damper operates easily Check the Installation Instructions to make sure the dryer venting is correct Blown fuses or tripped circuit Replace fuses or reset circu...

Page 23: ...23 Consumer Support Troubleshooting Tips Operating Instructions Safety Instructions Installation Instructions Notes...

Page 24: ...alls to your home Some states do not allow the exclusion or limitation of incidental or consequential damages This warranty gives you specific legal rights and you may also have other rights which var...

Page 25: ...ials or workmanship During this From the date of the limited one year warranty Mabe will also provide free of charge all labor and related service original purchase costs to replace the defective part...

Page 26: ...n purchase it on line anytime or call 800 626 2224 during normal business hours GE Consumer Home Services will still be there after your warranty expires In Canada call 1 888 261 2133 Parts and Access...

Page 27: ...en 8 Directives d installation 9 21 Installations lectriques pour s cheuses lectrique 17 18 Installations lectriques 11 vacuation 12 13 Raccord au gaz pour s cheuses gaz 19 Exigences alimentation en g...

Page 28: ...compl te Pour r duire au minimum l exposition ces substances faites vacuer l air de la s cheuse l ext rieur AVERTISSEMENT Pour votre s curit suivez les directives fournies dans le pr sent manuel afin...

Page 29: ...4 po de diam tre l int rieur de la carrosserie de la s cheuse Vous devez uniquement utiliser un conduit en m tal rigide ou souple de 4 po de diam tre pour l vacuation de l air vers l ext rieur L UTIL...

Page 30: ...toyage des vadrouilles des serviettes utilis es dans les salons de coiffure etc moins qu ils aient t d barrass s de toute trace et de toute vapeur de substance inflammable On utilise la maison de nomb...

Page 31: ...s nettoyez l int rieur de la s cheuse Des manations dangereuses ou un choc lectrique peuvent survenir Si votre s cheuse fonctionne au gaz elle est pourvue d un syst me d allumage lectrique automatique...

Page 32: ...DRY moins sec pour les tissus plus l gers Le programme TIMED DRY s chage minut fonctionne pour une dur e choisie COTTONS cotons Pour les cotons et la plupart des articles en lin Pour la plupart des br...

Page 33: ...teur de programme la position OFF ne coupe PAS l alimentation lectrique de l appareil La lampe du tambour est situ e au dessus de l ouverture de chargement de la s cheuse Avant de remplacer la lampe a...

Page 34: ...s cher les v tements normalement Les dommages caus s votre s cheuse par ces produits ne sont pas couverts par votre garantie Filtre charpie Nettoyez le filtre charpie avant chaque utilisation L accumu...

Page 35: ...de laisser ces directives avec le client Le Code national du gaz des U restreint l installation d appareils utilisant le gaz dans les garages Ils doivent se trouver 18 po 45 7 cm du sol et prot g s de...

Page 36: ...ent Coussinage mousse d exp dition Arri re de la s cheuse Mat riel et outillage n cessaires Tournevis Phillips Pinces r glables pour r gler les pattes de r glage Niveau bulle Tournevis plat ou droit p...

Page 37: ...endie de chocs lectriques ou de blessure N UTILISEZ PAS DE RALLONGE LECTRIQUE OU DE FICHE D ADAPTATION AVEC CET APPAREIL IL NE FAUT JAMAIS COUPER OU ENLEVER LA BROCHE DE MISE LA TERRE DU CORDON D ALIM...

Page 38: ...vacuation surtout aux coudes et aux joints Le syst me d vacuation doit tre inspect et nettoy au moins une fois par ann e LISTE DE V RIFICATION DU SYST ME D VACUATION VENT MURAL Terminez le conduit de...

Page 39: ...ent le risque d crasement et de d formation du conduit CONDUIT M TALLIQUE FLEXIBLE SEMI RIGIDE DE TRANSITION LIST PAR UL Si un conduit m tallique rigide ne peut tre utilis un conduit m tallique flexib...

Page 40: ...permettent un tube m tallique souple peut tre utilis pour relier votre s cheuse au tuyau d alimentation de gaz Le tube DOIT tre en acier inoxydable ou enrob de mati re plastique 4 Le tuyau d alimentat...

Page 41: ...b n ficier d un espace pour la ventilation N INSTALLEZ PAS VOTRE S CHEUSE DANS UN PLACARD MUNI D UNE PORTE PLEINE 4 Les portes du placard doivent avoir des persiennes ou tre autrement ventil es et do...

Page 42: ...n Kit Pub N 14 D346 33 5 Veuillez vous r f rer la section Liste de v rification du syst me d vacuation pour d autres renseignements importants concernant l vacuation de l air 6 L installation DOIT res...

Page 43: ...de l quipement peut pr senter des risques de chocs lectriques Dans le doute demandez un lectricien agr de v rifier si votre appareil est correctement mis la terre La s cheuse DOIT tre mise la terre Da...

Page 44: ...que les nouvelles constructions non existantes utilisent une connexion quatre fils pour une s cheuse lectrique Au Canada un cordon d alimentation quatre fils est install sur la s cheuse 1 Enlevez les...

Page 45: ...bien stable Placez un niveau sur le dessus de la s cheuse LA S CHEUSE DOIT TRE DE NIVEAU ET BIEN SOLIDE SUR SES PIEDS 4 Branchez le cordon d alimentation dans une prise mise la terre REMARQUE Assurez...

Page 46: ...tion de la s cheuse sur la laveuse Les chiffres de l illustration correspondent aux tapes de l installation 1 Enlevez le panneau sup rieur de la laveuse en d vissant les 4 vis qui se trouvent dans les...

Page 47: ...retirer les bouchons Prenez les pr cautions n cessaires pour ne pas ab mer la peinture 2 Enlevez les 4 vis qui retiennent les charni res au panneau frontal de la s cheuse REMARQUE Enlevez d abord 1 v...

Page 48: ...Un peu de vibration bruit est Installez la s cheuse sur un plancher uniforme ou faites bruyante ou vibre normal La s cheuse ne repose pas en sorte qu elle soit bien de niveau solidement sur le planch...

Page 49: ...obstru V rifiez si le volet de l vent mural bouge librement Voir la section Directives d installation pour vous assurer que l air de la s cheuse est correctement vacu Fusibles grill s ou disjoncteurs...

Page 50: ...24 Notes Conseils de d pannage Fonctionnement Mesures de s curit Directives d installation Soutien au consommateur...

Page 51: ...paration du produit selon les dispositions de cette Garantie limit e Toutes les garanties implicites incluant les garanties de commercialit et d ad quation un usage sp cifique sont limit es une ann e...

Page 52: ...lifi Soyez prudent car une r paration inad quate peut affecter le fonctionnement s curitaire de l appareil Vous trouverez dans les pages jaunes de votre annuaire le num ro du Centre de service Mabe le...

Reviews: