

Bluetooth
®
Headset
GE Model 86708
User Guide
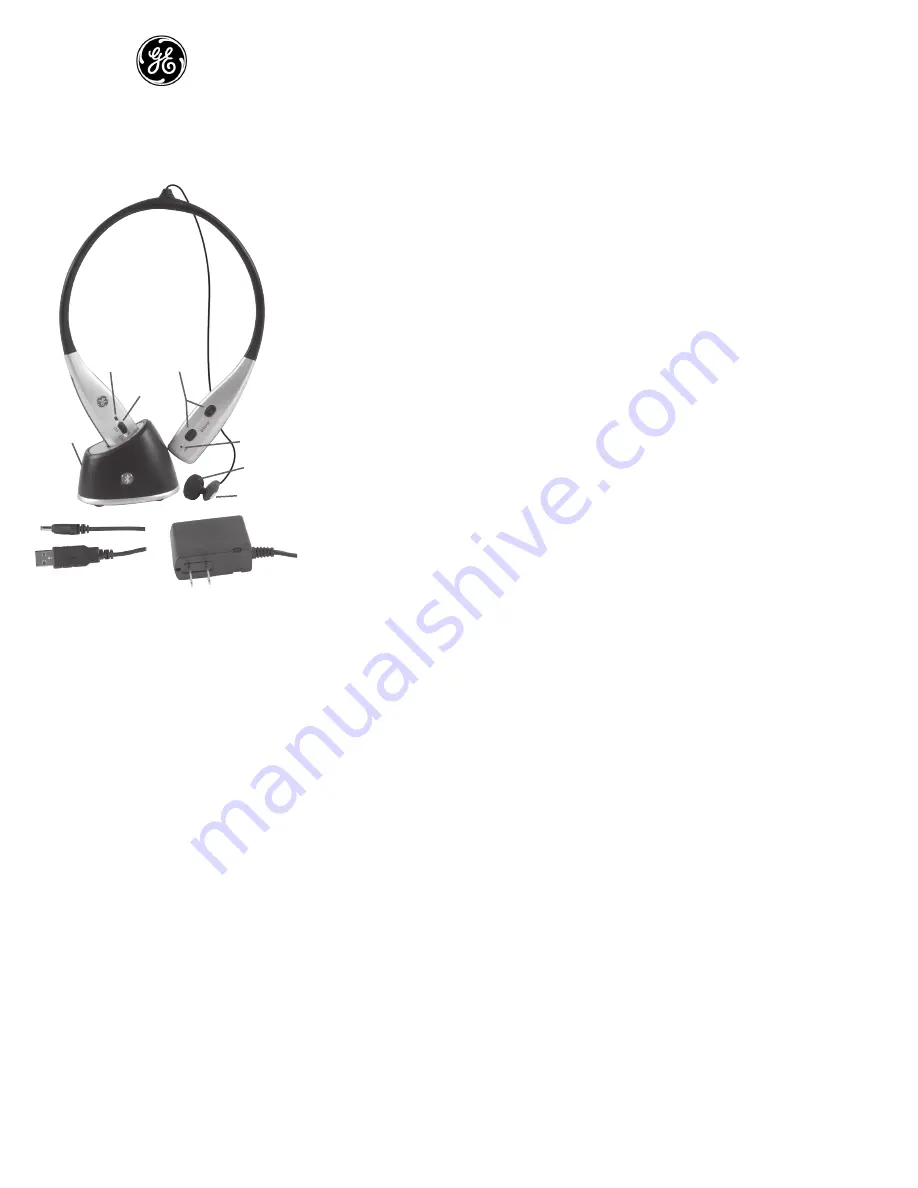
GE 86708 COMPONENTS
• Headset
• Desktop Charger Module
• AC Adapter/Charger
INSERTING BATTERIES
To insert the batteries, open the battery door on the
underside of the headset. Pull back the small tab (toward the
black dot) and at the same time use fingernail on other hand
to open battery door. The top end of the battery door (near
tab) should open. The bottom end of the door is hinged so do
not force it. Insert batteries with positive end of both batteries
pointed up toward tab. Replace door, by again sliding tab up
to allow door to fall back into original position.
CHARGING YOUR HEADSET
Before using your headset you must charge the batteries. We
recommend that for the very first charging the headset be
allowed to charge for six (6) hours. Subsequent charging will
take 1-2 hours. The headset can be charged in either the ON
or the OFF position.
Desktop Cradle Charging:
Plug in one end of AC adapter into
AC wall outlet and plug the connector end into the desktop
cradle. Insert the headset into the desktop charging cradle
making sure the metal contacts on the end of the headset
touch the contacts in the cradle. The LED indicator by the
ON-OFF switch will show continuous red which indicates the
headset is charging. When fully charged the LED indicator will
change to a continuous green color.
Charging With AC Adapter:
Plug AC adapter into the AC wall
outlet and plug the connector end into the bottom end of the
headset (on the side with the ON-OFF switch). LED indications
are same as above.
Charging With the USB Cable:
You can charge your headset
by using the power from you desktop or laptop computer.
Using the supplied USB cable plug the USB connector end into
a USB port on your computer and plug the other connector
end into the bottom of the headset or into the desktop
charging cradle. LED indications are the same as above.
TURNING ON AND OFF THE HEADSET
To turn on the headset, slide the switch to the ON position.
A tone will signify the headset is being turned on. The LED
indicator will flash green. To turn off, slide the switch to OFF
position. The LED indicator will also turn off.
BATTERY LOW INDICATION
The LED indicator will flash red every 2.5 seconds when the
battery becomes low in charge. Re-charging is recommended
at this time.
PAIRING YOUR HEADSET
In order for your headset to communicate with your
Bluetooth enabled phone the two must be “paired” together.
You should consult your phone’s user manual on how to make
such a pairing as all phones are slightly different.
Your headset needs to be “discoverable” by the phone (or
other Bluetooth device) so the two can be linked together.
To put the headset in the discoverable mode, push the TALK
button and hold it (for about five seconds) until the LED
indicator begins flashing green and red alternately and you
will also hear a beep tone in the earpiece. Then select the
function on your phone which makes the phone search or
“look for” Bluetooth devices. This linking procedure should be
explained in your phone’s user manual.
Once it has “found” or linked with the headset then it is
ready to be paired. Your mobile phone will prompt you for
a password, PIN, or pairing code (wording varies by phone
manufacturer). At that point ENTER 0000. You will then
most likely be prompted by the phone whether you want to
connect with the headset. After you respond affirmatively you
should then get confirmation that your phone and headset
are “connected”. The GE 86708 headset is now in standby
mode and ready for use. The LED indicator will flash green
more rapidly once connected.
Pairing Notes:
• This headset can be paired with up to eight phones/devices.
The most recently paired phone will be at the top of the list.
• When the TALK button is pressed in standby mode the
headset will try to connect to the most recently paired
phone only.
• The GE 86708 can also be paired with other Bluetooth
enabled devices like computers or voice access gateway
type products.
TO MAKE CALLS
You can make calls by either a) dialing directly from your
phone, b) using Voice Dialing, or c) using Last Number Redial
function. To use Voice Dialing or Last Number Redial these
must be supported by your mobile phone. Consult your
phone’s user manual for phone-specific instructions.
Before using the Voice Dial function you must first set up
“voice tags” according to your phone’s user’s manual. To
make a Voice Dial call simply press the TALK button once to
enable Voice Dialing. You will hear a couple low tone beeps
to signify an attempt to connect. To call using Last Number
Redial press twice the TALK button.
NOTE: This headset will work within 33-feet or 10-meters from
the location of the phone or other Bluetooth enabled device.
TO END CALLS
To end a call, press the TALK button once after conversation
has ended. A double tone will sound.
VOLUME CONTROL
Press the to increase volume and VOLUME – to
decrease volume. A short beep will be heard indicating that
maximum or minimum volume level is reached.
TO ANSWER AN INCOMING CALL
To answer an incoming call, press TALK once.
A couple low tone beeps (repeated until call is answered) will
signify an attempt to connect is being made. A short higher
tone beep will signify the connection was successfully made.
To reject an incoming call, press and hold the TALK button for
about two seconds.
CALL WAITING
The Call Waiting function on your phone would need to be
turned on before this function could be used. Not all phones
support Call Waiting. To accept a second incoming call and
disconnect the first party, press TALK once when you hear the
beep indicating an incoming call. To accept the second caller
but place on hold the first party, press and hold the
TALK button.
TRANSFER CALL BACK TO PHONE
To transfer the call back to your phone, press TALK twice.
CUSTOMER SERVICE INFORMATION
In addition to the troubleshooting table on this page you can
email help at: [email protected] or call 800 654-
8483. For other Bluetooth products or support, please view
our website www.jascoproducts.com
90-Day Limited Warranty
Jasco Products Company warrants this product to be free
from manufacturing defects for a period of ninety days
from the original date of consumer purchase. This warranty
is limited to the repair or replacement of the product only
and does not extend to consequential or incidental damage
to other products that may be used with this unit. This
warranty is in lieu of all other warranties express or implied.
Some states do not allow limitations on how long an implied
warranty lasts or permit the exclusion or limitation of
incidental or consequential damages, so the above limitations
may not apply to you. This warranty gives you specific rights,
and you may also have other rights which vary from state
to state. If unit should prove defective within the warranty
period, return prepaid with dated proof of purchase to:
Jasco Products Company, 311 N.W. 122nd St.,
Oklahoma City, OK 73114
FCC Information
This device complies with Part 15 of the FCC Rules. Operation
is subject to the following two conditions: (1) this device
may not cause harmful interference, and (2) this device may
accept any interference received, including interference that
may cause undesired operation.
Privacy of communications may not be ensured when using
this device.
Warning:
Changes or modifications to this equipment not
expressly approved by the party responsible for compliance
could void the user’s authority to operate the equipment.
NOTE:
This equipment has been tested and found to comply
with the limits for a Class B digital device, pursuant to Part
15 of the FCC Rules. These limits are designed to provide
reasonable protection against harmful interference in a
residential installation. This equipment generates, uses and
can radiate radio frequency energy and, if not installed and
used in accordance with the instructions, may cause harmful
interference to radio or television reception, which can be
determined by turning the equipment off and on. The user is
encouraged to try to correct the interference by one or more
of the following measures:
• Reorient or relocate the receiving antenna.
• Increase the separation between the equipment and
the receiver.
• Connect the equipment into an outlet o a circuit different
from that to which the receiver is needed.
• Consult the dealer or an experienced radio/TV
technician for help.
86708-1 vers. 1 7/06
• USB Cable for PC Charging
• Two Rechargeable
NiMH batteries
Volume
Controls
Talk Button
Desktop
Charger
On/Off
Switch
Microphone
LED
Indicator
Light
AC Adapter
Charger
USB Cable
Earbud


