


CONTROLS
Control
cOOLER>
5
2
7
THERMOSTAT
When you turn the Thermostat
The fuse may be blown or
the
Control to the desired setting,
circuit breaker may trip due to
the thermostat will automatically
overload if the Thermostat control
the temperature of the
is turned from a “cooler” setting to
indoor air. The higher the number
a “warmer” setting and immediately
selected, the cooler the room
reset to a
setting again.
air will be.
Wait at least three minutes before
resetting the thermostat.
Selector Switch
HI FAN
■
LO FAN
HI COOL
OFF
■
SELECTOR
OFF turns air conditioner off.
LO FAN provides low fan speed
operation without cooling.
FAN provides high fan speed
operation without cooling.
COOL provides cooling with
high fan speed operation.
LO COOL provides cooling with
low fan speed operation.
When the
switch is at the
CLOSED position, the vent door is
closed and
air inside the room
can be
and condition.
Slide the switch to the left to the
OPEN position
the vent door
opens to allow air, smoke or odors
to be exhausted from the room.
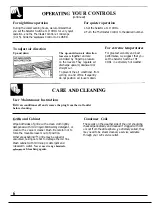
Freezing up
notice that your
conditioner is not
as it should, it may be that
Inside air
ice has formal on the cooling coils. The ice blocks airflow and stops the unit
hot and
from
the room. This
up” is a temporary condition that most
humid
often occurs at night when the Thermostat is set on 7 or 8 and the Selector is set
on LO COOL.
To correct the condition, set the Selector at
FAN or
COOL with the
Thermostat at 1 or 2.
Outside air
temperature
dropping
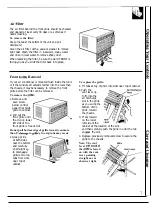
For normal cooling
For
cooling
1.
Set the Selector at HI COOL.
3. Slide the Ventilation Control
1.
Set the Selector at HI COOL.
2. Set the Thermostat at desired
to CLOSED except for brief
2. Set the Thermostat Control to 8.
number (usually 4-5 is a good
periods when you want to
exhaust room air to the outside.
3. Slide the Ventilation Control to
starting position). room
CLOSED.
temperature is not satisfactory
after a reasonable time, set the
(continued
Thermostat Control at a higher
number for a cooler room or at a
lower number for a warmer room.
5