background image

9

Customer Service

Troubleshooting T

ips

Operating Instructions

Safety Instructions

Care and Cleaning

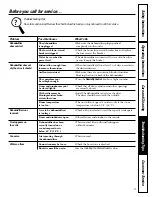
Before you call for service…

Troubleshooting Tips 

Save time and money! Review the chart below first and you may not need to call for service.

Problem

Possible Causes

What To Do

Dehumidifier 

The dehumidifier 

Make sure the dehumidifier plug is pushed

does not start

is unplugged.

completely into the outlet.

The fuse is blown/circuit

Check the house fuse/circuit breaker box and replace

breaker is tripped.

the fuse or reset the breaker.

Water has reached its 

The dehumidifier automatically turns off when this

preset level. 

occurs. Empty the bucket. 

Dehumidifier does not

Did not allow enough time 

When first installed, allow at least 3 or 4 days to maintain 

dry the air as it should

to remove the moisture. 

the desired dryness.

Airflow is restricted. 

Make sure there are no curtains, blinds or furniture 
blocking the front or back of the dehumidifier.

The control may not 

Turn the 

Humidity Control

knob to a higher number. 

be set high enough. 

Doors and windows may not 

Check that all doors, windows and other openings 

be closed tightly. 

are securely closed.

Clothes dryer may be 

Install the dehumidifier away from the dryer. 

blowing moisture-laden 

The dryer should be vented to the outside. 

air into the room. 

Room temperature 

The unit will not operate satisfactorily if the room 

is too low. 

temperature is below 65°F. (18°C.).

Dehumidifier runs

Area to be dehumidified 

Check with your dealer to see if the capacity is adequate. 

too much

is too large. 

Doors and windows are open. 

Close all doors and windows to the outside. 

Frost appears on 

Dehumidifier has been 

This is normal. Frost will usually disappear 

the coils

recently turned on or 

within 60 minutes. 

room temperature is 
below 65°F. (18°C.). 

Fan noise 

Air is moving through

This is normal. 

the dehumidifier. 

Water on floor

Connection may be loose. 

Check the hose if one is attached. 

Bucket is not all the way in. 

See the 

Installing the Water Bucket

section. 

Summary of Contents for AHG40

Page 1: ...ng the Water Bucket 7 Adjusting the Water Level 7 Care and Cleaning Grille and Case 8 Air Filter 8 Cleaning Inside the Unit 8 Troubleshooting Tips Before You Call For Service 9 Customer Service Produc...

Page 2: ...money over the life of your dehumidifier READ THIS MANUAL IF YOU NEED SERVICE You ll find many answers to common problems in the Before You Call For Service section If you review our chart of Trouble...

Page 3: ...or other flammable vapors or liquids in the vicinity of this or any other appliance When using this dehumidifier always follow basic safety precautions including the following SAFETY PRECAUTIONS 3 Cu...

Page 4: ...d If this is not done the adapter ground terminal is very likely to break with repeated use If the adapter ground terminal breaks DO NOT USE the dehumidifier until a proper ground has been established...

Page 5: ...setting Use the dehumidifier as long as excess moisture is present Fan Speed on some models The fan control adjusts the fan speed Set the fan control to HIGH for maximum moisture removal When the humi...

Page 6: ...ng a Location The dehumidifier must be operated in an enclosed area to be most effective Close all doors windows and other outside openings to the room Place the dehumidifier in a location that does n...

Page 7: ...in the proper position for the Water Level Control Switch to work The Water Level Control Switch will automatically turn off the dehumidifier at the fill level you have selected Loosen the screw to ch...

Page 8: ...n the grille Use a vacuum attachment or brush Air Filter The air filter is on the back of the dehumidifier It should be checked and cleaned at least every 30 days or more often if necessary To remove...

Page 9: ...ture blocking the front or back of the dehumidifier The control may not Turn the Humidity Control knob to a higher number be set high enough Doors and windows may not Check that all doors windows and...

Page 10: ...ubleshooting Tips Operating Instructions Safety Instructions Care and Cleaning Customer Service Troubleshooting Tips Safety Instructions Operating Instructions Customer Service Troubleshooting Tips Sa...

Page 11: ...Customer Service Troubleshooting Tips Operating Instructions Safety Instructions Care and Cleaning Notes 11...

Page 12: ...ubleshooting Tips Operating Instructions Safety Instructions Care and Cleaning Customer Service Troubleshooting Tips Safety Instructions Operating Instructions Customer Service Troubleshooting Tips Sa...

Page 13: ...tection or you may request your money back on the remaining value of your contract No questions asked It s that simple Protect your refrigerator dishwasher washer and dryer range TV VCR and much more...

Page 14: ...r register online at www geappliances com 1 2 3 Model Number Serial Number Cut here Complete and mail your Consumer Product Ownership Registration today Have the peace of mind of knowing we can contac...

Page 15: ...trical plumbing and other connecting facilities Failure of the product resulting from modifications to the product or due to unreasonable use including failure to provide reasonable and necessary main...

Page 16: ...Consumer Service will still be there after your warranty expires Parts and Accessories 800 626 2002 Individuals qualified to service their own appliances can have parts or accessories sent directly t...

Reviews: