
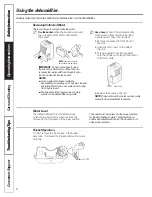


NOTE:
When the bucket is full or removed, the
controls cannot be set.
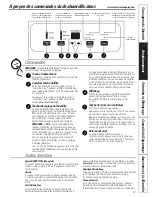
Power Pad
Press to turn the dehumidifier on and off.
Filter Timer
After 250 hours of operation, the
Clean the Filter
indicator light will glow to remind you to clean
the filter. Remove the filter and clean it.
Press to turn off the
Clean the Filter
light. See
the
Care and Cleaning
section.
Humidity Set Control Pads
The humidity level can be set within a range of
35% RH (Relative Humidity) to 80% RH (Relative
Humidity) in 5% increments or at
CO
for
continuous operation. To set the unit for
continuous operation, press the
▼
pad until
the screen reads
CO.
NOTE:
If
CO
(Continuous) is selected, the
dehumidifier will operate continuously at
its maximum dehumidification settings if
attached to a hose to drain or until the bucket
is full.
For drier air, press the
▼
pad and set to
a lower percent value (%).
For damper air, press the
▲
pad and set
to a higher percent value (%).
When you first use the dehumidifier, set
the humidity control to 45% or 50%. Allow at
least 24 hours for the dehumidifier to achieve
the humidity level. If you still have damper air
than desired, set the humidity level to a lower
setting or select Continuous for maximum
dehumidification.
Display
Shows the set % humidity level while setting,
then shows the actual (+/– 5% accuracy)
room % humidity level.
Fan Speed Pad
Controls the fan speed.
Press to select either
High
,
Medium
or
Low
fan
speed.
Set the fan control to
High
for maximum
moisture removal. When the humidity
has been reduced and quiet operation is
preferred, set the fan control to
Medium
or
Low
.
Delay Off
While the dehumidifier is in operation, press
this pad to set it to automatically turn off in 2
hours or 4 hours.
4
Consumer Support
Troubleshooting Tips
Operating Instructions
Safety Instructions
Troubleshooting Tips
Care and Cleaning
Safety Instructions
Operating Instructions
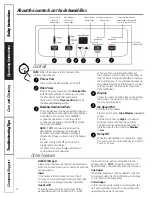
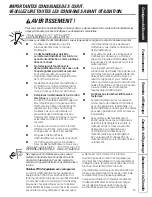
Clean the Filter
indicator light
About the controls on the dehumidifier.
Controls
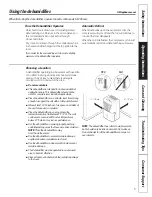
Other Features
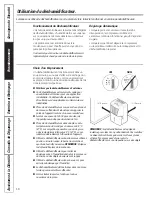
BUCKET FULL Light
Glows when the bucket is ready to be emptied, or
when the bucket is removed or not replaced in the
proper position.
Alarm
If the bucket is full or missing for more than 3
minutes, an alarm will sound for about 10 seconds
to remind you to empty and replace the bucket.
Auto Shut Off
The Water Level Control Switch shuts off the
dehumidifier when the bucket is full, or when
the bucket is removed or not replaced in the
proper position.
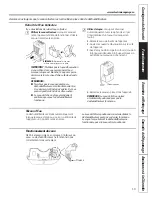
NOTE:
Fan will continue to run
approximately 3 minutes after bucket is removed.
Auto Defrost
When frost builds up on the evaporator coils, the
compressor will cycle off and the fan will continue
to run until the frost disappears.
Power Outage
In the case of a power outage or interruption, the
unit will automatically restart, in the settings last
used, after the power is restored.
Continuous operation on
indicator light
Bucket Full light indicates
bucket needs to be emptied
or is not in place in the unit
4 hour or 2 hour
delay off
indicator lights
High, Medium
and Low fan
indicator lights
Power On
indicator light


