

4. Plug one end of the coiled cord into the jack on the bottom of the
telephone base and the other end into the jack at the bottom of the
corded handset.
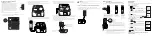
2. Turn the telephone base over and position it with the power jack
and telephone line jack facing towards you.
3. Press on the convertible base mount indicated by arrows below to
remove it from the telephone base.
WALL
WALL
WALL
THIS END UP
FOR WALL USE
THIS END UP
FOR DESK USE
WALL
DESK
DESK
WALL
WALL
Route the
cord through
the tabbed
slot.
WALL
WALL
Charger installation (For models with additional handsets)
1. Plug the smaller end of the power adapter into the charger.
2. Plug the larger end of the power adapter into an electrical outlet
not controlled by a wall switch.
CAUTION:
1. Use only the power adapter that came with this unit. Using other power
adapters may damage the unit.
2. To prevent fire or electrical shock hazard, do not expose this product to rain or
moisture.
10
Initial settings
Date and time
In order for your answering system to accurately mark your messages,
you must set the time and date.
Using a cordless handset
1. Press
when in idle mode.
2. Press
or
to select
CLOCK & ALARM
and then
press
.
3. Press
again to select
SET DATE/TIME
.
4. Enter the current month, day and year. For example,
May 16, 2010 should be entered as [0], [5], [1], [6], [1],
[0].
5. Press
to confirm.
6. Enter the current hour and minute. For example, 9:30
should be entered as [0], [9], [3], [0]. Press
or
to select
AM
or
PM
and then press
to confirm.
Using the telephone base
1. Press
when in idle mode.
2. Press
/
to select
CLOCK & ALARM
and then press
.
3. Press
again to select
SET DATE/TIME
.
4. Enter the current month, day and year. For
example, May 16, 2010 should be entered as [0],
[5], [1], [6], [1], [0].
5. Press
to confirm.
6. Enter the current hour and minute. For example,
9:30 should be entered as [0], [9], [3], [0]. Press
/
to select
AM
or
PM
and then press
to confirm.
Please refer to your 30524 user’s guide for complete
telephone settings.
CLOCK & ALARM
>SET DATE/TIME
10:30
PM
11/20
SET DATE
05/16/10
10:30
PM
11/20
SET TIME
09:30 PM
10:30
PM
11/20
10:30
PM
11/20
CLOCK & ALARM
>SET DATE/TIME
10:30
PM
11/20
SET DATE
05/16/10
10:30
PM
11/20
SET TIME
09:30 PM
6
8
5
Installing on a desk or tabletop
Telephone jack requirements
To use this phone, you need a RJ11C type modular
telephone jack, which might look like the one
pictured here, installed in your home. If you do not
have a modular jack, call your telephone service
provider to find out how to have one installed.
If you have DSL high speed Internet service, a DSL
filter is required (not included). Contact your DSL
service provider for more information about DSL
filters.
Wall plate
Modular
telephone
line jack
1. Make sure the wall mounting tab is in
DESK
position. Use a coin or
small flat tool to rotate it if needed.
NOTE:
Refer to your 30542 user’s guide for wall mounting instructions.
6. Turn the set over and place the handset on the cradle. Plug one end
of the telephone line cord into the jack on the back of the telephone
base and the other end into a modular jack.
7. Plug the smaller end of the power adapter into the jack on the back
of the telephone base and the larger end into an electrical outlet
not controlled by a wall switch.
DSL filter (not included) is
required if you have DSL
high speed Internet service.
Route the cord through
the tabbed slot.
5. Replace the convertible base mount by aligning the small tabs to
the slots in the middle of the telephone base and the larger tabs in
the slots near the top as shown..
DESK
DESK
WALL
WALL
WALL
WALL
THIS END UP
FOR WALL USE
THIS END UP
FOR DESK USE
7
Battery installation
Please fully charge your handset before use!
For optimum battery performance, charge the battery for 16 hours before first
use.
1. Plug the battery connector
securely into the socket inside the
handset battery compartment.
Make sure that red and black wires
on the plug are properly inserted
into the socket as shown.
2. Place the
battery and
the wire inside
the battery
compartment.
4. Place the handset onto the charger as shown. An
animated battery icon will display after a few minutes
to show that the handset battery is successfully being
charged. For optimum performance, please allow the
battery to charge for 16 hours before first use.
3. Align the
cover against
the battery
compartment
and slide it
upwards until it
clicks into place.
Animated
charging
indicator
red
wire
black
wire
9
CAUTION:
1. Use only the supplied rechargeable battery or equivalent replacement battery.
See battery specifications on the Technical specification page in your 30524
user’s guide or visit our website at
www.gephones.com to find out how to order
a replacement battery if necessary.
2. If the handset will not be used for an extended period of time, unplug the battery
and remove it from the handset to prevent possible leakage.