background image

2

G

ETTING

 S

TARTED

P

OWERING

 U

P

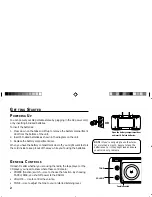
You can power your GE portable stereo by plugging in the AC power cord,
or by inserting 6 D-sized batteries.

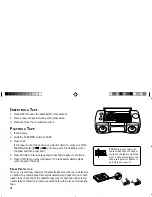
To insert the batteries:

1. Press down on the tabs and lift up to remove the battery compartment

door from the bottom of the unit.

2. Insert 6 D-sized batteries as shown in the diagram on the unit.

3. Replace the battery compartment door.

When you have the battery compartment door off, you might want to store
the cord inside to keep it out of the way while you’re using the batteries.

OR

Open the battery compartment door
and insert 6 D-sized batteries.

G

ENERAL

 C

ONTROLS

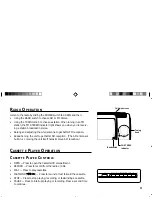
It doesn’t matter whether you are using the radio, the tape player, or the
CD player, you need to know where these controls are:

POWER (function) switch — Use to choose the function. By choosing
TAPE or DISC, you shut off power to the RADIO.

VOLUME — Use to control the volume.

TONE — Use to adjust the tone to your preferred listening level.

NOTE: 

If you’re not going to use the stereo

for more than a month, be sure to take the
batteries out, or it they might leak and cause
you all kinds of problems.

TONE

VOLUME

0

1

2

3

4

5

6

7

8

9

10

0

1

2

3

4

5

6

7

8

9

10

OPEN

POWER

RADIO

TAPE

DISC

COMPACT

DIGITAL AUDIO

Function switch

TONE

VOLUME

3-7025.e

10/25/96, 9:46 AM

2

Summary of Contents for 3-7025

Page 1: ...Portable Stereo System User s Guide 3 7025 We bring good things to life ...

Page 2: ...ces Any repairs or internal adjustments should be made only by a trained technician Warning Never operate this product with the cabinet removed Do not touch the player with wet hands If any liquid enters the player cabinet take the player to a trained technician for inspection This compact disc player uses a laser to read the music on the disc The laser mechanism corresponds to the cartridge and s...

Page 3: ...can take with you almost anywhere You can listen to the radio CDs or cassette tapes and can record to cassette from the radio or CDs In order to get the best possible use from your stereo we suggest that you take a few minutes right now to read this User s Guide and familiarize yourself with your new stereo The first Section Getting Started tells you how to power up your stereo and discusses the g...

Page 4: ...eries OR Open the battery compartment door and insert 6 D sized batteries GENERAL CONTROLS It doesn t matter whether you are using the radio the tape player or the CD player you need to know where these controls are POWER function switch Use to choose the function By choosing TAPE or DISC you shut off power to the RADIO VOLUME Use to control the volume TONE Use to adjust the tone to your preferred...

Page 5: ...ception OPEN RECORD PLAY FASTWIND STOP PAUSE CASSETTE PLAYER OPERATION CASSETTE PLAYER CONTROLS OPEN Press to open the Cassette CD compartment RECORD Press to record from the radio or CDs PLAY Press to play cassettes FASTWIND Press to rewind or fast forward the cassette STOP Press to stop playing recording or fastwinding a cassette PAUSE Press to interrupt playing or recording Press a second time ...

Page 6: ...lay press PAUSE again to continue 5 Press STOP to stop play completely The tape automatically stops when it gets to the end ERASE PROTECTION When you record new material the cassette deck records over whatever is on a tape To protect a tape from accidental erasure break off one or both plastic tabs on the top of the cassette tape one for each tape side If you decide later to record on the tape sea...

Page 7: ...CORDING FROM THE RADIO 1 Slide the FUNCTION switch to RADIO 2 Tune the radio to the desired station 3 Insert a blank cassette tape unless you want to record over something else and rewind it to the point at which you want to begin recording 4 Press RECORD to begin recording 5 Press STOP to stop recording The unit automatically stops recording at the end of the tape RECORDING FROM COMPACT DISCS 1 S...

Page 8: ...rrently playing A flashing number The unit is in pause mode cd There is a disc in the compartment nd There is no disc in the compartment INSERTING A CD 1 Press the OPEN button to open the disc compartment door 2 Place a disc on the spindle with the label facing up 3 Tightly close the compartment door or CD won t play CD PLAYER CONTROLS FROM RIGHT TO LEFT REPEAT Press REPEAT one time in Play mode t...

Page 9: ...ntinue playing the CD Or Press STOP once to stop CD play then press STOP a second time to turn off shuffle feature CARE AND MAINTENANCE GENERAL GUIDELINES Do not touch the laser lens on the CD player Temperature changes can cause condensation to form on the laser lens If condensation forms on the lens leave the disc compartment door open with no disc for an hour to remove condensation Exposure to ...

Page 10: ...e of the laser lens rubbing gently until all traces of dirt are removed HANDLING COMPACT DISCS To get the best possible sound from your compact discs you need to keep them clean Note the following guidelines regard ing the use and care of compact discs Don t touch the playing surface the side without the label Don t store discs in places with high temperatures or high humidity they can become warp...

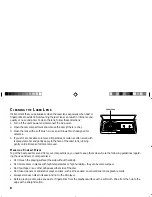
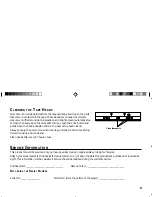
Page 11: ...ng time when using a liquid cleaner Clean heads after every 40 hours of use Clean these parts SERVICE INFORMATION This product should be serviced only by those specially trained in appropriate servicing techniques Attach your sales receipt to the booklet for future reference or jot down the date this product was purchased or received as a gift This information will be valuable if service should be...

Page 12: ... on a secured spot Vibration or jarring can cause the disc to skip RADIO TAPE PROBLEMS Problem Solutions Poor FM reception Make sure antenna is fully extended Electrical interference in your home can cause poor reception Move the unit away from electrical appliances especially those with motors such as hair dryers and vacuum cleaners or transformers such as fluorescent lamps Distorted or noisy rec...

Page 13: ...ng the Laser Lens 8 compact discs 3 and 5 6 handling and care 8 condensation on the laser lens 7 D I display items 6 Erase Protection 4 General Controls 2 Inserting a Tape 4 O P OPEN button 6 pausing a tape 5 PLAY PAUSE button 7 Playing a Tape 4 POWER function switch 2 R reception 3 Recording from Compact Discs 5 Recording from the Radio 5 REPEAT ENTER button 6 Repeating tracks 6 S Searching withi...

Page 14: ...ails Thomson Consumer Electronics Inc ONE YEAR LIMITED WARRANTY What does your warranty cover Any defect in material or workmanship For how long after the original purchase One year The warranty for rental units begins with the first rental What will we do Provide you with a new or at our option a refurbished unit The exchange unit is warranted for the remainder of your product s original one year...

Reviews: