GE 21838 User Manual Download Page 12

– 12 – 

z


Press 

  key as often as necessary until the HANDSET menu 

appears and press “INT/OK” key. 

z


Press 

 or 

 key to select the submenu PREFIX MEM 

and press “INT/OK” key. 

z


Enter prefix number (e.g. access code of the subscriber you call 
most frequently). 

z


Press “INT/OK” key to confirm. 

Emergency Call 

There are 

2

 emergency call numbers and can be set in the user menu. 

z


Press 

  key as often as necessary until the HANDSET menu 

appears and press “INT/OK” key. 

z


Press 

 or 

 key to select the submenu EMERGENCY 

and press “INT/OK” key. 

z


Press 

 or 

 key to select the location 1 

or 2

 of the 

emergency call and press “INT/OK” key. 

z


Enter the emergency number and press “INT/OK” key to 
confirm. 

z


Note:

 The emergency call number can be dialled out even when 

the keypad is locked. 

Switching the Key Tone On/Off 

z


Press 

  key as often as necessary until the HANDSET menu 

appears and press “INT/OK” key. 

z


Press 

 or 

  key to select the submenu KEY TONE and 

press “INT/OK” key. 

z


Press 

 or 

  key to select the setting ON/OFF and press 

“INT/OK” key to confirm. 

Activating/Deactivating Automatic Call 
Answering 

The automatic call answering function enables the incoming call to 
be taken immediately when the handset is removed from the base 
station. 

z


Press 

  key as often as necessary until the HANDSET menu 

appears and press “INT/OK” key. 

z


Press 

 or 

  key to select the submenu AUTO ANS and 

press “INT/OK” key. 

z


Use 

 or 

  key to switch automatic call answering on or 

off and press “INT/OK” key to confirm. 

Default Settings 

The handsets can be reset to the default settings. In doing so, all the 
settings which you have changed are returned to their default values. 
The phone book entries are retained. 

z


Press 

 key until the HANDSET menu appears and press 

“INT/OK” key. 

z


Press 

 or 

 key to select the submenu DEFAULT and 

press “INT/OK” key. 

z


‘CONFIRM?’ will display, press “INT/OK” key to confirm. 

Note:

 The display will switch back to standby mode. 

Registering Additional Handsets 

Further handset of the same model can be registered on one base 
station. The max number of handsets that can register to the same 
base is 4. 

z


Press 

 key until the HANDSET menu appears and press 

“INT/OK” key. 

z


Press 

 or 

 key to select the submenu REGISTER and 

press “INT/OK” key. 

z


Handset display shows ‘SEARCHING’. 

z


Press and hold 

  key on the base station more than 3 seconds 

until acknowledgement signal is heard. 

z


Enter the PIN (default setting = 0000) and press “INT/OK” key. 

Note:

 After the connection has been established, the name and 

number of the handset (the next available handset number should be 2) 
appear in the display. 

The base will be ready for registration for 5 minutes when the page 
key is pressed and hold for more than 3 seconds.  After selecting 
REGISTER, the handset starts searching for a base station which is 
available for registration. The aerial icon 

 starts flashing. 

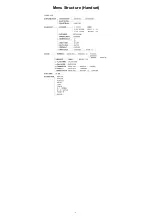
Summary of Contents for 21838

Page 1: ... ovens computers etc To clean the 21838 use a lightly moistened antistatic cloth Information for DECT product The 21838 telephone is compliant with the DECTTM standard It is designed to transmit and receive telephone calls and be connected to the public telephone Country network DECT is a trademark registered by ETSI Safety In the event of danger the mains adapter acts as 230V power isolating devi...

Page 2: ...MATION WITHIN THE TRIANGLE IS WARNING SIGN ALERTING YOU OF IMPORTANT INSTRUCTIONS ACCOMPANYIN G THE PRODUCT SEE MARKING ON BOTTOM BACK OF PRODUCT Battery Safety Precautions z Do not burn disassemble mutilate or puncture Like other batteries of this type toxic materials could be released which can cause injury z To reduce the risk of fire or personal injury use only the battery listed in User s Gui...

Page 3: ...ockets in the base station they can not be connected incorrectly because the sockets and plugs are designed prevent reverse poling Lay the cable under the telephone to the rear Plug the telephone line in the telephone connection socket Insert the power plug at the other end in the power outlet The base station in now ready to operate Only use the connection cable supplied CAUTION Plug the adapter ...

Page 4: ...th the following features z Digital cordless telephone complying to DECT standards z Operation instruction in 10 languages z Teleconference z Call forwarding z Internal free communication between handsets z Prefix dialing z Automatic call answering on off z Call log function with caller list for 20 numbers or names from phone book network dependent z Alphanumeric LCD display 1 line icons 1 line 14...

Page 5: ... 5 Menu Structure Handset ...

Page 6: ...s Menu Down key CID key Asterisk key INT OK INT OK key C Cancel Mute key Speaker phone key Redial Pause key Up key External call key Phone book key R Flash key Hash key Lock key Paging VMWI In use LED Voice message call off hook ...

Page 7: ...on for each handset z In standby mode press button and 6 key Current language is displayed z Press or to select the desired language z Press INT OK key to confirm the selection or press C to abort Note The following languages are available English German French Polish Czech Turkish Greek Bulgarian Russian Hungarian Making Internal Calls IMPORTANT Internal calls can be made only if more than one ha...

Page 8: ... a call z Press key to end the call Redialling The phone stores the last five numbers dialled in the redial memory z Press key the last call number dialled is displayed Press or key to search the required number in the redial memory list z Press key to carry out the conversation z Press key to end the call Dialling from the Phone Book z Press key the first entry in the phone book appears Or EMPTY ...

Page 9: ...ss display is 2345678 z Press display is 345678 key is no function if number is 6 or less digits then press or key display is 12345678 Note If original CLI number exceeds 16 digits new digits can not be inserted Muting the Microphone z Press C key to switch the microphone on or off during a call Holding Calls Forwarding Calls If the telephone is connected to a PABX system it is possible to put cal...

Page 10: ...ndicating a pause The pause can also be entered when programming numbers in the phone book Switching the Key Lock On Off Incoming calls can still be received when key locked z Press and hold key for 2 seconds to activate or deactivate the key lock The icon turns on or off Phone Book The telephone can store up to 40 entries in the phone book with name and call number When the function is supported ...

Page 11: ...Changing the Ringing Volume z Press key until the HANDSET menu appears and press INT OK key z Press or key to select RINGER and press INT OK key z Press or key to select VOLUME and press INT OK key z Press or key to adjust the volume level 0 5 and press INT OK key to confirm z Note The ringer volume can be heard at different volumes If the ringer symbol appears as non dotted bar the ringing volume...

Page 12: ...ess or key to select the submenu AUTO ANS and press INT OK key z Use or key to switch automatic call answering on or off and press INT OK key to confirm Default Settings The handsets can be reset to the default settings In doing so all the settings which you have changed are returned to their default values The phone book entries are retained z Press key until the HANDSET menu appears and press IN...

Page 13: ...ress INT OK key z Press or key to select the submenu RINGER and press INT OK key z Press or key to select the ringer volume 0 5 and press INT OK key Note If you set the base ringer volume to 0 the base ringer will be off z Press or key to select the ringing melody 1 10 and press INT OK key Changing the Flash Time z Press key until the BASE menu appears and press INT OK key z Press or key to select...

Page 14: ...0 hours talk time Approx 100 hours standby AC DC Adapter for Base VD060035D Input 230V AC 50 Hz 60mA Output 6V DC 350mA Single phase AC excluding IT installations defined by the EN 60950 standard Caution the network voltage is classified as a hazard by the criteria of this standard AC Adapter for Handset charger Due pack only VA070020D Input 230V AC 50 Hz Output 7V AC 200mA Single phase AC excludi...

Page 15: ...ection to the base station blinking The keypad is locked The handset is outside the base station range The handset is not registered The base station does not work Press key longer than 2 seconds Move closer to the base station Register the handset see Registering Handset Unplug and then plug the power adapter to the power outlet 230V AC 50 Hz and the other end into the power jack on base bottom E...

Reviews: