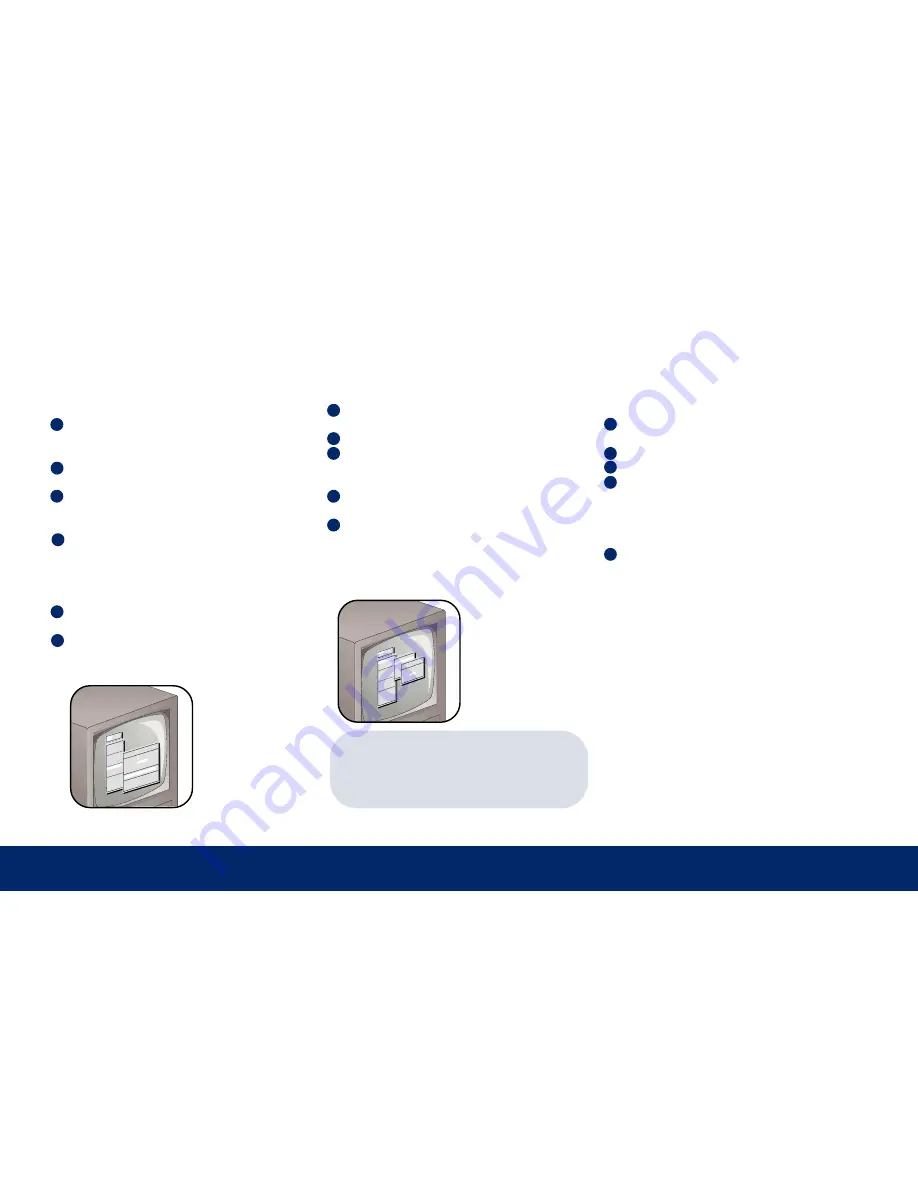
background image

10    |    Initial Setup

Camera Titles
To change the title that shows on the monitor
for each camera:

1

Jog to Camera Setup in the Main menu and
press Enter. Camera Titles is highlighted;
press Enter.

2

Jog to Edit Titles and press Enter. Camera 1
and its title shows.

3

Press Enter again to highlight the title for
Camera 1; the character bank appears in the
middle of the screen.

4

To change the first letter of the title, jog to
the character you want and press the
number 2 button. Repeat for each new
letter, using the number 1 button for blank
spaces.

5

For additional cameras, use the shuttle to
select a camera number.

6 When you’re done, press Enter, jog to OK,

and press Enter again. Press Menu twice to
exit to the Main menu.

Initial Setup

Time and Date
To set the time format:

1

Jog to Time/Date in the Main menu and
press Enter.

2

Set Time will be highlighted. Press Enter.

3

Press Enter again to move to hours, and jog
to select the hour, using the 24-hour time
format.

4

Shuttle to move to minutes and jog to
select. Do the same for seconds.

5

Press Enter when you’re done, then jog to
OK and press Enter. Press Menu to exit.

To set the date, use the same process as for
time.

TIP:
Date Setup

—The StoreSafe automatically

selects the day of the week based on the
date you enter.

Mai

n O

per

ato

r

Tim

e/D

ate

Seq

uen

cin

g

Rec

ord

Ala

rms

Mac

ro

Mot

ion

 De

tec

tio

n

Cam

era

 Se

tup

Arc

hiv

e S

etu

p

Aud

io 

Set

up

Com

mun

ica

tio

ns

Fro

nt 

Pan

el 

Loc

k

Fac

tor

y S

ett

ing

s

Pas

swo

rds

Tim

e /

 Da

te 

Dis

pla

y

Set

 Ti

me 

For

mat

Set

 Da

Set

 Ti

Set

 Da

Set

 Ma

Set

 Re

Tim

e F

orm

at 

Set

up

Sel

ect

 Fo

rma

t

12H

OUR

Main

 Ope

rato

r

Time

/Dat

e

Sequ

enci

ng

Reco

rd

Alar

ms

Macr

o

Moti

on D

etec

tion

Came

ra S

etup

Arch

ive 

Setu

p

Audi

o Se

tup

Comm

unic

atio

ns

Fron

t Pa

nel 

Lock

Fact

ory 

Sett

ings

Pass

word

s

Came

ra T

itle

 Edi

t

[CAN

CEL]

  [O

K]

Came

ra  

1

Titl

e : 

Fron

t ro

om

@ABC

DEFG

HIJK

LMNO

PQRS

TUVW

XYZ[

\]^_

SEQ 

key 

sele

cts 

char

acte

r ba

nk

'1' 

Key 

inse

rts 

blan

k ch

arac

ter

'2' 

Key 

inse

rts 

sele

cted

 cha

ract

er

Daylight-saving Time
To automatically match daylight-saving
time changes:

1

Jog to Time/Date in the Main menu
and press Enter.

2

Jog to Set Region and press Enter.

3

Shuttle to USA and jog to Time Zone.

4

Shuttle to your time zone.

EST equals GMT minus 05:00
CST equals GMT minus 06:00
MST equals GMT minus 07:00
PST equals GMT minus 08:00

5

Jog to OK and press Enter. Press Menu
to exit.

Summary of Contents for StoreSafe

Page 1: ...StoreSafe Quick Start Guide ...

Page 2: ... in the User Manual Introduction TIP You ll find special items like Tips and Cautions in the page margins These items make setup and basic operation easier Information in this document is subject to change without notice 2003 GE Interlogix All rights reserved TIP If you have a problem setting up or operating your StoreSafe try these solutions in this order 1 Re read the Quick Start Guide 2 Read th...

Page 3: ...les StoreSafe Quick Start Guide User Manual Universal power supply Power cord Surveillance monitor Coaxial cable Surveillance camera CAUTION Installation Area Your StoreSafe needs space around it for ventilation Make sure the fans and vents on the sides of the unit are not obstructed Install your StoreSafe in a place where the temperature is always between 0 and 40 C 32 and 104 F and has normal hu...

Page 4: ...ite monitor A output Camera inputs Connecting and Powering Up StoreSafe back panel Here are the connections you will use for functions described in this guide Monitor back panel Video input Power connection Camera back panel Video output Power connection ...

Page 5: ... to other devices if necessary Start by connecting your StoreSafe to the monitor and camera s Connecting and Powering Up 1 Connect the coaxial video cable to the video output on the camera 2 Connect the coaxial camera cable to the top Camera 1 input on the StoreSafe 4 Connect the coaxial monitor cable to the video input on the monitor 3 Connect the coaxial monitor cable to the monitor A output on ...

Page 6: ... Powering Up 1 Plug the monitor and camera power cords into the outlets TIP Powering Up When you plug the StoreSafe power supply into an outlet the StoreSafe automatically detects all connected cameras The StoreSafe shows which version of software is installed then shows a display of live views from each connected camera and automatically begins recording 2 Plug the single prong end of the StoreSa...

Page 7: ...t of the StoreSafe Multiscreen viewing options vary by model Camera selection Alarm Zoom Record Stop Search Enter Jog Shuttle 4 way view 16 way view Monitor A 9 way view 13 way view Sequence Function Reverse Play Pause Freeze Forward Play Menu Monitor B Print Burn CD Open Close CD door CD door ...

Page 8: ... either direction The Shuttle is the outside ring Use it to move between menus and select some settings To operate it twist it in either direction The Menu button brings up the Main menu and enables you to move from submenus back to the Main menu The Enter button brings up submenus and confirms settings Main Operator Time Date Sequencing Record Alarms Macro Motion Detection Camera Setup Archive Se...

Page 9: ...ss the Main menu and begin setup follow these steps Main Operator Password Box Enter a new Password 2 Enter the installer password by using the number buttons For 4 camera models enter 3444 For 10 and 16 camera models enter 3477 3 The Main and Operator menu headings are the first menu you see High Event and TL 02 Continuous Enabled Active 5 None Yes Camera 01 Camera 02 etc 50 Enabled 57600 Baud 19...

Page 10: ...ain menu and press Enter 2 For 4 camera models enter 1414 and press Enter For 10 and 16 camera models enter 5415 and press Enter 3 Jog to select a language and press Enter Initial Setup CAUTION Password When you set custom pass words you cannot revert to the default passwords If you forget your password you must send the StoreSafe back to the factory to be reset Main Operator Time Date Sequencing ...

Page 11: ...s Enter when you re done then jog to OK and press Enter Press Menu to exit To set the date use the same process as for time TIP Date Setup The StoreSafe automatically selects the day of the week based on the date you enter Main Operator Time Date Sequencing Record Alarms Macro Motion Detection Camera Setup Archive Setup Audio Setup Communications Front Panel Lock Factory Settings Passwords Time Da...

Page 12: ...TIP Record Lock To prevent anyone else from changing record settings jog to Record Lock in the Record menu and press Enter Jog to On and press Enter This means the installer password is necessary to stop recording or to change settings Main QuickInstall Operator SystemView Time Date Sequencing Record Alarms Macro Motion Detection Camera Setup Archive Setup Audio Setup Communications Front Panel Lo...

Page 13: ...e Zoom button for a 2X view You can use the Jog and Shuttle to move within the zoomed view Note The camera does not move Press Zoom again to cancel Freeze Press the Freeze button to freeze all camera views being displayed Press Freeze again to return to a live view TIP POS or ATM text StoreSafe Advanced models can capture and store POS point of sale or ATM text associated with the video of any tra...

Page 14: ...Play button Monitor A displays images at the rate they were recorded Press Stop to end reverse play or press Forward Play to return to forward play Multiscreen Playback Press any of the Multiscreen display buttons to activate a multiscreen display Forward Play Press the Forward Play button Playback is available only on monitor A Press Forward Play twice and select a multiscreen view to see both li...

Page 15: ... press Zoom for a 2X view You can use the Jog and Shuttle to move within the zoomed view Note The camera does not move Press Zoom again to cancel Freeze Press the Freeze button to freeze all camera views being displayed Press Freeze again to cancel Frame Advance During Freeze mode jog to view frames individually in either direction Stop Press Stop to end playback and return to live viewing ...

Page 16: ...ewest At the left of the graph at both the top and bottom are small cursors In the top right corner of the graph is a time and date display The time and date correspond to the cursor position 2 Jog to move the cursors left and right along the bars the time and date change to tell you when each section was recorded 3 When you find a section you wish to view press Enter and the video begins to play ...

Page 17: ...u want to record Shuttle to Stop Time and jog to change it if needed 4 When the start and stop times are set press the red Record button While StoreSafe records the LED light on the CD tray blinks and a recording progress bar appears in the lower right corner of the monitor NOTE While the selected video segment is recording the monitor switches to a live camera view but that view is not recorded 5...

Page 18: ...while viewing images in a 4 way display mode StoreSafe will switch to the last selected full screen camera view freeze that image and send it to the printer CAUTION Printer Connection To print images StoreSafe must be connected to the same local network as your print server See the User Manual for important information One Button Printing To print an image 1 Press the corresponding camera number t...

Page 19: ...18 Notes Notes ...

Page 20: ...19 Notes Notes ...

Reviews: